
Table of Contents
Introduction
Hey guys, welcome back to Techatronic. In this article, we are going to discuss the interfacing of a Solenoid valve with the Arduino.
You have to provide the supply of liquid for which you want to control the flow on the one end of the solenoid valve.
this is the same as our previous article Arduino solenoid lock interface. Just leave the other end or you can also connect a pipe to it as per your requirements.
When the power is turned off the liquid will not flow from the other end of the valve is in the off position. To turn the supply on you have to provide the power.
The solenoid valve is the same as the manual valve. if you know the manual valve. there is a lever that helps you to on and off the supply. in this Arduino Tutorial, we will describe how does the Arduino interface with the solenoid lock. there are two types of valve water valve and air valve.
What is a Solenoid Valve
Just like the valves used in your homes for controlling the flow of the water a solenoid valve is used to serve the same purpose.
The main difference between an ordinary valve and a solenoid valve is that a solenoid valve can operate automatically.
You can program it to work automatically according to the given instructions. you can also make Smart Irrigation System
In this project,
we use an Arduino UNO microcontroller for controlling the solenoid valve.
Mainly it is used in the industries. Inside the solenoid valve,
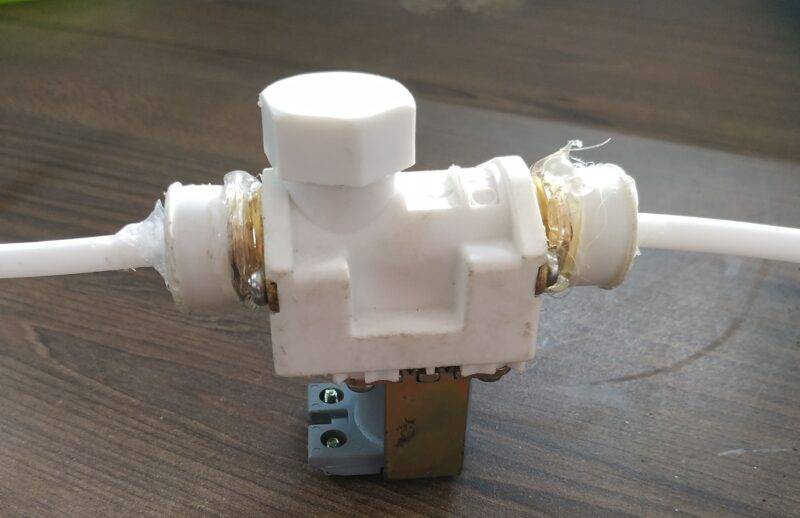
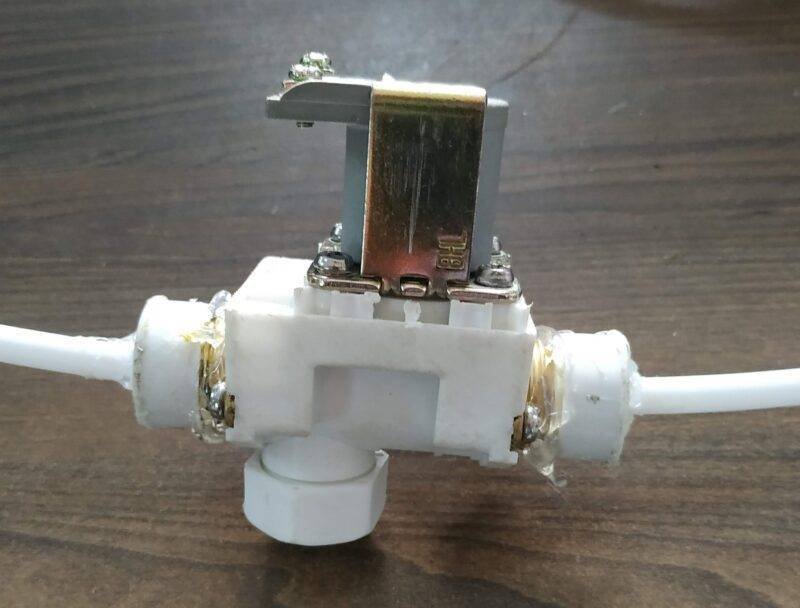
- there is a coil of insulated copper wire which turns into an electromagnet when you supply the power to it.
- The valve is open for the flow of liquid when the coil produces a magnetic field around it and cuts the flow when there is no power.
- The inner mechanism returns to its home position in the absence of electricity.
- A solenoid valve looks like this. As you can see at the upper part there is a coil inside the part which works on electromagnetism.
How Does it Work?
The solenoid valve is used for controlling the flow of any liquid. In this article, we show you the interfacing of the solenoid valve with Arduino and you can make your own projects from it.
We use a relay module here if you don’t know how to use a relay module with Arduino then check it first.
The solenoid valve can open and close automatically at a regular time interval of 1 second. Another one is the solenoid lock which is used in the lock system it also operates with a program.
You can change it by modifying the code. Just complete the circuit and then upload the given code to the Arduino UNO.
Components Required
| Arduino UNO | BUY LINK |
| 5 Volt single channel relay module | BUY LINK |
| USB cable for unloading the code | BUY LINK |
| Jumper wires | BUY LINK |
| 12-volts DC power supply | BUY LINK |
| breadboard | BUY LINK |
Circuit Diagram for the Project

Connection Table
| Arduino UNO | 5V Single Channel Relay Module | |
| ( +5V ) | VCC | |
| GND | GND | |
| D12 Pin | IN1 Input | |
| 12V DC Adaptor | Solenoid Valve | 5V Single Channel Relay Module |
| Normally Open | ||
| Positive | Common | |
| Positive Terminal | Normally Closed | |
| Negative | Negative Terminal |
- The circuit diagram is given above, you have to make the connections according to it.
- Connect the 5-volts pin of the Arduino uno with the VCC pin of the relay module.
- Attach the GND pin of the Arduino to the GND pin of the relay module.
- Join the digital-12 pin of the Arduino to the IN pin of the relay module.
- On the other side of the relay module connect the positive wire of the 12-volts DC supply and the positive wire of the solenoid valve as shown in the diagram.
- Attach the negative wire of the 12-volts DC supply to the negative wire of the solenoid valve.
Check more Projects on Arduino made by us.
Code for the Project
NOTE: Please upload the code given below to the Arduino as it is.
 // TECHATRONIC.COM
  void setup()
  {
  pinMode(12,OUTPUT); // RELAY PIN
  digitalWrite(12,HIGH); // Normally ON Only For Chanies Relay Module
  }
  void loop()
  {
  digitalWrite(12,LOW); // RELAY ON
  delay(1000);
  digitalWrite(12,HIGH); // RELAY OFF
  delay(1000);
  }
Solenoid Valve Interfacing With Arduino
Smart Irrigation System using Arduino
How to automatic plant watering system
We hope that you completely understand the working of the solenoid valve with Arduino. If you are facing any errors do inform us in the comments section. Please do check out more tutorials on Arduino and Raspberry pi written by us.
HAPPY LEARNING!