
Hey guys welcome back to the technique in this article we are going to make editorial how to make automation using ESP32 Bluetooth have nbuilt Bluetooth feature is very good to use and very simple or easy to understand and handle. This article we are going to make a automation system in which included PSP 32 inbuilt Bluetooth instead of external Bluetooth.
As all you know the ESP32 has both wireless connections Wi-Fi and bluetooth inbuilt inside so if you want to make a project or system where you have to use the Bluetooth you can use ESP 32 here the Bluetooth already connected with the years to 32 and it is very simple and easy to use.
This is small but very powerful controller which have many feature as they have discussed in our last article. Practically ESP32 has more range than the hc05 Bluetooth module and you don’t have to make any connections to activate or use Bluetooth control module because here only the Bluetooth device is inside within the ESP32. the ESP32 is very compact microcontroller. In this article we are going use ESP 32 Bluetooth.
If you want to make a project with bluetooth communication there is a two way either you can use arduino with HC-05 module. If you are using arduino with bluetooth module HC-05 it would be expensive because you have to buy two module first is arduino and second is bluetooth HC-05. But this communication can be possible by using a single module which is ESP 32. Here ESP32 have inbuild Bluetooth function which is better than the hc05 module.
To use this function of ESP 32 module you need an application which can connect to the Bluetooth module. To connect with the application you need to go to the phone setting and then tap on the Bluetooth select pair new device then select ESP 32 device after selecting the device go to the application and click on the connect button. And select your Bluetooth module.
First of all we need the list of required component to make this activity works.
Table of Contents
Required Components
- ESP32S
- LED (RED, GREEN, YELLOW, BLUE)
- Jumper Wires
- Breadboard
- Connecting Cable
ESP32 is a powerful small microcontroller which have inbuilt wifi and Bluetooth. So, today we using the esp32 bluetooth.
So here we will explain how to make the circuit with the ESP 32 for bluetooth communication and how to do the code
ESP32 Bluetooth Control Circuit Diagram.
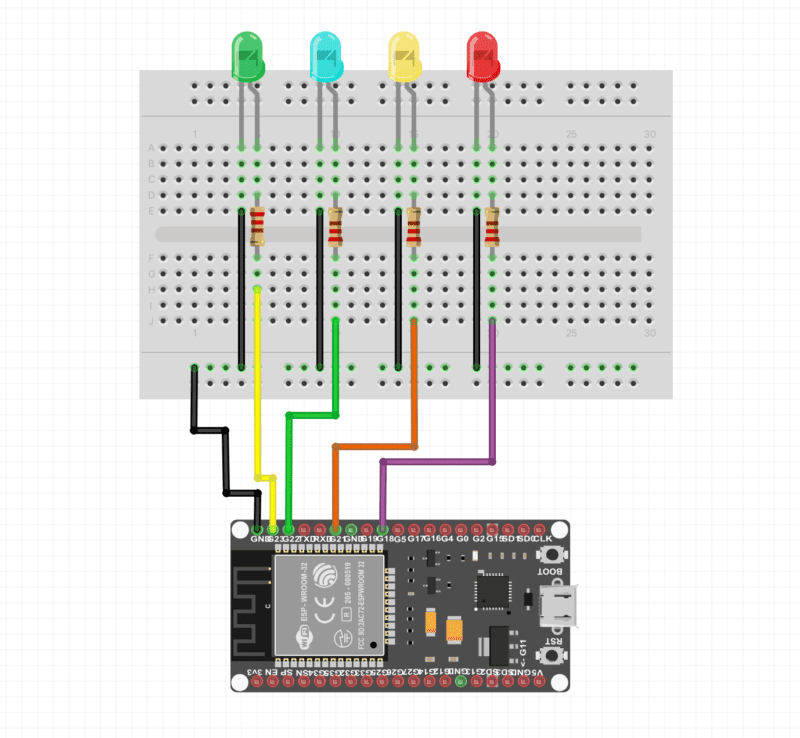
Here, is the circuit diagram for ESP32 Bluetooth communication. You have to connect all for LED to the ESP 32 GPIO pins.
Connect ESP pin 19 to the red LED positive pin along the resistor.
Connect ESP pin 21 to the Yellow LED positive pin along the resistor.
Connect ESP pin 22 to the Blue LED positive pin along the resistor.
Connect ESP pin 23 to the Green LED positive pin along the resistor.
Connect all ground from the LED to the ESP32.
here we are using, LED with the registers and the restore hello is 470 ohm. ESP 32 provide 3.3 voltage on the GP are you pins which is greater than the required voltage of leds. So if we are not using the registers the LED can damage.
Now we require an application which can connect to thee ESP32. we have made an application by using the mit app inventor. Also, we have given the link below.or if you want to make your app we have tutorial on our website.
After Completing the Circuit and all the connections of esp32 Bluetooth communication. we have to make a code and upload to the ESP32.
According to the code we have to initialize the Bluetooth of esp32 by a code.
ESP32 Bluetooth communication Code
  #include <FastLED.h>


#include "BluetoothSerial.h"

/* Check if Bluetooth configurations are enabled in the SDK */
/* If not, then you have to recompile the SDK */
#if !defined(CONFIG_BT_ENABLED) || !defined(CONFIG_BLUEDROID_ENABLED)
#error Bluetooth is not enabled! Please run `make menuconfig` to and enable it
#endif

BluetoothSerial SerialBT;


void setup() {
  Serial.begin(115200);
  /* If no name is given, default 'ESP32' is applied */
  /* If you want to give your own name to ESP32 Bluetooth device, then */
  /* specify the name as an argument SerialBT.begin("myESP32Bluetooth"); */
  SerialBT.begin();
  //Serial.println("Bluetooth Started! Ready to pair...");

   pinMode(19, OUTPUT);
   pinMode(21, OUTPUT);
   pinMode(22, OUTPUT);
   pinMode(23, OUTPUT);

}

void loop() {

  if (SerialBT.available()>0)
  {
char m = SerialBT.read();

    Serial.println(m);


switch (m)

{


case 'A': //BLINK

while(1)


{
if(SerialBT.available()>0)
{
break; }

 digitalWrite(19, HIGH);

}


case 'B': //BLINK

while(1)


{
if(SerialBT.available()>0)
{
break; }

 digitalWrite(21, HIGH);

}

case 'C': //BLINK

while(1)


{
if(SerialBT.available()>0)
{
break; }

 digitalWrite(22, HIGH);

}

case 'D': //BLINK

while(1)


{
if(SerialBT.available()>0)
{
break; }

 digitalWrite(23, HIGH);

}


///


case 'E': //BLINK

while(1)


{
if(SerialBT.available()>0)
{
break; }

 digitalWrite(19, LOW);

}


case 'F': //BLINK

while(1)


{
if(SerialBT.available()>0)
{
break; }

 digitalWrite(21, LOW);

}

case 'G': //BLINK

while(1)


{
if(SerialBT.available()>0)
{
break; }

 digitalWrite(22, LOW);

}

case 'H': //BLINK

while(1)


{
if(SerialBT.available()>0)
{
break; }

 digitalWrite(23, LOW);

}

}
}
}
How to create an application for ESP32 Bluetooth
Now in this step, we will make an android application for Bluetooth communication using ESP32. Bluetooth will be connected to the application.
go to the mit app inventor official website first which is MIT app inventor.
In this application, we will send the character using the Bluetooth of the phone. basically, there will be some buttons on the application whenever we touch any button it will send some data to the ESP.
Step 1
Open the MIT app inventor official website and create your account there. click on the create app button then there will be an option to create your account or you may log in with your google account.

step 2.
Click on the start new project and give a name to your project.
there will be a dashboard to make the application.
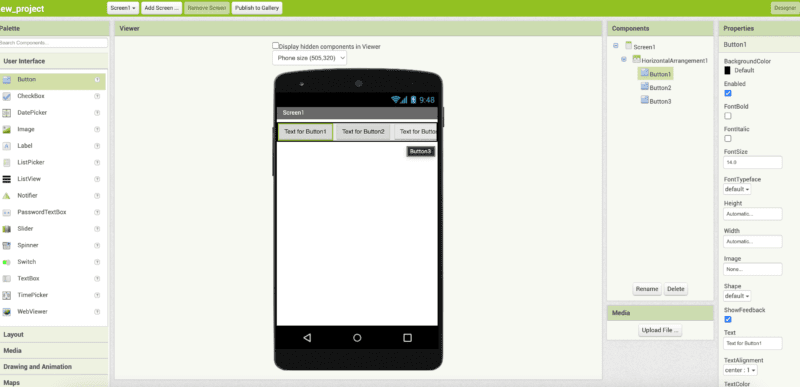
from the left side in the layout section drag and drop the horizontal arrangement on the mobile screen.

step 3.
now from the right side click on the width and select the fill parent. and go to the user interface Edgar and drop the button to the mobile screen inside the horizontal arrangement. drag and drop the 3 button at least there

Step 4.
now from the right sidebar changes button properties like color, name, and whatever you want.
drag and drop the Bluetoothclient 1 from the connectivity to the mobile screen
Step 5.
Click on the block button on the upper right side. and start the coding
make these two different blocks from control, list picker 1 and Bluetooth.

Step 6.
make 3 more blocks as given in the image from control, bluetoothclient1 and text.

now your app is ready again click on the design button and click on the built and click on the android app there will be a QR code shown by the website. It will be an important part of your control RGB with Arduino project.
download mit app inventor on your mobile phone from the google play store and scan the same QR code and it will download the app automatically on your mobile phone.
now we will start the second process of making this project.
Make 4 button from the application.
Here, I am also sharing the application link.
we have made many projects using esp32 Bluetooth. because it’s reliable and easy to use.
if you have any doubts or any problems you can ask us in the comment section.