
Hey guys, welcome back to thee techatronic, The usage of music, sound , audio file can be integrate with the coding. here is a module called the DF player mini. which can be connect with the Microcontroller. and we here we are using DF player mini with Arduino. Arduino is a microcontroller which h can be use easily. Here you don’t need to be expert in coding. you just need to have some basics of Coding and there is a lot of Libraries. which can help to make the DF player mini work.
Here is the full detail review how does the system works. you need audio files. which needed to call by the speaker. name all the audio file as 1,2,3,4 and so on. because the code can understand the numeric values for call. Also, we need a sd card which can fit in the DF player mini sd card slots.
DF player mini can be helpful for such project where we need to reply or play any sound. like we are using this system in a project where. we open a gate with RFID. Once you near the the RFID tag then it should be sound place your RFID tag. then you place the card the it sound Authorised access. and welcome to the home , office or anywhere you want to sounds like.
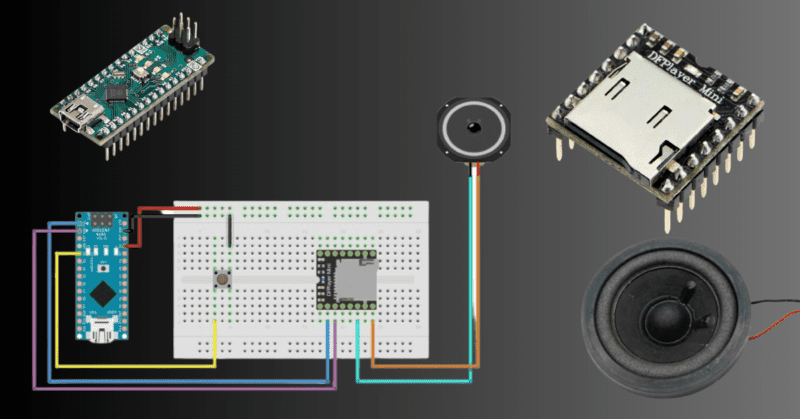
Table of Contents
DFPlayer Mini
The DFPlayer Mini is a small size module which can add any kind of sound to playback. with the help of DF Player Mini your you can integrate audio in your all projects. despite its small size like a coin. but it has a lot of features.
The DF player mini have an sd card slot which is very convenient to store files. you need to just plug the card. There is an inbuilt amplifier in the DF player mini-module.so, you can directly connect the speaker with the DF player mini.
The DF player mini supports Simple Serial communication between the module and the Arduino (microcontroller). Which is very simple communication protocol. DF player mini support the audio format mp3, wav, wma.
is a compact and low-cost MP3 player module designed to add sound playback functionality to Arduino and other microcontroller-based projects. Despite its small size, the DFPlayer Mini packs a punch, offering a variety of features that make it an ideal choice for audio applications:
this player can support many format that’s why we are using it in our project DF Player mini With Arduino.
Getting Started with DF Player Mini with Arduino:
To begin working with the DFPlayer Mini and Arduino, you’ll need the following components
Required Components
| Arduino nano | BUY LINK |
| DFPlayer Mini module | |
| MicroSD card (formatted with FAT16 or FAT32 filesystem) | |
| MicroSD card reader (to transfer audio files to the card) | |
| Speakers | |
| Jumper wires for connections | BUY LINK |
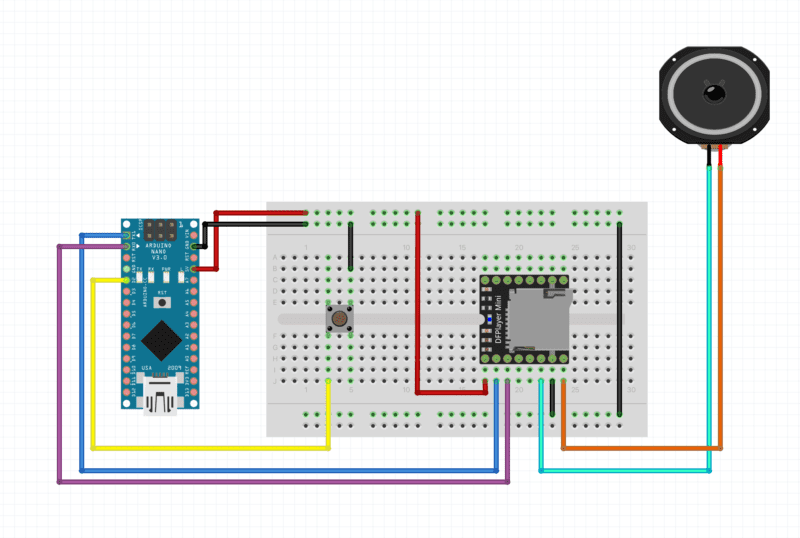
The wiring between the DFPlayer Mini and Arduino is straightforward. Here’s how you can connect the two
- VCC: Connect to Arduino’s 5V pin.
- GND: Connect to Arduino’s GND pin.
- TX: Connect to Arduino’s digital pin (e.g., D2) for serial communication.
- RX: Connect to Arduino’s digital pin (e.g., D3) for serial communication.
- IO1: Leave unconnected.
- IO2: Leave unconnected.
Ensure that the microSD card is properly inserted into the DFPlayer Mini module before powering it up.
Installing the DFPlayer Mini Library:
To control the DFPlayer Mini from Arduino, you’ll need to install the DFPlayer Mini library. Here’s how you can do it:
- Open the Arduino IDE.
- Go to Sketch > Include Library > Manage Libraries.
- In the Library Manager, search for “DFPlayer Mini” and install the library by dfrobot.
Once the library is installed, you’re ready to start programming your Arduino to interact with the DFPlayer Mini.
DF Player mini With Arduino Circuit Diagram
DF Player mini with Arduino Code
Code
#include <SoftwareSerial.h>
#include <DFRobotDFPlayerMini.h>

#define RX_PIN 3 // Connect DFPlayer Mini TX pin to Arduino D3
#define TX_PIN 2 // Connect DFPlayer Mini RX pin to Arduino D2
#define BUTTON_PIN 4 // Connect button to Arduino D4

SoftwareSerial mySerial(RX_PIN, TX_PIN); // RX, TX
DFRobotDFPlayerMini myDFPlayer;

void setup() {
  Serial.begin(9600);
  mySerial.begin(9600);

  if (!myDFPlayer.begin(mySerial)) {
    Serial.println(F("Unable to begin:"));
    Serial.println(F("1.Please recheck the connection!"));
    Serial.println(F("2.Please insert the SD card!"));
    while(true);
  }

  myDFPlayer.volume(20); // Set volume (0 to 30)

  pinMode(BUTTON_PIN, INPUT_PULLUP);
}

void loop() {
  if (digitalRead(BUTTON_PIN) == LOW) {
    playAudio();
    delay(1000); // Debounce delay
  }
}

void playAudio() {
  myDFPlayer.play(1); // Play the first MP3 file on the microSD card
}
Explaining the Code
#include <SoftwareSerial.h>
#include <DFRobotDFPlayerMini.h>
These lines include the library files for Arduino when we call these libraries the code inside the libraries merges to our code and makes a combination to begin the DF Player.
#define RX_PIN 3 // Connect DFPlayer Mini TX pin to Arduino D3
#define TX_PIN 2 // Connect DFPlayer Mini RX pin to Arduino D2
#define BUTTON_PIN 4 // Connect button to Arduino D4
These 3 lines explain the pin why we are using it. such as the RX_PIN 3 is defined Receiver pin as pin 3 of Arduino pin 3. same as we are using pin 2 and pin 4 of Arduino.
SoftwareSerial mySerial(RX_PIN, TX_PIN); // RX, TX
This line of code is define the rx and tx pin use in the software serial communication. Softwareserial is a keyword which enable the desired pin use for serial communication. there is only two pins in Arduino which can be use in Serial communication. these are two physical pins Rx Tx pins.
But with the softwareserial library we can use any of the pin as rx and tx pins. so , here we are using Rx and Tx pin as Arduino pin 3,4.
After the definition, we use the void setup. we assign all the pin and protocol initiation in void setup and run only once.
This Code inside the void setup
Serial.begin(9600);
mySerial.begin(9600);
we are initiating the serial communication for the serial monitor and DF player mini.
if (!myDFPlayer.begin(mySerial)) {
Serial.println(F(“Unable to begin:”));
Serial.println(F(“1.Please recheck the connection!”));
Serial.println(F(“2.Please insert the SD card!”));
while(true);
These lines ensure the DF player mini is working or not.
I think we have shared all the required details to use the DF player mini with Arduino. still if you have any problem in project you can ask us in the comment section.