

Hey Guys, Welcome back to the Techatronic. Today we are doing a very interesting project. Although we have made an Advance Smart Irrigation Project earlier too. but this time we are making this project in a very different way. in this project, we are using a guide rail. A combination of some linear bearings with the stepper motor, pulley, and belt. we made a moveable system for the water pump nozzle. so, the nozzle can move from one point to another point.
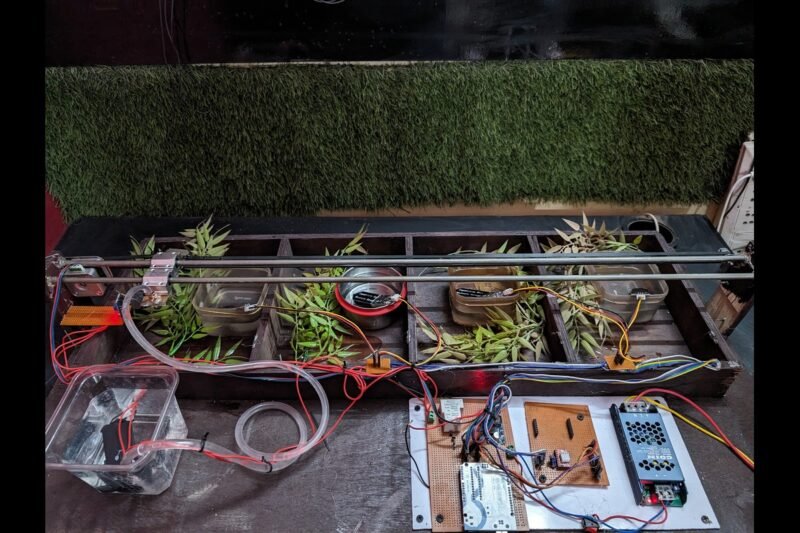
There we are using 4 different sections for 4 different plants. with different water requirements. so, whenever which plant need water the guide rail with water nozzle moves to the specific section and start the water sprinkling. We have made a lot of project on smart irrigation system such as Smart irrigation project for 2 plants with servo motor. and Advance Smart Irrigation Project for a single plant. this is something advance from the earlier projects.
In this project we are going to use many of the electronic and mechanical components. so, with the combination with the electronic and mechanical components we will make this project. So, all the detail to make this project we are going to share here. if you want to make the project and want to learn all the things. you need to read full article and follow the given steps. we have made this advance irrigation project on IOT too.
Code, Circuit and step by step instructions given here. To make this awesome project first we need the required components.
Components required for Advance Smart Irrigation Project
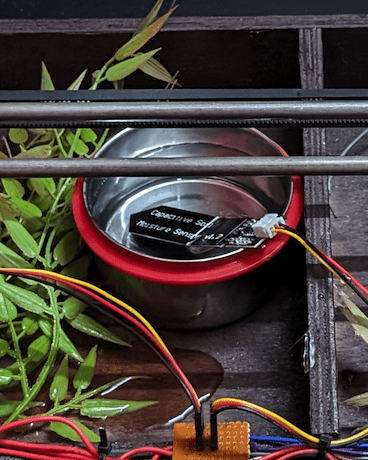
| 4- Capacitive soil moisture sensor | BUY LINK |
| 1- Arduino Uno | BUY LINK |
| 1- Arduino uno cable | BUY LINK |
| Water pump 5v | BUY LINK |
| 1- Level Pipe | |
| 1- on-off switch | BUY LINK |
| 1-hook-up wire | |
| 1-Jumper Wire | BUY LINK |
| 1- Stepper Motor | BUY LINK |
| 2-Pulley | |
| 1- belt | |
| 1- A4966 Stepper motor driver | BUY LINK |
| 1- Magnat sensor |
How to make the Pulley Machanism.
Here first we need to make the structure for our Advance Smart Irrigation Project which can do the movement of our nozzle. to move the nozzle we need to place two linear bearing on the MS rode. as you can see in the image. there are two rode place parallel like a train track. and both the linear bearing place in a manner that the both linear bearing move together. a MS plate we have point with both the linear bearing. which help to attached the water nozzle and. at the other end we have to tie the belt.
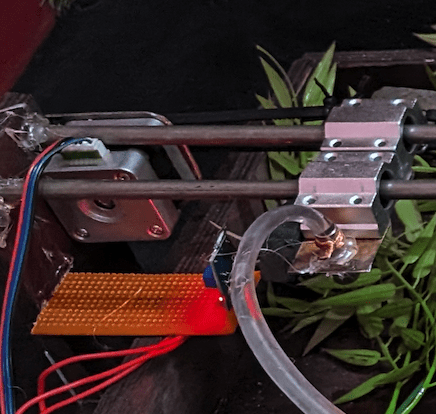
Now. at the both end we need to place two pulley which can move the belt here and there. at the one side the pulley connect with the stepper motor and at the other end the pulley connect with the wall. so that the motor can pull the belt and the nozzle can make the movement linearly. like to-and- fro motion. so, first I added in the code the nozzle position will be near the motor and in 1st farming section initially.
Also, in our Advance Smart Irrigation Project there is a magnet sensor near the one end which so the nozzle position can be collide with the wall. when the nozzle comes near to the motor or wall the system will stop.
Now, if there is no moisture detect in any field which is detected by the sensor. the motor make a movement to send the nozzle at that area. for example if the 2nd field detect no moisture. then the motor will rotate clockwise for 10 section. in 10 seconds the motor rotate the pulley which is eqaual to the distance from initial position to the second field. it mean if motor will rotate clockwise for 10 seconds the nozzle will reach in the second field.
Same as, if the motor will rotate for 30 seconds. the nozzle will reach top the 3rd field. so, this is the way to reach the nozzle to the required field.
After pulley mechanism we will talk about the water pump and sprinkler system.
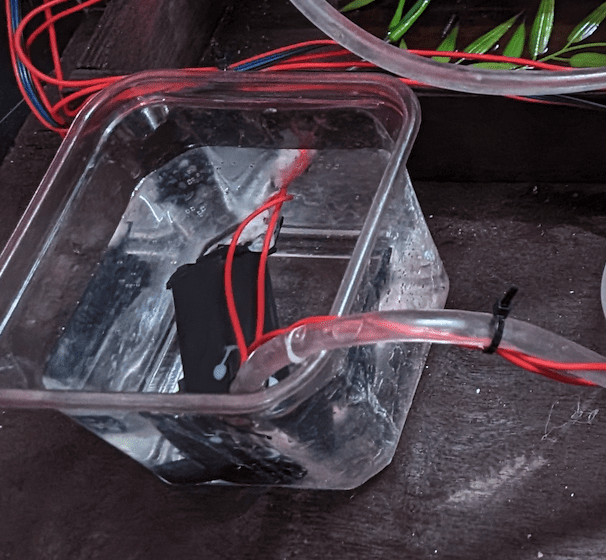
There is a 12v powerful pump which drive the water from water tank to the nozzle end. with the medium of level pipe. at the other end there is a sprinkler connected to the to pipe which makes the water sprinkler. the process is pretty simple.
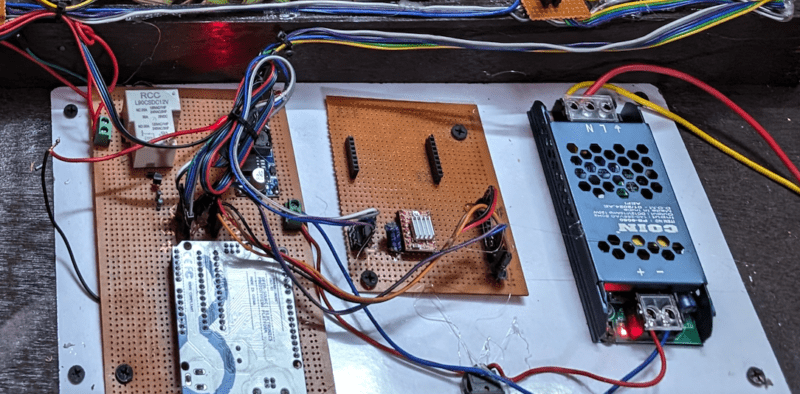
Once, the soil moisture sensor detect the no moisture in any field it sends the information to the Arduino (which is the brain of this project). Now Arduino identify the sensor and compare it with the desired condition. which is if any sensor detect the no moisture then the arduino should send the instruction to the stepper motor to rotate. for second field stepper motor will rotate 10 seconds.
Now, after stepper motor movement the water pump will get start. and pump the water to the nozzle and it start the plant watering. when the soil get enough moisture the pump will turn off and the nozzle again to the it’s initial position.
Here we have made the components list for Advance Smart Irrigation Project above I hope all the components you have.
Now we need the Circuit Diagram to connect all the components together. We have similar project smart irrigation using Raspberry pi too.
Advance smart irrigation Circuit Diagram

Advance Smart Irrigation Project Arduino Code
// Define pin connections & motor's steps per revolution
const int dirPin = 2;
const int stepPin = 3;
const int stepsPerRevolution = 1000;
const int stepsPerRevolutiona = 300;
const int stepsPerRevolutionb = 1200;
const int stepsPerRevolutionc = 2100;
const int stepsPerRevolutiond = 3000;
const int stepsPerRevolutions = 10000;

void setup()
{
  // Declare pins as Outputs

  pinMode(A0, INPUT);
pinMode(A1, INPUT);
pinMode(A2, INPUT);
pinMode(A3, INPUT);
pinMode(4, OUTPUT);
pinMode(8, OUTPUT);
Serial.begin(9600);
  pinMode(stepPin, OUTPUT);
  pinMode(dirPin, OUTPUT);
pinMode(7, INPUT_PULLUP);
   digitalWrite(dirPin, HIGH);


  //digitalWrite(dirPin, LOW);

  // Spin motor quickly
  for(int x = 0; x < stepsPerRevolutions; x++)
  {
    digitalWrite(stepPin, HIGH);
    delayMicroseconds(500);
    digitalWrite(stepPin, LOW);
    delayMicroseconds(500);
    int m = digitalRead(7);
    if(m==0)
    {break;}
  }
  delay(500); // Wait a second
}
void loop()
{


int m = analogRead(A0);
int n = analogRead(A1);
int o = analogRead(A2);
int p = analogRead(A3);
Serial.print(m);
Serial.print("     ");
Serial.print(n);
Serial.print("     ");
Serial.print(o);
Serial.print("     ");
Serial.println(p);
delay(50);

  if(m>=400)

  {

digitalWrite(dirPin, LOW);

  // Spin motor quickly
  for(int x = 0; x < stepsPerRevolutiona; x++)
  {
    digitalWrite(stepPin, HIGH);
    delayMicroseconds(500);
    digitalWrite(stepPin, LOW);
    delayMicroseconds(500);
  }
  delay(2000); // Wait a second

  digitalWrite(4, HIGH);
  delay(5000);
  digitalWrite(4, LOW);
  delay(2000);


 digitalWrite(dirPin, HIGH);

  // Spin motor quickly
  for(int x = 0; x < stepsPerRevolutions; x++)
  {
    digitalWrite(stepPin, HIGH);
    delayMicroseconds(500);
    digitalWrite(stepPin, LOW);
    delayMicroseconds(500);
     int m = digitalRead(7);
    if(m==0)
    {break;}
  }
  delay(2000);
  }


 else if(n>=400)

  {

digitalWrite(dirPin, LOW);

  // Spin motor quickly Advance Smart Irrigation Project
  for(int x = 0; x < stepsPerRevolutionb; x++)
  {
    digitalWrite(stepPin, HIGH);
    delayMicroseconds(500);
    digitalWrite(stepPin, LOW);
    delayMicroseconds(500);
  }
  delay(2000); // Wait a second

  digitalWrite(4, HIGH);
  delay(5000);
  digitalWrite(4, LOW);
  delay(2000);


 digitalWrite(dirPin, HIGH);

  // Spin motor quickly
  for(int x = 0; x < stepsPerRevolutions; x++)
  {
    digitalWrite(stepPin, HIGH);
    delayMicroseconds(500);
    digitalWrite(stepPin, LOW);
    delayMicroseconds(500);
     int m = digitalRead(7);
    if(m==0)
    {break;}
  }
  delay(2000);
  }


else if(o>=400)

  {

digitalWrite(dirPin, LOW);

  // Spin motor quickly
  for(int x = 0; x < stepsPerRevolutionc; x++)
  {
    digitalWrite(stepPin, HIGH);
    delayMicroseconds(500);
    digitalWrite(stepPin, LOW);
    delayMicroseconds(500);
  }
  delay(2000); // Wait a second

  digitalWrite(4, HIGH);
  delay(5000);
  digitalWrite(4, LOW);
  delay(2000);


 digitalWrite(dirPin, HIGH);

  // Spin motor quickly
  for(int x = 0; x < stepsPerRevolutions; x++)
  {
    digitalWrite(stepPin, HIGH);
    delayMicroseconds(500);
    digitalWrite(stepPin, LOW);
    delayMicroseconds(500);
     int m = digitalRead(7);
    if(m==0)
    {break;}
  }
  delay(2000);
  }


//Advance Smart Irrigation Project

else if(p>=400)

  {

digitalWrite(dirPin, LOW);

  // Spin motor quickly
  for(int x = 0; x < stepsPerRevolutiond; x++)
  {
    digitalWrite(stepPin, HIGH);
    delayMicroseconds(500);
    digitalWrite(stepPin, LOW);
    delayMicroseconds(500);
  }
  delay(2000); // Wait a second

  digitalWrite(4, HIGH);
  delay(5000);
  digitalWrite(4, LOW);
  delay(2000);


 digitalWrite(dirPin, HIGH);

  // Spin motor quickly
  for(int x = 0; x < stepsPerRevolutions; x++)
  {
    digitalWrite(stepPin, HIGH);
    delayMicroseconds(500);
    digitalWrite(stepPin, LOW);
    delayMicroseconds(500);
     int m = digitalRead(7);
    if(m==0)
    {break;}
  }
  delay(2000);
  }


  else

  {digitalWrite(8, HIGH);}


}
Here, you can see all the information from code to circuit and step-by-step instructions. If still you have any issue in project you can ask us in the comment section. if you have any difficulty how to upload the code the article is given. Also, I have posted the different smart irrigation projects on this website the link is given below.
Automatic plant watering project using Arduino |Arduino smart Irrigation
Smart Irrigation System using Arduino
All the best guys I hope you will learn and make your Advance Smart Irrigation Project.