
Welcome to the Techatronic, In this article, we will share with you how to make a smart irrigation system using Arduino.Smart irrigation or we can call it automatic watering system for plants. so, in this project we use the electronic which manage to watering the plant without the man power. basically this project aims is to reduction of man power. cause if we have plants in our home we need to watering the plant daily sometime we forgot the watering or can leave our home for some days. in this case this project will help us a lot.

this is a very popular project nowadays. if you are searching for the project you are in the right place. you will learn a lot of things in this article regarding smart irrigation systems.we are going to share a many things here about this project. first of all i would like to mention we will share all the detail like code and circuit.
Table of Contents
Introduction
- it is actually a precision automatic watering system for the plant which automatically waters the plant without your engagement with the system.
- this is made up of Arduino which can easily make by nontechnical persons also so it is the Arduino irrigation system this system is used in gardens and farms widely.
So many of the students searching for this project over the internet as a final year project for the smart irrigation system is not using only the garden and farms it is implemented into the crops and smart greenhouse also.
we are having more Arduino projects also you can see this awesome Bluetooth Rc car project.
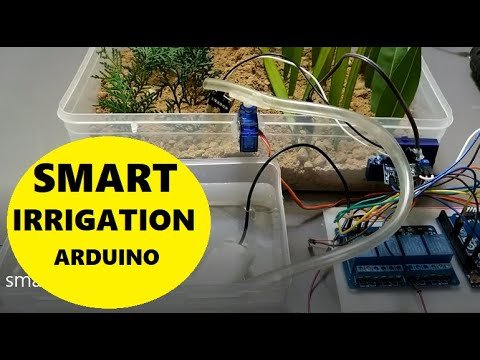
A preview image of the actual project. you can customize the project as per your need.
How does smart irrigation work?
As we are using a soil moisture sensor that,
- senses the moisture content in the soil.
- send this data to the Arduino that we are using.
- Soil moisture sensors can send data in both. in analog as well as in digital.
- so we are using the analog data here to get the accuracy in the project.
- we insert the soil moisture sensor in the soil and connect it to the Arduino and the sensor sends the data to the Arduino about the moisture inside the soil.
- it makes the smart irrigation controller. the Arduino will get the action on the data.
according to the condition given in the program. if the soil moisture sensor detects no moisture or very little moisture then the pump will get started and water the plants.
I would like to mention too that this is an advanced version of the smart irrigation system which recognizes the less moisture-contained soil in various fields.
in this ece final year project,
- the water pipe is connected to the servo motor which rotates according to the requirement.
- if there are two crops A & B. and if A has less amount of moisture then the servo motor rotates toward crop A.
- and starts the watering and when it will fill up it will rotate towards crop B. this is one more benefit of this project.
Smart irrigation system Components required:-
- Arduino Uno
- Servo motor
- Soil moisture sensor
- mini water pump
- jumper wires.
- Relay module
- Breadboard
Components Table / Buy Link
| S.No | Component Name | Quantity | Link |
| 1. | Arduino UNO | 1 | BUY LINK |
| 2. | Soil Moisture Sensor | 2 | BUY LINK |
| 3. | Servo Motor | 1 | BUY LINK |
| 4. | DC Mini Water Pump | 1 | BUY LINK |
| 5. | Jumper Wire | 30 | BUY LINK |
| 6. | Breadboard | 1 | BUY LINK |
| 7. | Single Channel Relay Module | 1 | BUY LINK |
| 8 | 12 Volt DC Adaptor | 1 | BUY LINK |
You Can Buy All Components To Together BUY NOW
Right now a framework,
we took a soil moisture sensor that can detect the Moisture in the soil.
- Soil moisture sensor gives some an incentive to the microcontroller which we use in the framework for directions.
- we prescribe utilizing the simple worth. since on the simple worth, you can adjust the dampness level with the yield gadget.
- for instance, Soil moisture gives the worth 0 to 1023.
- so you can align the sensor as your soil condition. yet, on the advanced yield of the sensor
- you can not align the sensor by the code as indicated by the Soil moisture.
- there is a potentiometer to adjust the sensor. for more precision utilize simple sensors. The keen smart irrigation system framework is useful for a conclusive year venture.
In the wake of adjusting the sensor, I found that the cut-off value is 970.
at this worth, the moisture level is exceptionally low in the dirt. that is to say, on the off chance that the Soil moisture sensor detects the worth more than 970, at that point the water pump is on.
what’s more, if the sensor detects the worth under 970 the water pump will stop. in this way, align your sensor.
Circuit Diagram for smart irrigation system:-
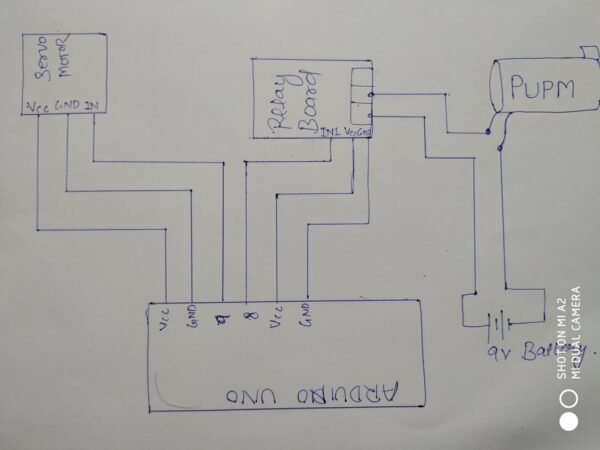
Fritzing Diagram

Connection Table
Smart irrigation Arduino Code
| GND | GND |
| Water Pump | Single-channel Relay Module |
| Terminal 1 | Normally Open |
| Common | |
| Normally Closed | |
| Terminal 2 | GND |
| Arduino UNO | Relay Module |
| Normally Open | |
| VCC | Common |
| Normally Closed |
#include <Servo.h> // servo library
Servo myservo;
int m=0;
int n=0;
int pos = 0;
void setup()
{
// put your setup code here, to run once:
pinMode(A0, INPUT_PULLUP); // Soil Moisture Sensor 1 PIN A0
pinMode(A1, INPUT_PULLUP); // Soil Moisture Sensor 1 PIN A1
pinMode(8,OUTPUT); // Relay Module PIN D8
Serial.begin(9600); // Sensor Buart Rate
myservo.attach(9); // Servo PIN D9
digitalWrite(8, HIGH); // Relay Normally Hight for OFF condition
}
void loop()
{
// put your main code here, to run repeatedly:
int m= analogRead(A0); // Soil Moisture Sensor 1 PIN A0
int n= analogRead(A1); // Soil Moisture Sensor 1 PIN A1
Serial.println(m);
delay(10);
Serial.println(n);
delay(200);
if (m>=980)
{
myservo.write(90); // tell servo to go to position in variable 'pos'
digitalWrite(8, LOW); // Relay ON
delay(1000);
}
else if(m<=970)
{
digitalWrite(8, HIGH); // Relay ON
}
if (n>=980)
{
myservo.write(0); // tell servo to go to position in variable 'pos'
digitalWrite(8, LOW); // Relay ON
delay(1000);
}
else if(n<=970)
{
digitalWrite(8, HIGH); // Relay OFF
}
else
{
digitalWrite(8, HIGH); // Relay OFF
}
}upload the code in the Arduino bu using the Arduino IDE
download Arduino IDE