

Hey guys, welcome back again to our website this time we are having a very good project for you. this is known as the automatic plant watering system. In this project, we are nurturing the plants using technology. we did it for a month and notice that the plants have better growth.

So, here we are going to share our full research and how we made it, and what was the result. so, if you want to make this smart irrigation using the Arduino system on your own just read and follow our article. we will share all the information from construction to code. so, without any delay let’s get started.
Table of Contents
Automatic plant watering System Introduction
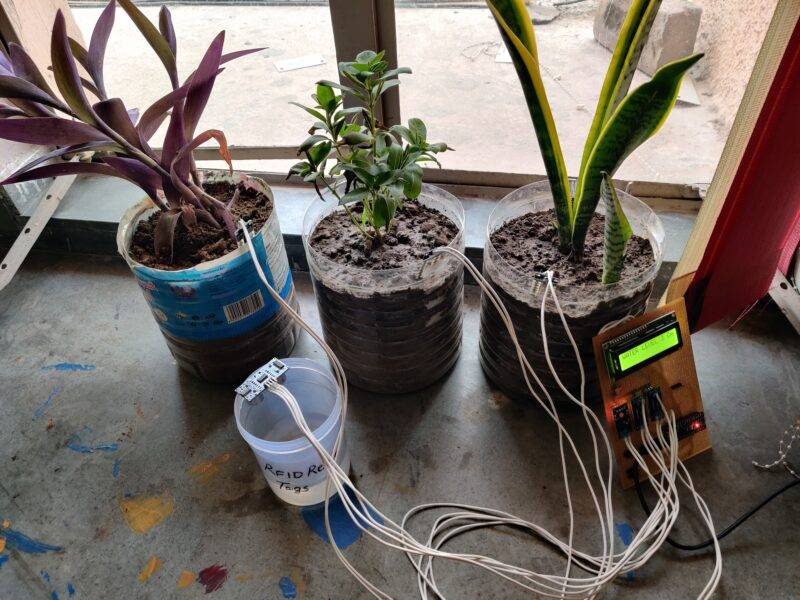
Here are some plants with us all the pots have some sensors and a water dripping system. which will monitor the water into the soil and maintain the required amount of water in the pot. if the plant required the water in this smart irrigation system then the water pump starts and watering the plant with accuracy and when the plant got the required amount of water then the water pump will shut down.
An automatic watering system for plants. soil moisture sensor which can sense the moisture in the soil. The soil moisture sensor is associated with the relay which will be triggered to start the water pump.

Smart irrigation system is an advance and new technique for irrigation that can reduce manpower, time, and many more things. There we took three plants each plant having a different water requirement one we took the “snake plant”. snake plant does not need water daily. this plant required a very less amount of water even in winter it can survive more than two months without water.
another plant we have taken is sadabahar(periwinkle) plant it required daily water. and the last one is the cordyline plant which is in the middle of both plants which we have taken.
we are using a source of water in which the water pump lye down. we are also making and water level detector for this reservoir. how much water remains in the tank we will get to know by the display we are using
Now we are calibrating all the sensors as per the requirement and there are different threshold values for each plant sensor. Each sensor gives the difference value according to the soil condition. All the things like soil condition for all sensors and water level of resource water will be displayed over the 16X2 display.
Construction of Automatic plant watering system
To make this awesome project which is Smart irrigation we need Some components to be attached and assembled in a particular manner to make this project. so, first, we are sharing the list of the components.
Components Required
| Arduino UNO | BUY LINK |
| Soil moisture sensor | BUY LINK |
| Water Pump 5v | BUY LINK |
| Wires | BUY LINK |
| General-purpose PCB board | BUY LINK |
| Pipe compatible | BUY LINK |
| 16X2 Display | BUY LINK |
| Ultrasonic sensor | BUY LINK |
| Potentiometer 10k | BUY LINK |
| Berg strip | BUY LINK |
| UNO Cable | BUY LINK |
You can buy all components together-BUY LINK
Construction:-
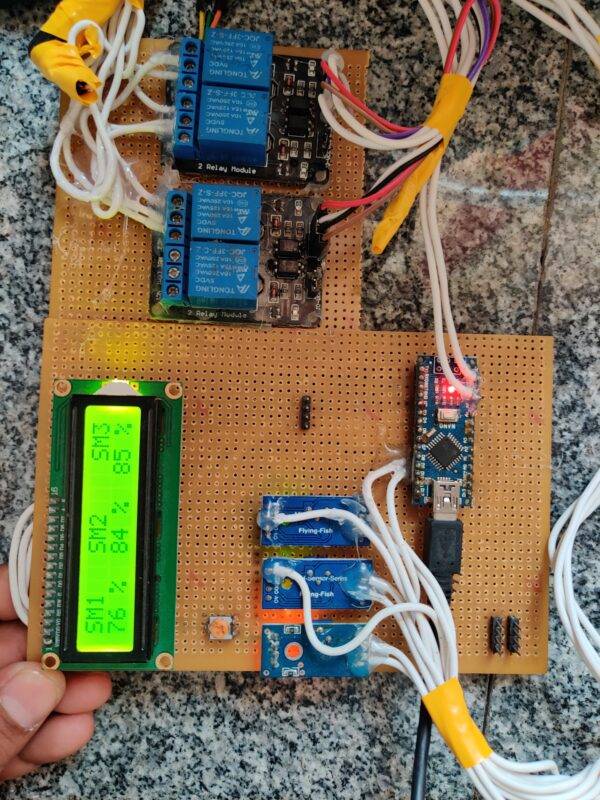
First, make a pcb on zero pcb as per given in the circuit diagram
then connect all the soil moisture sensors. after connecting the soil moisture sensor check the output of the sensor at the serial monitor. There you will monitor that the values are changing from 0 to 1000.
After that, we have to connect the display and the relay which will trigger the relay. also connect the mini water pump with the relay as per the circuit diagram.
Automatic plant watering Circuit Diagram

Smart irrigation Code / Automatic plant watering Code
const int trigPin = 9;
const int echoPin = 10;
long duration;
int distanceCm, distanceInch;
#include <LiquidCrystal.h>
// initialize the library by associating any needed LCD interface pin
// with the arduino pin number it is connected to
const int rs =8 , en = 7, d4 = 3, d5 = 4, d6 = 5, d7 = 6;
LiquidCrystal lcd(rs, en, d4, d5, d6, d7);
void setup() {
// put your setup code here, to run once:
pinMode(A0, INPUT);
pinMode(A1, INPUT);
pinMode(A2, INPUT);
Serial.begin(9600);
pinMode(2, OUTPUT);
pinMode(11, OUTPUT);
pinMode(12, OUTPUT);
pinMode(trigPin, OUTPUT);
pinMode(echoPin, INPUT);
lcd.begin(16, 2);
}
void loop() {
// put your main code here, to run repeatedly:
digitalWrite(trigPin, LOW);
delayMicroseconds(2);
digitalWrite(trigPin, HIGH);
delayMicroseconds(10);
digitalWrite(trigPin, LOW);
duration = pulseIn(echoPin, HIGH);
distanceCm= duration*0.034/2;
distanceInch = duration*0.0133/2;
int soil_moisture = analogRead(A0);
int soil_moisture_2 = analogRead(A1);
int soil_moisture_3 = analogRead(A2);
Serial.print(soil_moisture);
Serial.print(" ");
Serial.print(soil_moisture_2);
Serial.print(" ");
Serial.println(soil_moisture_3);
int z= map(soil_moisture, 0, 1023, 100, 0);
int z_2= map(soil_moisture_2, 0, 1023, 100, 0);
int z_3= map(soil_moisture_3, 0, 1023, 100, 0);
//Serial.print(z);
//Serial.print(" %");
//Serial.print(" ");
//Serial.print("Distance: ");
int a = map(distanceCm, 0, 17, 20, 0);
//Serial.print(distanceCm);
//Serial.println(" Cm");
lcd.clear();
lcd.setCursor(0, 0);
lcd.print("SM1");
lcd.setCursor(0, 1);
lcd.print(z);
lcd.setCursor(3, 1);
lcd.print("%");
lcd.setCursor(6, 0);
lcd.print("SM2");
lcd.setCursor(6, 1);
lcd.print(z_2);
lcd.setCursor(9, 1);
lcd.print("%");
lcd.setCursor(13, 0);
lcd.print("SM3");
lcd.setCursor(12, 1);
lcd.print(z_3);
lcd.setCursor(15, 1);
lcd.print("%");
delay(300);
lcd.clear();
lcd.setCursor(0, 0);
lcd.print("WATER LEVEL");
lcd.setCursor(12, 0);
lcd.print(a);
lcd.setCursor(14, 0);
lcd.print("Cm");
delay(300);
if(soil_moisture>500)
{
digitalWrite(2,LOW);
}
else
{
digitalWrite(2,HIGH);
}
if(soil_moisture_2>280)
{
digitalWrite(11,LOW);
}
else
{
digitalWrite(11,HIGH);
}
if(soil_moisture_3>700)
{
digitalWrite(12,LOW);
}
else
{
digitalWrite(12,HIGH);
}
}The given code should be uploaded on the same Arduino. before making the connection. after making the connection could damage the GPIO pins. there
Working on automatic plant watering system project
The working of this smart irrigation project is very simple and interesting. there is 3 part to this project input, processing, and output. in input, we have a soil moisture sensor and ultrasonic sensor. the soil moisture sensor is used to detect the moisture in the soil. and the ultrasonic sensor is used to detect the water level inside the water reservoir which we will use to water the plant.

We have researched the three different plants which have different water requirements.
- periwinkle (sadabahar) needs water on a daily basis. green leaf with purple-pink flower a small height plant.
- Cordiline. need water twice a week. it depends on the weather condition. if there is winter it can survive only once in week watering.
- snake plants’ need for water varies according to the weather condition in summer they can survive once in four weeks and in winter they can survive for 2-3 months without water.
So, according to the water requirement of the different plants, we have programmed the sensor and Arduino to fulfill the water requirement. such as if a snake plant less water we have calibrated the sensor to sense the lowest moisture. and the rest of the two plant sensors were also calibrated according to their water requirement.
Now, the next part is to involve the ultrasonic sensor, the ultrasonic sensor is to detect the water inside the water reservoir with a notification on LCD display. in an automatic plant watering system, we are using full automation to reduce human effort. An ultrasonic sensor continuously monitors the tank and sends the reading on the LCD display. you can also attach a buzzer to it. we have many other project on iot smart irrigation project if you want to add some iot feature you can get the refrence from that.
Advantages of smart irrigation / Automatic plant watering project
- It saves time you don’t have to water the plant on a daily basis it can water the plant by itself
- it saves human effort with this project you don’t need a person to water the plant
- it saves a huge amount of water with this smart irrigation project we can save a lot of water it gives the water to the plant as per the requirement no extra amount of water
- it can help in farming too. we can use this project at a corporate level in farming
Disadvantages of smart irrigation / Automatic plant watering project
It needs electricity continuously it can’t run without electricity.
the soil moisture sensor gets rusted after some time
if the system will fail the plant can damage
Automatic plant watering project FAQ!
Q.1 in automatic plant watering system how many days the soil moisture sensor can survive?
Ans.1 The soil moisture sensor can survive maximum 1 week after that they get start rusting.
Q.1 where we have to put the soi moisture sensor?
Ans.1 you have to insert the moisture sensor into the soil near the plant.
Q.1 Can ultrasonic sensor measure the water level?
Ans.1 yes.