
Table of Contents
What is Arduino
Welcome to the Techatronic Guys, So finally we are starting the Arduino Tutorial Series. This is for all the peoples who are beginners and want to learn the Arduino. in this article, we will provide a brief introduction to what is an Arduino. In which we will cover all the essential Points to Related to What is an Arduino.
Many people buy Arduino to make their project and learn it. but due to a lack of the proper knowledge they unable to use the Arduino for their purpose. for those people, we are writing what is Arduino & Introduction to it,

tools use, Software uses to make any basic or intermediate level project. we will post the whole course here with the videos. so you can learn better from here. we are also having the Projects on Arduino like RFID Arduino Security Lock .
Arduino was made in early 2000 by Massimo Banzi, David Cuartielles, Tom Igoe, Gianluca Martino, and David Mellis. according to them, they made the Arduino for the non-technical people who don’t have the proper knowledge. Arduino can be used for the learning purpose, teaching. even we can operate the Arduino with the tinkercad arduino software nowadays.
it is easy to operate. there are a lot of libraries available in the Arduino software which can be very useful in our project.
Content:-
- Hardware Specification
- Required Hardware
- Required Software
What is an Arduino?
Arduino is a Microcontroller Development Board with ATmega328p Microcontroller works on 16 which helps to make the projects work. this was invented for nontechnical persons who want to make their small and basic projects with the help of technology.
Even artists can also make art with the Arduino. it is like a brain that helps to automate simple Arduino projects. like if I want to make a 3d artist and I want to make the automatic movement in the art then I can do it with it and a stepper or servo motor.
if I want to make your home automatic I can interface the sensor with the board. another example:-
if you want to make your curtain rise automatically when you clap. then you can make this system with the help of a sound sensor, Arduino, and the motor. so it helps to make things easy.
If you learnt what is an Arduino you can make any project by your self.
Here is some of example:-
NRF Remote Control | NRF 24L01 Remote for Rc Car Plane
Keyless bike Project using Arduino and Android app
Smart water heater using Arduino DIY Project
Smart Helmet Project Using Arduino | Accident Detection Helmet
There is more project in our category.
now we will see the hardware configuration and the software of the Arduino. In Arduino software there we use the c and c+ language Arduino coding basics of the Arduino.
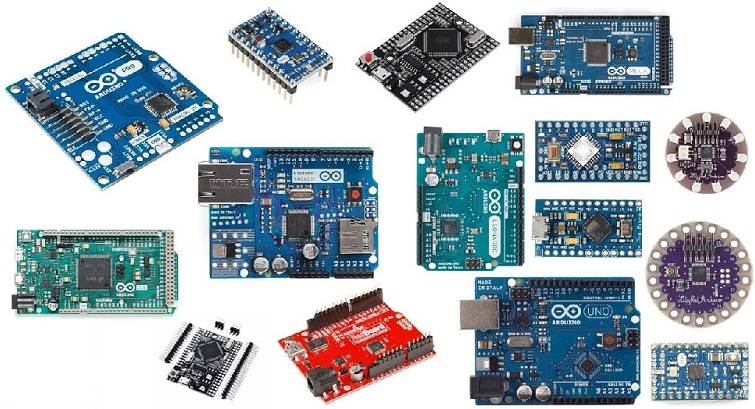
Types of Arduino.
- Arduino Uno
- Arduino Mega
- Arduino Nano
- Arduino Pico
- Arduino Due(84) Mhz
- Arduino Leonardo
If you want to learn more about the different types of Arduino deeply you can refer our given Article.
Types Of Arduino Boards | Arduino Uno | Mega | Mini | Specification
Arduino Uno Hardware specification:-
Arduino is an open-source development board with an at328p microcontroller chip. which also can be programmed by the Keil MicroVision software
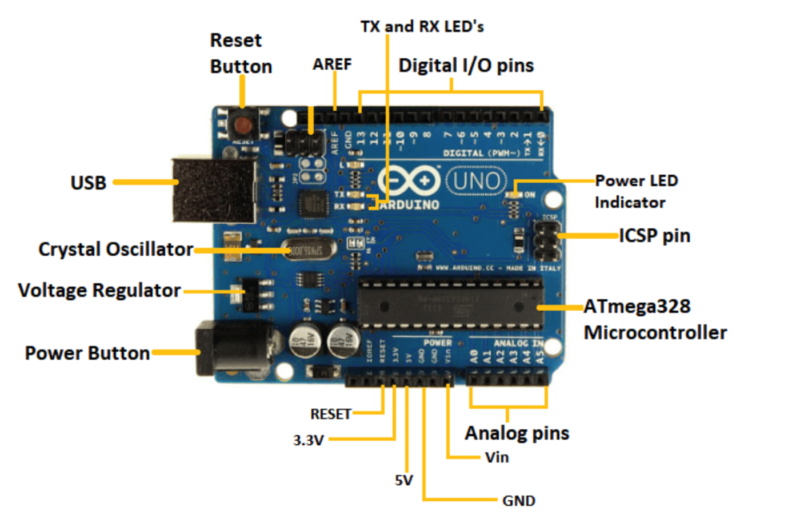
- The required minimum voltage is 5v.
- having 14 Digital GPIO pins and 6 analog pins.
- 5v and 3.3v power pins with 3 ground pins onboard.
- Another SMD microcontroller inbuilt for boot the Arduino main chip.
- there is also two voltage regulator one is for 5v and another is for 3.3v.
- for SPI protocol there is MISO, MOSI, SCK, and SS pin which is pin 12, pin 11, pin 13 and pin 10 respectively.
- for I2C protocol there are SCL and SDA pins above the pin 13 & Vref.
- serial communication by the pin Rx & Tx Which are given at pin 1 & pin 2.
- There are also some PWM pins on the board you can see all the detail in the given diagram.
There is a 5v regulator which helps to convert the high voltage to the 5v. so that the. 5 volt only goes to. the main controller and other components.
there is a dc port you can see in the arduino. where we can connect the dc voltage from 5v to 12 voltage. if there is more than 12 voltage. the regulator ic inside the arduino board will conveer the voltage to 5v. this will save our Arduino.
There is one more 3.3 volt regulator ic. which convert the 5v to 3.3 voltage. this is for a external pin given by the arduino. on this pin arduino gives 3.3 v. there is many sensors available which only can works on 3.3 voltage for example OLED display and RFID module. both only can works on the 3.3 volt so, it can help a lot.
There is Vin pin given at the arduino power port nearly gnd. this is given to provide vin to the Arduino if you don’t have dc pin for dc port you can given power to the arduino by using this Vin pin. but always make sure voltage not more than the 5v. because across the Vin there is no regulator ic or any to protect the Arduino.
Direct given power more than 5v may cause damage to the microcontroller and other internal articitectiure.
What are Arduino Uno pin descriptions?
| Pin Category | Pin Name | Detail |
| Power | Vin, 3.3v, 5v, Gnd | Vin: Input voltage to Arduino when given external Voltage 5v: 5v pin of Arduino from where you can connect sensors 3.3v : 3.3v given by the Arduino using regulator Ic Gnd : Ground Pin |
| Reset | Reset Pin | To Reset thee microcomntroller |
| Analog Pin | A0,A1,A2,A3,A4,A5,A6 | to receive the analog Data |
| Input/ Output pins | 0-13 | 0-13 digital input output pins |
| Serial | Rx, Tx | to start the serial communication using UART |
| External Interrupt | 2,3 | To interrupt the main program |
| PWM | 3,5,6,9,11 | pulse width modulated pins for variable output |
| SPI | 10,11,12,13 | for SPI communication protocol |
| Inbuild LED | 13 | to indicate and check the program |
| TWI | A4(SDA , A5(SCL) | for I2C communication |
| AREF | for reference voltage |
Arduino UNO hardware specification
| Microcontroller | ATmega328P – 8 bit AVR Family Microcontroller |
| Operating Voltage | 5V |
| input voltage limit | 7.12V |
| analog input pins | 6-20V |
| recommended input voltage | 6(A0-A5) |
| digital I/O pins | 14 (0-13) |
| DC current on I/O pins | 40 mA |
| DC Current on 3.3v pin | 50 mA |
| Flash Memory | 32 kb |
| SRAM | 2 KB |
| EEPROM | 1 KB |
| Frequency | 16 MHz |
Basic Required Hardware for Arduino Uno:-
We need
- A PC or laptop to program the Arduino board.
- USB A TO B cable.
- Bread Board
- jumper wire
- Some LED’S
- Potentiometer
- LCD
- Resistor
these can complete the Arduino Basics.
What is an Arduino? Video brief.
What is the Required Software for Arduino Uno
Here is one platform to Program the Arduino That is Arduino IDE (Integrated Development Environment). You can download this software from the given link. In our next article, we will learn how to use this software with the Arduino board.
you can also program by the Mobile phone android app is available on the Play store but we recommend to use pc and Arduino IDE.
Click here to download the Arduino IDE