
RFID Arduino gate security
Hey Guys, welcome to the Techatronic. in this article, we are going to make am RFID Arduino gate security system. Basically, this project is for Parking and toll purposes. you don’t have have to buy the token now. you can pass the gate simply by tap the RFID card on the card reader. nowadays this technology used in the Metro gate and the parking gate. when you tap the Tag or card at the reader then the gate will be open for some time. so, using the same method we made a project as you can see at the given image. you can use this lock at your home also. put the RFID card at the door and use a solenoid lock there then. whenever you will tap the tag on the reader the gate will be open. we also made a video on this project. so, if you want to make this project or you want to learn this project we would like to refer you on the youtube video page which is given at the last of this post we also made a Fingerprint door security lock with the Arduino check it once for the reference.

How does it work?
So when we talk about the working of this project there are two things which are the major part of this project. One is the Arduino and another is RFID RC522 card reader and Tag. it is simple, when we tap the tag at the Reader then our lock will be open. what process goes inside the system we will talk about it in this paragraph.
RFID rc522 is a radio frequency-based module in which having the sensing range is near about 5 cm. because there is two thing transfer from one module to another module. The reader is connected to the power supply and it provides the power to the tag also by the mutual induction method. it means when the tag reaches in the range of the coil of reader then voltage induced in the tag for a moment. at this moment the tag aslo transfers the information inside the chip via Radiofrequency. when we take the tag near to the reader the voltage and current induce in the tag and that instant the tag transfer the information via Radiofrequency that’s why we called it RFID that stand for Radio frequency identification method.
We interface the RFID module with the Arduno and make a program for it. first, we have to extract the tag value by tapping it to the the reader. when we tap the tag to the reader get a value from the tag and we use this value into the database. according to this database the lock will open or close. for example we tap the tag to the reader and the reader gets value 12345. then we use this value in the Arduino code and make a condition there. if the value is same as the code value then the gate will be open. if the tag value is not the same as the database or code value the gate will not be open.
Download MFRC library
the above-given library needed for coding. download it and install it to you Arduino IDE
Components Required
| Arduino UNO | BUY LINK |
| Servo motor | BUY LINK |
| Buzzer | BUY LINK |
| Jumper wires | BUY LINK |
| Breadboard | BUY LINK |
| RC522 RFID module | BUY LINK |
| 220-ohm resistors and a 10K potentiometer | BUY LINK |
| USB cable for uploading the code | BUY LINK |
| Power supply | BUY LINK |
You Can Buy All Components To Together – BUY LINK
Buy full compoenents kit here. – Buy Now
RFID Arduino security lock Circuit diagram:-
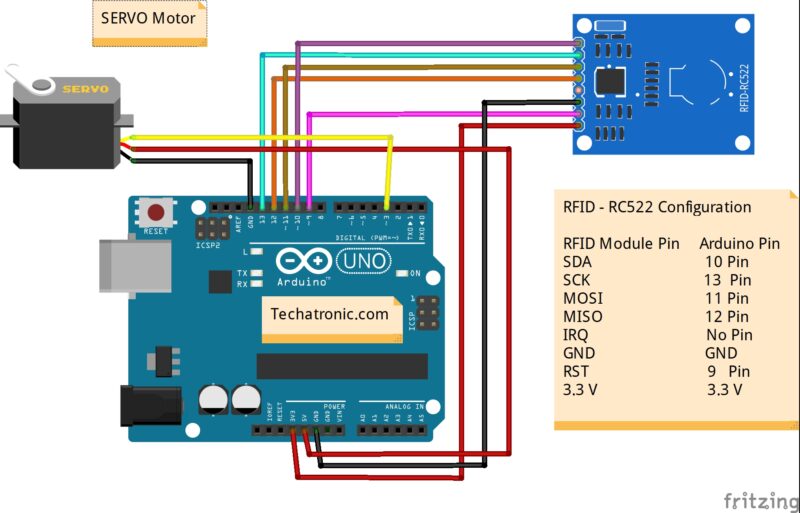

| Arduino UNO | RFID – RC522 Module |
| 10 Pin | SDA Pin |
| 13 Pin | SCK Pin |
| 11 Pin | MOSI Pin |
| 12 Pin | MISO Pin |
| No Pin | IRQ Pin |
| GND | GND |
| 9 Pin | RST Pin |
| 3.3 V | 3.3 V |
| Arduino UNO | Servo Motor |
| D3 Pin | OUT Pin ( Orange Colour ) |
| ( +5V ) VCC | VCC ( Red Colour ) |
| GND ( Ground ) | GND ( Black Colour ) |
Now we are also sharing the code of this project:-
#include "SPI.h"
#include "MFRC522.h"
#include
#define SS_PIN 10
#define RST_PIN 9
#include
int m=0,n=0;
Servo myservo;
int pos = 0;
MFRC522 rfid(SS_PIN, RST_PIN);

MFRC522::MIFARE_Key key;
const int rs = 0, en = 6, d4 = 5, d5 = 4, d6 = 2, d7 = 1;
LiquidCrystal lcd(rs, en, d4, d5, d6, d7);
void setup() {
  Serial.begin(9600);
  SPI.begin();
  rfid.PCD_Init();
  pinMode(A0, OUTPUT);
  pinMode(A1, OUTPUT);
  pinMode(A2, INPUT_PULLUP);
  pinMode(A3, INPUT_PULLUP);

  lcd.begin(16, 2);
  myservo.attach(3);
}

void loop() {


m= analogRead(A3);
n= analogRead(A2);
int val_1= map(m, 250 , 850 , 0 , 100);
int val_2= map(n, 250, 850, 0, 100);

  if (!rfid.PICC_IsNewCardPresent() || !rfid.PICC_ReadCardSerial())
    return;

  // Serial.print(F("PICC type: "));
  MFRC522::PICC_Type piccType = rfid.PICC_GetType(rfid.uid.sak);
  // Serial.println(rfid.PICC_GetTypeName(piccType));

  // Check is the PICC of Classic MIFARE type
  if (piccType != MFRC522::PICC_TYPE_MIFARE_MINI &&
    piccType != MFRC522::PICC_TYPE_MIFARE_1K &&
    piccType != MFRC522::PICC_TYPE_MIFARE_4K) {
    Serial.println(F("Your tag is not of type MIFARE Classic."));
    return;
  }

  String strID = "";
  for (byte i = 0; i < 4; i++) {
    strID +=
    (rfid.uid.uidByte[i] < 0x10 ? "0" : "") + String(rfid.uid.uidByte[i], HEX) + (i!=3 ? ":" : ""); } strID.toUpperCase(); Serial.print("Tap card key: "); Serial.println(strID); if(strID.indexOf("1A:28:54:73")>=0)

{
  Serial.println("card accepted");
  digitalWrite(A0, HIGH);
  lcd.setCursor(0, 1);
  lcd.print("Speed Limit= ");
  lcd.print(val_2);
  delay(1000);
  lcd.clear();
  digitalWrite(A0, LOW);

     myservo.write(0);
    myservo.write(90);              // tell servo to go to position in variable 'pos'
    delay(15);
    delay(2000);// waits 15ms for the servo to reach the position

    myservo.write(0);              // tell servo to go to position in variable 'pos'
    delay(15);                       // waits 15ms for the servo to reach the position


  }
else

{
  digitalWrite(A0, LOW);
  }

if(strID.indexOf("1A:28:54:73")>=0)

{
  Serial.println("Token Accepted");
  digitalWrite(A1, HIGH);
  lcd.setCursor(0, 1);
  lcd.print("Speed Limit= ");
  lcd.print(val_1);
  delay(1000);
  lcd.clear();
  digitalWrite(A1, LOW);


  }
else

{
  digitalWrite(A1, LOW);
  }


  rfid.PICC_HaltA();
  rfid.PCD_StopCrypto1();
}
Watch this video for full explanation:-