
Table of Contents
Introduction
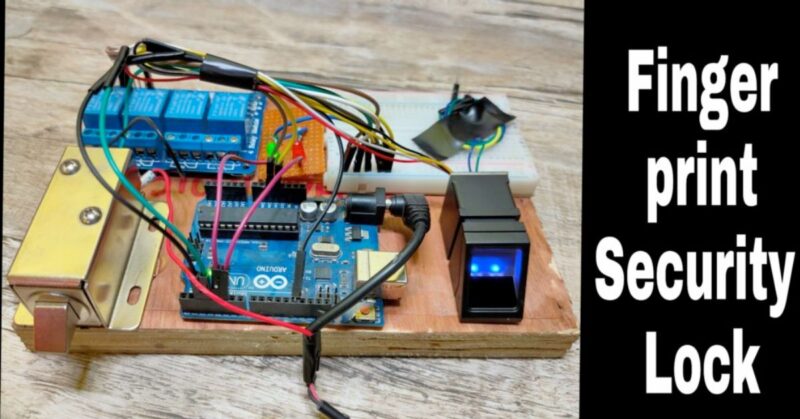
Welcome to the Techatronic Guys, In this article, we are going to make an Arduino Fingerprint door lock to control the Gate lock. this is trending nowadays,
This is the most trustable biometric nowadays. and widely used incorporate as well as the personals. for example, this uses as the attendance system in many offices.
there are many other applications like Fingerprint door locks project which I have made in this project and I am gonna share all the requirements in this project. so read the full article to learn how to make a fingerprint Arduino security lock.
if you go to the market for the fingerprint lock it is near $135 but by this method of Arduino, you can make this lock-in just $20. it is cheap and you can use it in your home as well as your office also.
A preview image of obstacle-avoiding robot can be different from your own.
Automatic door lock Fingerprint door lock working?
Arduino-based fingerprint project lock working is very simple and easy.
- The fingerprint sensor is interfaced with the Arduino Uno
- first, we have to enroll the fingerprint to the fingerprint sensor and saved our fingerprint sensor.
- it can save 137 fingerprints if we talk about the R307 scanner.
- it saves your fingerprint data into the inbuilt memory. and we use this data in our database.
- then we compare this saved file with every finger scanned on the scanner.
for example, in this fingerprint project, if I save my finger into the database then the system will compare every single fingerprint with mine. and if it gets the same fingerprint then it will send the command to open the lock otherwise the lock will remain close.
fingerprint sensor working in Fingerprint project
- fingerprint sensor captures the image of the fingerprint and makes the pattern inside the memory of the fingerprint how the Fingerprint project works.
- the shape of the pattern will break into the binary code and then save into the memory of the fingerprint.
- for each and every fingerprint it will save the different patterns according to the fingerprint because as we know we all have different fingerprints even in our hand each fingerprint having its own unique fingerprint.
- it will never match the other finger and according to the research,
- the accuracy of the fingerprint is near about 98% which is good enough to secure any system.
The Fingerprint door lock, as its name infers, is an electronic entryway lock that might be introduced on any passageway in your home. and it may be a good idea in the electronic projects for ece.
It utilizes a unique mark scanner by instructing the electric entryway strike to give individual access.
Also, I had an approach to bolt my entryway all things considered thus that I thought an electric entryway lock is an incredible chance to over-engineer something and become familiar with a couple of cool stuff.
This blog will be sufficiently straightforward to look at so you could get the hang of something and have a device to keep out gatecrashers and to help you to learn this Arduino based fingerprint project.
Arduino Project having a metal detector Arduino based also uploaded you must check it
Fingerprint door lock Components Table
You can buy the whole components from the given link we have to share the amazon link. from where you can get a good discount on the components.
| S.No | Component Name | Quantity | Link |
| 1. | Arduino UNO & Cable | 1 | BUY LINK |
| 2. | Adafruit r307 fingerprint sensor | 1 | BUY LINK |
| 3. | 12 Volt Solenoid | 1 | BUY LINK |
| 4. | 5 Volt Single Cannel Relay | 1 | BUY LINK |
| 5. | 12 Volt Adaptor | 1 | BUY LINK |
| 6. | LED | 2 | BUY LINK |
| 7. | 220 Ohm Resistor | 2 | BUY LINK |
| 8. | Breadboard | 1 | BUY LINK |
| 9. | Jumper Wire | 40 | BUY LINK |
You Can Buy All Components To Together –BUY LINK
Library to be installed in Arduino IDE- Download
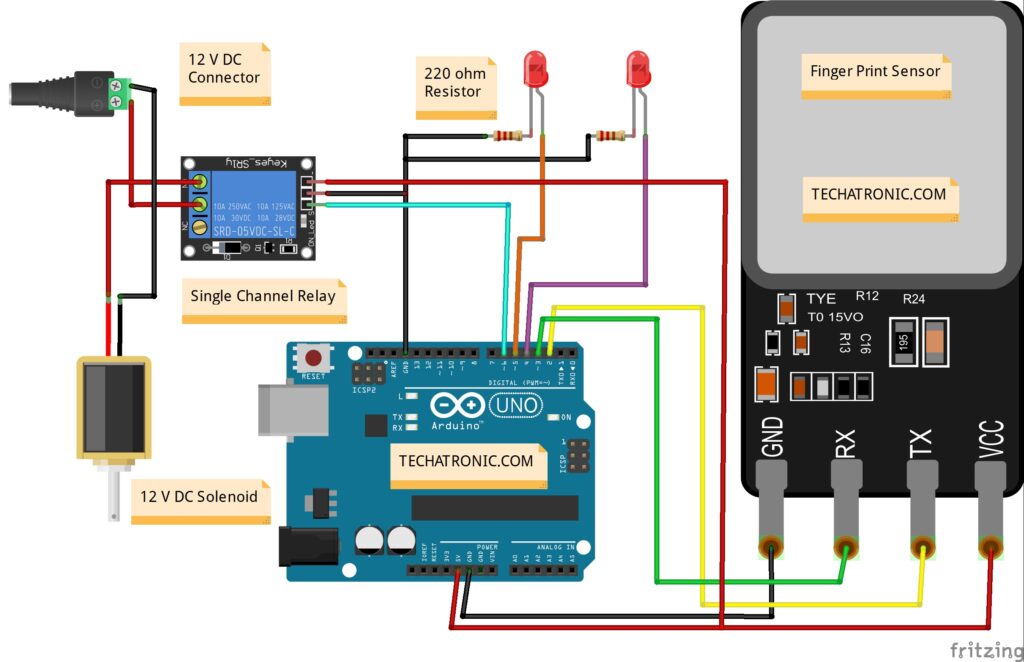
Circuit Diagram for Arduino Fingerprint door lock
As you can see the solenoid lock is connected to the power supply and the relay interfaced with the Arduino.and fingerprint sensor has been connected to the arduino via the rx and tx wire.
Fingerprint door lock Project Arduino Code
Fingerprint Enroll Code:-
// TECHATRONIC.COM

#include <Adafruit_Fingerprint.h>

// On Leonardo/Micro or others with hardware serial, use those! #0 is green wire, #1 is white
// uncomment this line:
// #define mySerial Serial1

// For UNO and others without hardware serial, we must use software serial...
// pin #2 is IN from sensor (GREEN wire)
// pin #3 is OUT from arduino (WHITE wire)
// comment these two lines if using hardware serial
SoftwareSerial mySerial(2, 3);

Adafruit_Fingerprint finger = Adafruit_Fingerprint(&mySerial);

uint8_t id;

void setup()
{
Serial.begin(9600);
while (!Serial); // For Yun/Leo/Micro/Zero/...
delay(100);
Serial.println("\n\nAdafruit Fingerprint sensor enrollment");

// set the data rate for the sensor serial port
finger.begin(57600);

if (finger.verifyPassword()) {
Serial.println("Found fingerprint sensor!");
} else {
Serial.println("Did not find fingerprint sensor :(");
while (1) { delay(1); }
}
}

uint8_t readnumber(void) {
uint8_t num = 0;

while (num == 0) {
while (! Serial.available());
num = Serial.parseInt();
}
return num;
}

void loop() // run over and over again
{
Serial.println("Ready to enroll a fingerprint!");
Serial.println("Please type in the ID # (from 1 to 127) you want to save this finger as...");
id = readnumber();
if (id == 0) {// ID #0 not allowed, try again!
return;
}
Serial.print("Enrolling ID #");
Serial.println(id);

while (! getFingerprintEnroll() );
}

uint8_t getFingerprintEnroll() {

int p = -1;
Serial.print("Waiting for valid finger to enroll as #"); Serial.println(id);
while (p != FINGERPRINT_OK) {
p = finger.getImage();
switch (p) {
case FINGERPRINT_OK:
Serial.println("Image taken");
break;
case FINGERPRINT_NOFINGER:
Serial.println(".");
break;
case FINGERPRINT_PACKETRECIEVEERR:
Serial.println("Communication error");
break;
case FINGERPRINT_IMAGEFAIL:
Serial.println("Imaging error");
break;
default:
Serial.println("Unknown error");
break;
}
}

// OK success!

p = finger.image2Tz(1);
switch (p) {
case FINGERPRINT_OK:
Serial.println("Image converted");
break;
case FINGERPRINT_IMAGEMESS:
Serial.println("Image too messy");
return p;
case FINGERPRINT_PACKETRECIEVEERR:
Serial.println("Communication error");
return p;
case FINGERPRINT_FEATUREFAIL:
Serial.println("Could not find fingerprint features");
return p;
case FINGERPRINT_INVALIDIMAGE:
Serial.println("Could not find fingerprint features");
return p;
default:
Serial.println("Unknown error");
return p;
}

Serial.println("Remove finger");
delay(2000);
p = 0;
while (p != FINGERPRINT_NOFINGER) {
p = finger.getImage();
}
Serial.print("ID "); Serial.println(id);
p = -1;
Serial.println("Place same finger again");
while (p != FINGERPRINT_OK) {
p = finger.getImage();
switch (p) {
case FINGERPRINT_OK:
Serial.println("Image taken");
break;
case FINGERPRINT_NOFINGER:
Serial.print(".");
break;
case FINGERPRINT_PACKETRECIEVEERR:
Serial.println("Communication error");
break;
case FINGERPRINT_IMAGEFAIL:
Serial.println("Imaging error");
break;
default:
Serial.println("Unknown error");
break;
}
}

// OK success!

p = finger.image2Tz(2);
switch (p) {
case FINGERPRINT_OK:
Serial.println("Image converted");
break;
case FINGERPRINT_IMAGEMESS:
Serial.println("Image too messy");
return p;
case FINGERPRINT_PACKETRECIEVEERR:
Serial.println("Communication error");
return p;
case FINGERPRINT_FEATUREFAIL:
Serial.println("Could not find fingerprint features");
return p;
case FINGERPRINT_INVALIDIMAGE:
Serial.println("Could not find fingerprint features");
return p;
default:
Serial.println("Unknown error");
return p;
}

// OK converted!
Serial.print("Creating model for #"); Serial.println(id);

p = finger.createModel();
if (p == FINGERPRINT_OK) {
Serial.println("Prints matched!");
} else if (p == FINGERPRINT_PACKETRECIEVEERR) {
Serial.println("Communication error");
return p;
} else if (p == FINGERPRINT_ENROLLMISMATCH) {
Serial.println("Fingerprints did not match");
return p;
} else {
Serial.println("Unknown error");
return p;
}

Serial.print("ID "); Serial.println(id);
p = finger.storeModel(id);
if (p == FINGERPRINT_OK) {
Serial.println("Stored!");
} else if (p == FINGERPRINT_PACKETRECIEVEERR) {
Serial.println("Communication error");
return p;
} else if (p == FINGERPRINT_BADLOCATION) {
Serial.println("Could not store in that location");
return p;
} else if (p == FINGERPRINT_FLASHERR) {
Serial.println("Error writing to flash");
return p;
} else {
Serial.println("Unknown error");
return p;
}
}
Fingerprint Verify Code:-
/***************************************************
This is an example sketch for our optical Fingerprint sensor

Designed specifically to work with the Adafruit BMP085 Breakout
----> http://www.adafruit.com/products/751

These displays use TTL Serial to communicate, 2 pins are required to
interface
Adafruit invests time and resources providing this open source code,
please support Adafruit and open-source hardware by purchasing
products from Adafruit!

Written by Limor Fried/Ladyada for Adafruit Industries.
BSD license, all text above must be included in any redistribution
****************************************************/

#include <Adafruit_Fingerprint.h>

// On Leonardo/Micro or others with hardware serial, use those! #0 is green wire, #1 is white
// uncomment this line:
// #define mySerial Serial1

// For UNO and others without hardware serial, we must use software serial...
// pin #2 is IN from sensor (GREEN wire)
// pin #3 is OUT from arduino (WHITE wire)
// comment these two lines if using hardware serial
SoftwareSerial mySerial(2, 3);

Adafruit_Fingerprint finger = Adafruit_Fingerprint(&mySerial);

void setup()
{

pinMode(4, OUTPUT);
pinMode(5, OUTPUT);
pinMode(13, OUTPUT);
digitalWrite(13, HIGH);
digitalWrite(4, HIGH);
Serial.begin(9600);
while (!Serial); // For Yun/Leo/Micro/Zero/...
delay(100);
Serial.println("\n\nAdafruit finger detect test");

// set the data rate for the sensor serial port
finger.begin(57600);
delay(5);
if (finger.verifyPassword()) {
Serial.println("Found fingerprint sensor!");
} else {
Serial.println("Did not find fingerprint sensor :(");
while (1) { delay(1); }
}

finger.getTemplateCount();
Serial.print("Sensor contains "); Serial.print(finger.templateCount); Serial.println(" templates");
Serial.println("Waiting for valid finger...");
}

void loop() // run over and over again
{
getFingerprintIDez();
delay(50); //don't ned to run this at full speed.
}

uint8_t getFingerprintID() {
uint8_t p = finger.getImage();
switch (p) {
case FINGERPRINT_OK:
Serial.println("Image taken");
break;
case FINGERPRINT_NOFINGER:
Serial.println("No finger detected");
return p;
case FINGERPRINT_PACKETRECIEVEERR:
Serial.println("Communication error");
return p;
case FINGERPRINT_IMAGEFAIL:
Serial.println("Imaging error");
return p;
default:
Serial.println("Unknown error");
return p;
}

// OK success!

p = finger.image2Tz();
switch (p) {
case FINGERPRINT_OK:
Serial.println("Image converted");
break;
case FINGERPRINT_IMAGEMESS:
Serial.println("Image too messy");
return p;
case FINGERPRINT_PACKETRECIEVEERR:
Serial.println("Communication error");
return p;
case FINGERPRINT_FEATUREFAIL:
Serial.println("Could not find fingerprint features");
return p;
case FINGERPRINT_INVALIDIMAGE:
Serial.println("Could not find fingerprint features");
return p;
default:
Serial.println("Unknown error");
return p;
}

// OK converted!
p = finger.fingerFastSearch();
if (p == FINGERPRINT_OK) {
Serial.println("Found a print match!");
} else if (p == FINGERPRINT_PACKETRECIEVEERR) {
Serial.println("Communication error");
return p;
} else if (p == FINGERPRINT_NOTFOUND) {
Serial.println("Did not find a match");
return p;
} else {
Serial.println("Unknown error");
return p;
}

// found a match!
Serial.print("Found ID #"); Serial.print(finger.fingerID);
Serial.print(" with confidence of "); Serial.println(finger.confidence);

return finger.fingerID;
}

// returns -1 if failed, otherwise returns ID #
int getFingerprintIDez() {
uint8_t p = finger.getImage();
if (p != FINGERPRINT_OK) return -1;

p = finger.image2Tz();
if (p != FINGERPRINT_OK) return -1;

p = finger.fingerFastSearch();
if (p != FINGERPRINT_OK) return -1;

if( finger.fingerID==5 )

{
digitalWrite(13, LOW);
digitalWrite(5, HIGH);
delay(2000);
digitalWrite(13, HIGH);
digitalWrite(5, LOW);
}

// found a match!
Serial.print("Found ID #"); Serial.print(finger.fingerID);
Serial.print(" with confidence of "); Serial.println(finger.confidence);
return finger.fingerID;
}
Do you know how to upload the code into the Arduino. in this fingerprint project we need to upload 2 time. If you don’t have any idea how to upload the code you can visit the given link
Video Sample
Arduino-based fingerprint project is very easy and simple to make. and we have share all the content here. still if you found any difficulties you can as us in the comment section.
R307 fingerprint sensor is very tough to use there is multiple wire in the sensor which need to be correctly connected to the Arduino. this sensor communicates with the Arduino by serial communication. and uses rx and tx wires for communication and data transfer. This is the best Fingerprint project for door lock and security.
fingerprint security is most accurate biometric security. hence, you can use this security at your home too.
Advantage of Fingerprint project
Fingerprint sensors are the most accurate and secure biometric so you can use this fingerprint project anywhere. still we can see these kind of security in our mobile phone.
It not possible to replicate the fingerprint or break the security
The interfacing is very easy with controller like Arduino
we can store 190+ fingerprint in a single fingerprint sensor without the external memory
They are very fast and secure as we discuss above
The l