
Welcome to the Techatronic guys, So in this project, we will make an
Obstacle avoiding robot using Arduino and kit. do you know about the obstacle-avoiding robot? well, I am gonna explain to you what does it is and how does it work. So, Basically we made this project for study purpose and you can use this in your any other project. like you need to carry some material from one point to another point.
So, if you want to learn and make this project you need to read full article. we are sharing all the detail here like code circuit and step by step instructions.
Table of Contents
Introduction
it is a robot that walks automatically with the help of an ultrasonic sensor. an ultrasonic sensor is used in many other mini-projects like Smart robots.
obstacle avoiding robot also known as the autonomous robot.
which takes the decision self. if there is something in front of the robot it will change
its path like a human.
so’ it is somewhere smart. it is the most popular project nowadays which is searched by most of the students nowadays. and everyone likes this robot.
in this project, you will also learn many things like how to use the ultrasonic sensor. and using the serial monitor also. we will discuss the code also.
How does it work? / Working
In Obstacle avoiding robot,
there is a sensor that is known as the ultrasonic sensor. which has the capability to measure the distance in front of the sensor.
in the below paragraph we will know how does the sensor work. this obstacle-avoiding robot using Arduino Uno works as a distance measurer.
- An ultrasonic sensor has two parts one is a transmitter and another is the receiver that is known as a trigger and echoes.
- the trigger is the transmitter part and transmits the ultrasonic wave.
- another part that is receiver an echo receive that transmitter ultrasonic waves transmitted from the trigger.
- now we calculate that in how much time the ultrasonic waves return back to the receiver and divide by 2 because the time travel is double.
we can make many other mini projects for ece with this useful sensor.
When you turn on the robot then the ultrasonic sensor start sensing continously. as we mention in above paragraph. ultrasonic sensor use ultrasound waves which transmit continously. so if any thing comes in front of the sensor the the sound waves are interruped. and comes back to the ultrasonic sensor. ultrasonic sensor have echo which detect the soundwave.
now from the formula of speed and time we can clculate the distance from the ultrasonic sensor and according to this distance we made the instructions. for movement of the robot.

we calculate the distance by the time and speed formula
distance = time X speed
of the ultrasonic wave = 340 m/s

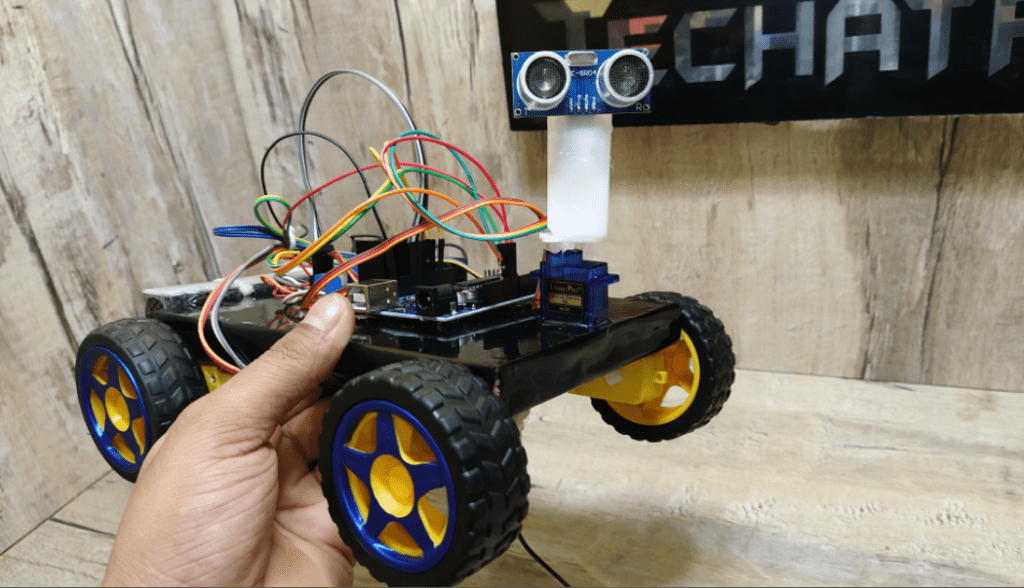
Components Required for obstacle avoiding robot
- Arduino NANO or Uno (any version) –BUY LINK
- HC-SR04 Ultrasonic Sensor –BUY LINK
- L298N Motor Driver Module –BUY LINK
- 5V DC Motors –BUY LINK
- Battery –BUY LINK
- Wheels –BUY LINK
- Chassis –BUY LINK
- Jumper Wires –BUY LINK

You Can Buy All Components To Together –BUY LINK
this is a special Obstacle avoiding robot using Arduino to detect the distance here and there also.
the ultrasonic sensor is connected to the servo which rotates if there is any obstacle found in the path of the robot-like human. when we cross the road.
the robot walks straight and if it found any obstacle in the path it rotates its neck and compares the distance from the right and left then according to the distance it takes the decision.
for example,
it detects any obstacle in the path then it will stop and check right and left where is the maximum distance. so it will turn the right or left according to the maximum distance.
If you want to add a metal detector to this project that makes it a big project so you can learn about how to make a metal detector
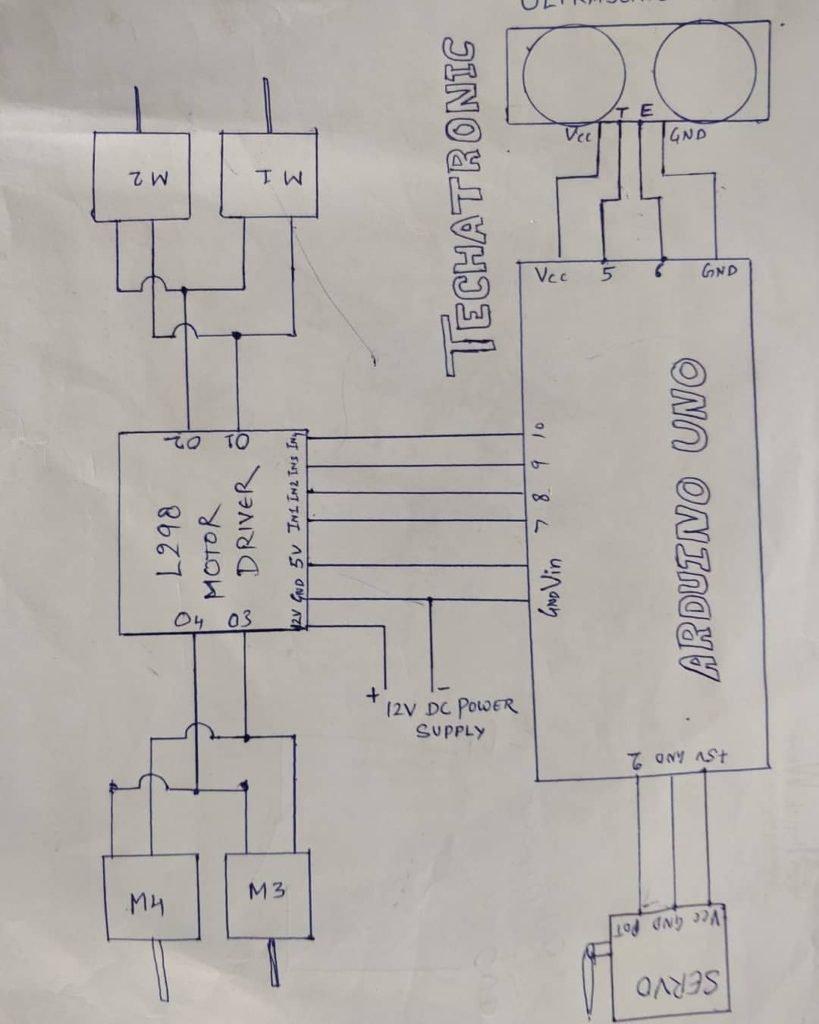
Obstacle avoiding robot circuit diagram
Fritzing Diagram
Fritzing-based diagrams help you make more clear connections still if you are stuck anywhere you can ask in the comment section.
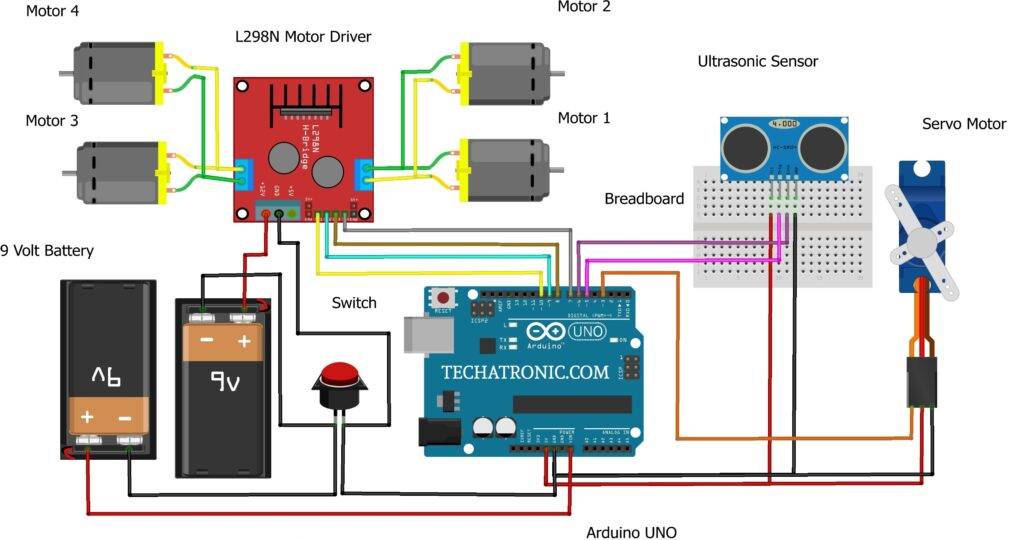
Connection Table
| Arduino UNO | Servo Motor | |
| PIN 3 | Signal Pin Orange Wire | |
| VCC | VCC Red Wire | |
| GND | GND Black Wire | |
| Arduino UNO | Ultrasonic Sensor | |
| VCC | VCC | |
| PIN 5 | Trig | |
| PIN 6 | Echo | |
| GND | GND | |
| Arduino UNO | L293d Motor Driver | |
| PIN 7 | IN 1 | |
| PIN 8 | IN 2 | |
| PIN 9 | IN 3 | |
| PIN 10 | IN 4 | |
| Arduino UNO | 9 Volt Battery | Switch |
| VIN PIN | + Positive | |
| GND | Terminal 1 | |
| GND | Terminal 2 | |
| L293d Motor Driver | 9 Volt Battery | Switch |
| +12 V PIN | + Positive | |
| GND | Terminal 1 | |
| GND | Terminal 2 |
Obstacle avoiding robot code:-
int duration=0;
long distance=0;
int firstduration=0;
long firstdistance=0;
int secondduration=0;
long seconddistance=0;

#include <Servo.h>
Servo myservo;

int pos = 0;

void setup() {
pinMode(5,OUTPUT);
pinMode(6,INPUT);
pinMode(7, OUTPUT);
pinMode(8, OUTPUT);
pinMode(9, OUTPUT);
pinMode(10, OUTPUT);
 myservo.attach(3);
Serial.begin(9600);
}
void loop()
 {
   digitalWrite(5, HIGH);
   delayMicroseconds(10);
   digitalWrite(5, LOW);
   delayMicroseconds(2);
   duration= pulseIn(6,HIGH);
   delay(100);
   distance=duration*0.034/2;
   Serial.println(distance);
   if(distance<=20)
    {
      digitalWrite(7, LOW);
      digitalWrite(8, LOW);
      digitalWrite(9, LOW);
      digitalWrite(10, LOW);
      delay(300);

      digitalWrite(7, LOW);
      digitalWrite(8, HIGH);
      digitalWrite(9, LOW);
      digitalWrite(10, HIGH);

      delay(350);
      digitalWrite(7, LOW);
      digitalWrite(8, LOW);
      digitalWrite(9, LOW);
      digitalWrite(10, LOW);

      myservo.write(0);
      delay(500);
      digitalWrite(5, HIGH);
      delayMicroseconds(10);
      digitalWrite(5, LOW);
      delayMicroseconds(2);
      firstduration= pulseIn(6,HIGH);
      delay(100);
      firstdistance=firstduration*0.034/2;
      int first = firstdistance;
      Serial.println(firstdistance);

      myservo.write(90);
      delay(500);

      myservo.write(180);
      delay(500);
      digitalWrite(5, HIGH);
      delayMicroseconds(10);
      digitalWrite(5, LOW);
      delayMicroseconds(2);
      secondduration= pulseIn(6,HIGH);
      delay(100);
      seconddistance=secondduration*0.034/2;
      int second = seconddistance;

      Serial.println(seconddistance);

      myservo.write(90);
      delay(500);

if(first < second ) { digitalWrite(7, LOW); digitalWrite(8, HIGH); digitalWrite(9, HIGH); digitalWrite(10, LOW); delay(500); } else if(first >   second  )


{

    digitalWrite(7, HIGH);
    digitalWrite(8, LOW);
    digitalWrite(9, LOW);
    digitalWrite(10, HIGH);
    delay(500);
  }
}
else
{
    digitalWrite(7, HIGH);
    digitalWrite(8, LOW);
    digitalWrite(9, HIGH);
    digitalWrite(10, LOW);
  }

}
Here we have shared the code and upload the code into the Arduino. we use the Arduino Ide.

We have uploaded 1000+ projects for engineers. you can visit our website homepage to better understand.This Obstacle avoiding robot is very easy to built. only you need some basic knowledge of electronic and coding.Here we are sharing the youtube vide. in this video we show all the step to making so, i would like to suggest you to see the video.