
Welcome to Techatronic Guys! We always strive to bring you innovative inventions and exciting electronic projects that are practical, educational, and fun to build. This time, we are proud to introduce our latest project — a Smart Dustbin. In this tutorial, we will guide you step by step on how to build a Smart Dustbin using Arduino. We will share all the essential details including the complete procedure, source code, and circuit diagram so that you can easily build it yourself at home.
As we all know, the present and future era is driven by technology and automation. Almost everything around us is becoming smarter day by day. From our smartphones to our homes and vehicles, technology is transforming the way we live. Inspired by this rapid advancement, we decided to make a small yet meaningful contribution by creating an automatic dustbin that opens and closes on its own using sensors and a microcontroller.
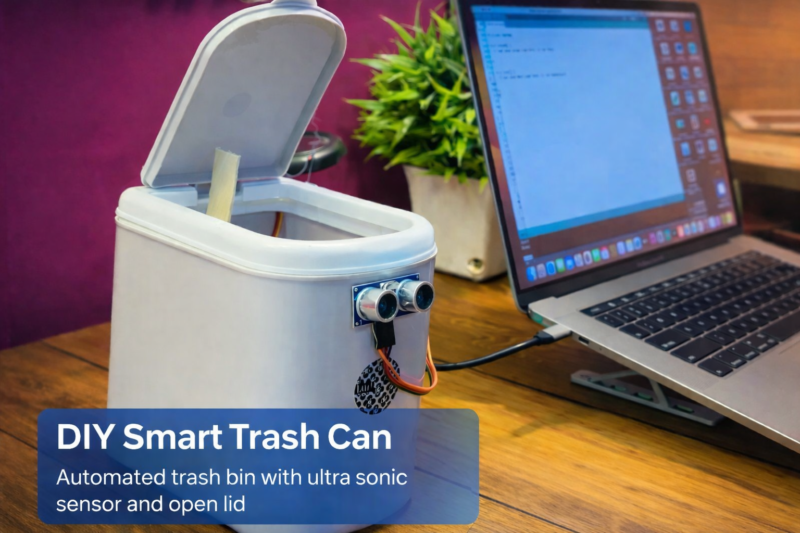
The Smart Dustbin works using an ultrasonic sensor that detects the presence of a hand near the lid. When someone brings their hand close, the lid automatically opens, making it completely touch-free and hygienic. This is especially useful for maintaining cleanliness and preventing the spread of germs. After a few seconds, the lid automatically closes, saving energy and ensuring convenience.
One of the best things about this project is that it is not only useful but also fun, especially for children. Kids get excited when they see the lid open automatically, and it encourages them to throw garbage properly into the dustbin. This helps keep the home clean while also introducing children to the basics of electronics and programming. It can spark curiosity and inspire them to learn more about technology.
In 2026, we have upgraded this project with improved code, better performance, and updated images to make the tutorial even clearer and easier to follow. Now, you have two choices: you can follow our original version or build the updated version with enhanced features.
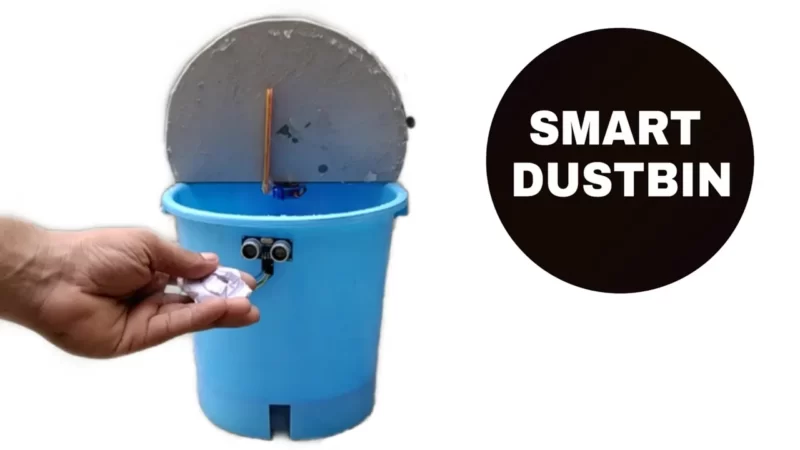
Table of Contents
What is a Smart Dustbin?
The smart dustbin is an automatic lid opener system for garbage. there is a sensor that detects the person in front of the sensor and then the lid of the dustbin will be open. you can make the smart dustbin using Arduino with our old dustbin present in your home.

it is very simple just read the full article which consists of the principle, working, and construction of the smart dustbin with Arduino. there are many other Arduino projects on the main page you can check there.
If you wanna Buy this Project we are selling this smart dustbin project. you can order from the given link.

How does a smart dustbin work?
We are using an ultrasonic sensor that transmits the ultrasonic waves and receives the waves when they come back by hitting any object. so when the person detects in front of the smart dustbin it sends some signal to the Arduino which we are using as a Controller in this project.
so now the Arduino gets the data and analyzes the data for further processing so that the dustbin can operate well.
now, we will explain how the Arduino analyses the data. the ultrasonic sensor sends the received signal to the Arduino and Arduino calculates the distance by the duration of soundwaves come back.
In smart dustbin using Arduino according to the distance, we make some conditions in the code. like if the distance between the person and the dustbin is less than 20 centimeters then the Arduino will send a command to the servo motor to rotate 90 degrees from its initial position which causes the lid to open and after the interval of 10 seconds, the lid well automatically close.
How to create Smart Dustbin using Arduino
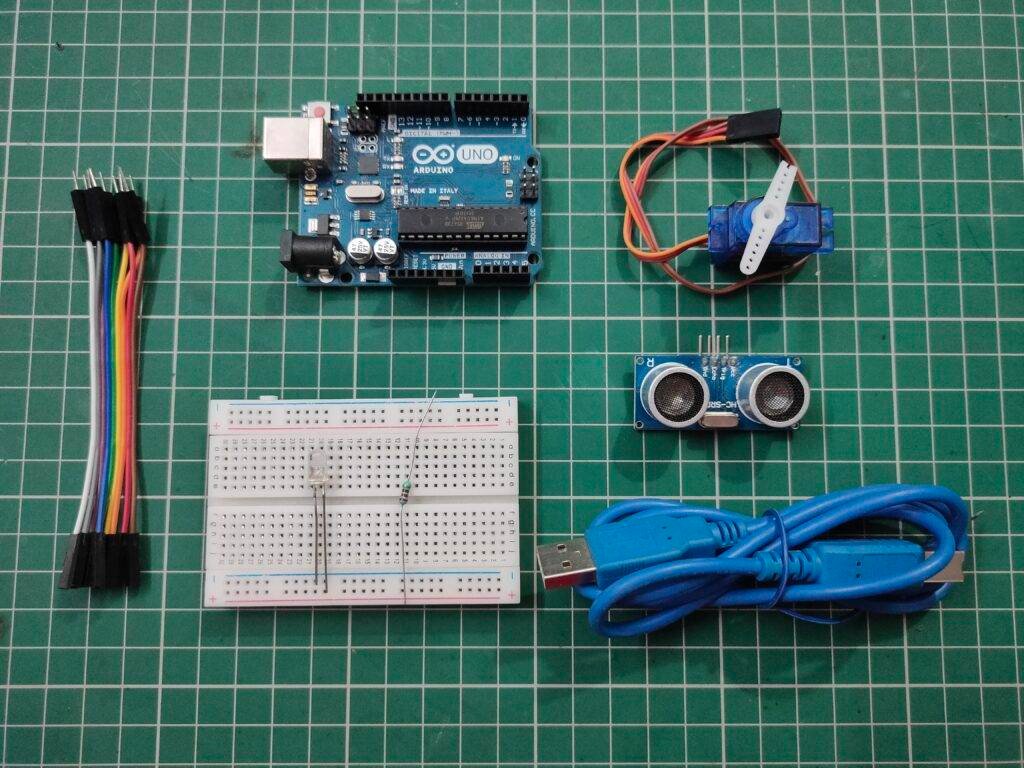
to make this dustbin you need the following components Material:-
Components required Smart dustbin using Arduino:-
| Arduino Uno | Buy Link |
| Servo Motor | Buy Link |
| Jumper wire | Buy Link |
| Breadboard | Buy Link |
| Ultrasonic sensor | Buy Link |
| Battery 9v | BUY LINK |
You Can buy full kit for Smart dustbin components kit
| S.No | Component Required | Quantity |
| 1. | Arduino UNO | 1 |
| 2. | Arduino UNO Cable | 1 |
| 3. | Ultrasonic Sensor | 1 |
| 4. | Servo Motor | 1 |
| 5. | Jumper Wire | 40 |
| 6. | Breadboard | 1 |
| 7. | 9 Volt Battery | 1 |
Material required:-
- Dustbin
- cardboard
- ice- cream stick
- adhesive
- scissor
- Paper cutter
- Cello tape
| S.No | Component Required | Quantity |
| 1. | Dustbin | 1 |
| 2. | Cardboard | 1 |
| 3. | Ice- Cream Stick | 1 |
| 4. | Adhesive | 1 |
| 5. | Scissor | 1 |
| 6. | Paper Cutter | 1 |
| 7. | Cello Tape | 1 |
Smart Dustbin Construction:-
cut the lid of the dustbin and replace the lid with the cardboard lid shape. You can see the whole construction video tutorial in the YouTube video attached to this post. attach the ultrasonic sensor at the front of the dustbin. and connect the servo with an ice cream stick and attach it to the dustbin.
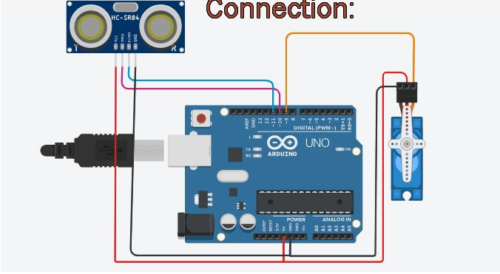
Smart dustbin circuit diagram

| Arduino UNO | Ultrasonic Sensor | |
| ( +5V ) | VCC | |
| GND | GND | |
| D10 Pin | Trig Pin | |
| D11 Pin | Echo Pin | |
| Arduino UNO | Servo Motor | |
| D9 Pin | OUT Pin | |
| ( +5V ) | VCC | |
| GND | GND | |
| Arduino UNO | LED | 220 Ohm Resistor |
| D12 Pin | Anode Pin | |
| Cathode Pin | Terminal 1 | |
| GND | Terminal 2 |
Is the connection according to the circuit diagram?
Connect Arduino 10, and 11 to the ultrasonic trig and echo pin respectively.
Connect Servo motor data pin which is yellow in colour with the Arduino pin 9
Connect LED positive terminal with the Arduino pin 12 via 220 ohm resistor.
Connect All ground from ultrasonic sensor, servo motor and LED to the Arduino Ground pin
if you read this full article and learn how to make a Smart dustbin using Arduino you will definitely learn.in the given code we are using pin number 2 as the output pin which has to be connected to the ultrasonic trigger pin. and this trigger pin transmits the ultrasonic signals now the same signals received by the receiver which is to be connected to the ECHO pin which is pin number 3. it is an input pin because it receives the data and sends it to the Arduino. if you
Smart dustbin Using Arduino Code
 #include <Servo.h>
 Servo myservo;
 int pos = 20;
 const int trigPin = 10;
 const int echoPin = 11;
 const int led = 12;
 long duration;
 float distance;
 void setup()
 {
  myservo.attach(9);
  pinMode(trigPin, OUTPUT);
  pinMode(echoPin, INPUT);
  pinMode(led, OUTPUT);
  myservo.write(pos);
 }
 void loop()
 {
  //Serial.begin(9600);
  digitalWrite(trigPin, LOW);
  delayMicroseconds(2);
  digitalWrite(trigPin, HIGH);
  delayMicroseconds(10);
  digitalWrite(trigPin, LOW);
  duration = pulseIn(echoPin, HIGH);
  distance = 0.034*(duration/2);
  //Serial.println(distance);
  if (distance < 27)
  {
   digitalWrite(led,HIGH);
   myservo.write(pos+160);
   delay(1000);
  }
  else
  {
   digitalWrite(led,LOW);
    myservo.write(pos);
  }
  delay(300);
 }
All the things we have given in the article. still if you have any kind of doubt you can ask in the comment section.
This Arduino code is used to control a Servo Motor and detect distance using an Ultrasonic Sensor (like HC-SR04). When an object comes closer than 27 cm, the servo rotates and the LED turns ON. Otherwise, the servo returns to its original position and the LED stays OFF.
Let’s break it down step by step 👇
1️⃣ Library and Object Creation
#include <Servo.h>
Servo myservo;
#include <Servo.h>→ Includes the Servo library to control a servo motor.Servo myservo;→ Creates a servo object namedmyservo.
2️⃣ Variable Declarations
int pos = 20;
const int trigPin = 10;
const int echoPin = 11;
const int led = 12;
long duration;
float distance;
Explanation:
pos = 20→ Initial servo position (20 degrees).trigPin = 10→ Trigger pin of ultrasonic sensor.echoPin = 11→ Echo pin of ultrasonic sensor.led = 12→ LED connected to pin 12.duration→ Stores time taken for echo signal.distance→ Stores calculated distance in centimeters.
3️⃣ Setup Function
void setup()
{
  myservo.attach(9);
  pinMode(trigPin, OUTPUT);
  pinMode(echoPin, INPUT);
  pinMode(led, OUTPUT);
  myservo.write(pos);
}
What Happens Here?
myservo.attach(9);→ Servo connected to pin 9.trigPin→ Set as OUTPUT.echoPin→ Set as INPUT.led→ Set as OUTPUT.myservo.write(pos);→ Servo moves to initial position (20°).
This runs only once when Arduino starts.
4️⃣ Loop Function (Main Logic)
void loop()
This runs repeatedly.
🔹 Step 1: Send Ultrasonic Pulse
digitalWrite(trigPin, LOW);
delayMicroseconds(2);
digitalWrite(trigPin, HIGH);
delayMicroseconds(10);
digitalWrite(trigPin, LOW);
- First set LOW (clear signal)
- Send HIGH signal for 10 microseconds
- This triggers the ultrasonic sensor to send a sound wave.
🔹 Step 2: Measure Echo Time
duration = pulseIn(echoPin, HIGH);
pulseIn()measures how long the echo pin stays HIGH.- This time equals the round-trip travel time of sound.
🔹 Step 3: Calculate Distance
distance = 0.034*(duration/2);
Explanation:
- Speed of sound = 0.034 cm per microsecond
- Divide by 2 because sound travels:
- From sensor → object
- From object → sensor
So formula is:Distance=Speed×(Time/2)
5️⃣ Condition Check
if (distance < 27)
If object is closer than 27 cm:
digitalWrite(led,HIGH);
myservo.write(pos+160);
delay(1000);
- LED turns ON.
- Servo rotates to:
20 + 160 = 180 degrees - Waits for 1 second.
6️⃣ Else Condition
else
{
  digitalWrite(led,LOW);
  myservo.write(pos);
}
If object is farther than 27 cm:
- LED turns OFF.
- Servo returns to 20 degrees.
7️⃣ Final Delay
delay(300);
Waits 300 ms before repeating the loop.
🔎 Overall Working Summary
| Distance | LED | Servo Position |
|---|---|---|
| < 27 cm | ON | 180° |
| ≥ 27 cm | OFF | 20° |
💡 Real-World Use Cases
- Automatic dustbin lid
- Smart door opener
- Hand sanitizer dispenser
- Object detection system
Upload the code into the Arduino and then make all the connections. all the best
Advantages of smart dustbin
Smart dustbin using Arduino, also known as intelligent or automated waste bins, come with various advantages that can enhance waste management efficiency and contribute to a cleaner environment. Here are some of the advantages of using smart dustbins:
- Hands-Free Operation: Smart dustbins have sensor technology, which allows for hands-free operation. This is especially beneficial in situations where users may not want to touch the dustbin, the smart dustbin promotes hygiene and reduces the spread of germs.
- Promotes Sustainability: By encouraging proper waste disposal practices, smart dustbins contribute to a more sustainable and eco-friendly approach to waste management. This is crucial in promoting a culture of environmental responsibility.
- Educational Value: Smart dustbins can be used in schools and colleges to teach and motivate students towards the invention.
- Aesthetic Appeal: Some smart dustbins are designed with a modern and sleek appearance, contributing to the overall aesthetics of the environment. This can be particularly relevant in public spaces and upscale settings.
This smart dustbin using Arduino uno is very simple and creative. we have shared all the details here. still if you have any problem you can ask us in the comment section or you can visit homepage of your website.
What is a Smart Dustbin using Arduino?
A Smart Dustbin using Arduino is an automatic trash bin that opens its lid when it detects a hand or object nearby. It usually uses an Ultrasonic Sensor, Servo Motor, and an Arduino board to operate without touching the bin, making it hygienic and convenient.
How does a Smart Dustbin work?
The ultrasonic sensor measures the distance between the bin and a hand.
- If the hand comes within a specific range (e.g., 20–30 cm),
- The Arduino processes the signal and rotates the servo motor,
- The servo opens the lid automatically.
After a few seconds, the lid closes again.
Which components are required to build a Smart Dustbin?
Common components include:
- Arduino Uno / Nano
- Ultrasonic Sensor (HC-SR04)
- Servo Motor (SG90 or MG90S)
- Jumper Wires
- Breadboard
- External Power Supply (optional)
- Plastic dustbin
Why is an ultrasonic sensor used in a smart dustbin?
The ultrasonic sensor detects objects without physical contact by sending sound waves and measuring the reflected signal. This makes the dustbin touch-free and more hygienic.
What is the role of the servo motor in a smart dustbin?
The servo motor controls the movement of the dustbin lid. When the Arduino receives a signal from the ultrasonic sensor, it rotates the servo to open or close the lid.
What is the detection range of the ultrasonic sensor?
The HC-SR04 ultrasonic sensor typically detects objects between 2 cm to 400 cm. However, in a smart dustbin project, it is usually set to operate within 15–30 cm for best results.
Can I add a buzzer to a smart dustbin project?
Yes, you can add a buzzer to:
- Alert when the bin is full
- Give a sound when the lid opens
- Provide warning for system errors
Here is the Video sample for projects
Here, we have made a full tutorial video on how to make a smart dustbin and share all the details. if you want to buy the project or need assistance to make the project you can contact us on Instagram. The link is given on our homepage. If you need any customization in the project, we can do this.