

Hello techies, welcome back to Techatronic. In the parking near us, the staff is present to manage the space and the entry-exit of the vehicles. But have you ever wondered what happens when humans are replaced by machines in the parking.
In this article, we are going to make an automatic car parking system project using Arduino UNO. For detecting the movement of vehicles we are using IR sensors and to display the parking status we are using a 16×2 LCD.
Also, do check out the latest projects on Arduino and Raspberry Pi. Make the connections according to the given diagram and upload the code.
automatic car parking system project Working?
There are two parking slots in our project. If you want to increase the number of paring slots then add a few more IR sensors and modify the code accordingly.
The system automatically detects whether the parking slot is empty or not. If the slot is empty in the automated car parking the new vehicles are allowed to enter else the entrance is blocked by the servo barrier in case the parking is full.
The visitors can see the status for the availability of the free space outside the parking on a 16×2 LCD. They can also see on the LCD how many parking slots are free. The data keeps updating as the vehicles move in and out of the parking. Also, check our basic electronics projects on 555 timer ic, Arduino projects, and IoT projects.
Components Required
| Arduino UNO | BUY LINK |
| 2. IR Sensor | BUY LINK |
| Servo motor | BUY LINK |
| Jumper wires | BUY LINK |
| Breadboard | BUY LINK |
| 16×2 LCD | BUY LINK |
| 12C Module | BUY LINK |
| Arduino uno cable | BUY LINK |
You can buy all components together-BUY LINK
automatic car parking Circuit Diagram
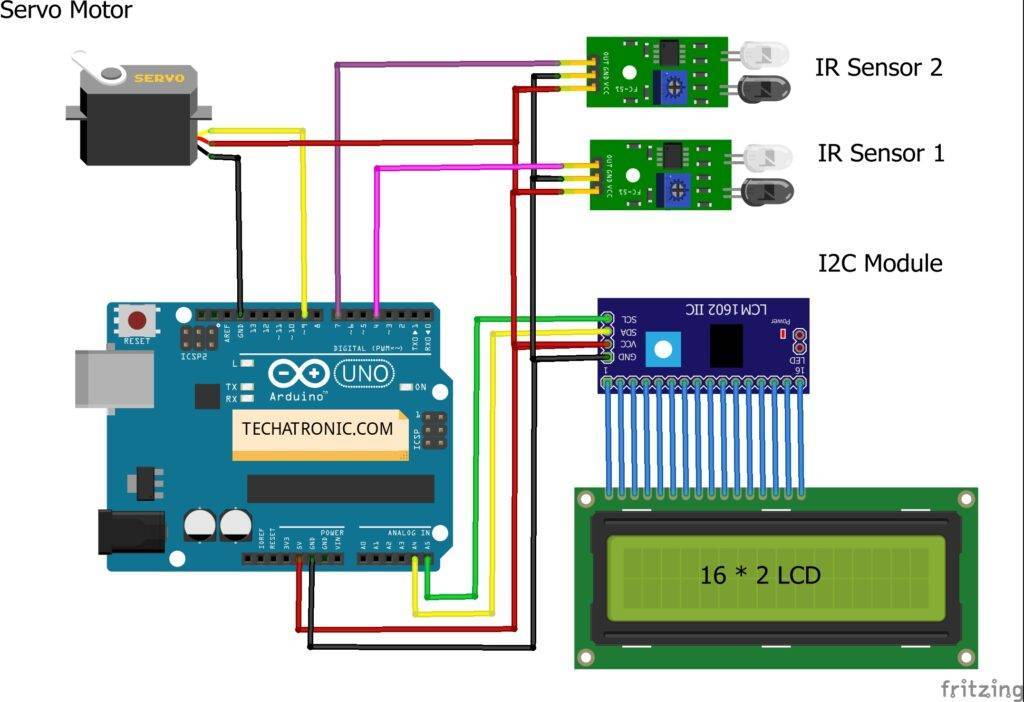
Before starting please check the address of the I2C module that you are using and modify the code accordingly.
Then connect the 5 volts pin of the Arduino with the VCC pin of the I2C module, the red wire of the servo motor, and the VCC pin of both the IR sensors.
Join the SDA pin of the I2C module with the analog-4 pin of the Arduino and the SCL pin of the I2C module with the analog-5 pin of the Arduino in this automatic car parking system project.
Connect the GND pin of the Arduino with the GND pin of the I2C module, the brown wire of the servo motor, and the GND pin of both the IR sensors. Attach the orange(signal) wire of the servo motor to the digital-9 pin of the Arduino.
Now connect the pins of the I2C module with the pins of 16×2 LCD.
You can check here the interfacing of 16×2 LCD with the I2C module. At last, connect the OUT pin of the first IR sensor with the digital-4 pin of the Arduino and the OUT pin of the second IR sensor with the digital-7 pin of the Arduino.
automatic car parking system project Code
NOTE: Please upload this code to Arduino and install <LiquidCrystal_I2C.h> and <Wire.h> libraries before compiling the code. Check here how to add a zip library in Arduino IDE.
// TECHATRONIC.COM
// I2C LIBRARY
//https://github.com/fdebrabander/Arduino-LiquidCrystal-I2C-library
#include <Wire.h>
#include <LiquidCrystal_I2C.h>
LiquidCrystal_I2C lcd(0x27,16,2);
#include <Servo.h>
Servo myservo1;
int IR1 = 4; // IR Sensor 1
int IR2 = 7; // IR Sensor 2
int Slot = 4; //Enter Total number of parking Slots
int flag1 = 0;
int flag2 = 0;
void setup()
{
lcd.init();
lcd.backlight();
pinMode(IR1, INPUT);
pinMode(IR2, INPUT);
myservo1.attach(9);
myservo1.write(100);
lcd.setCursor (0,0);
lcd.print(" ARDUINO ");
lcd.setCursor (0,1);
lcd.print(" PARKING SYSTEM ");
delay (2000);
lcd.clear();
}
void loop(){
if(digitalRead (IR1) == LOW && flag1==0){
if(Slot>0){flag1=1;
if(flag2==0){myservo1.write(0); Slot = Slot-1;}
}else{
lcd.setCursor (0,0);
lcd.print(" SORRY :( ");
lcd.setCursor (0,1);
lcd.print(" Parking Full ");
delay (3000);
lcd.clear();
}
}
if(digitalRead (IR2) == LOW && flag2==0){flag2=1;
if(flag1==0){myservo1.write(0); Slot = Slot+1;}
}
if(flag1==1 && flag2==1){
delay (1000);
myservo1.write(100);
flag1=0, flag2=0;
}
lcd.setCursor (0,0);
lcd.print(" WELCOME! ");
lcd.setCursor (0,1);
lcd.print("Slot Left: ");
lcd.print(Slot);
}
If you have any doubts regarding the project then ask them in the comments section given below. You can also check tutorials on Arduino.
Smart parking system using IoT
ECE Final Year Project | Major Project for ECE Students
Object Counter Using IR Sensor And Arduino
LCD Interfacing with Arduino using I2C
HAPPY LEARNING!