
What is I2C on Arduino?
Hey Friends, another demonstration and issue solving article on Arduino. In this, we are going to tell how you can check the address of various I2C modules using Arduino I2C scanner code. It is a big problem when we are hooking up our sensors to Arduino, and we don’t know their I2C Addresses. So in today’s article I’m gonna ease this issue by demonstrating how can you do this. Let’s begin!!
Preparation I2C Scanner:
First download and install the latest version of Arduino IDE on your system either visiting their Official website or to Downloads page directly.
Now after you have downloaded it next step is to update your Board definitions and libraries (Include Libraries in Arduino IDE). After this process you are all set from software side.
Connection for I2C:
Now connect your module I2C pins i.e., SCL and SDA pins to the Arduino SCL and SDA pins According to pin number assigned to various Arduino models or simple to SCL and SDA pins mark out on Board.
Be careful to connect SCL to SCL and SDA to SDA, or it may lead to no detection of module.
Code I2C Scanner Arduino 16×2 LCD I2C:
// TECHATRONIC.COM
// Arduino 16x2 LCD I2C Scanner
/*
Analog Pin 4 - SDA
Analog pin 5 - SCL
5V  - Vcc
GND - GND
*/

#include <Wire.h>
void setup()
{
Wire.begin();
Serial.begin(9600);
Serial.println("\nI2C Scanner");
}
void loop()
{
byte error, address;
int Devices;
Serial.println("Scanning...");
Devices = 0;
for(address = 1; address < 127; address++ )
{

Wire.beginTransmission(address);
error = Wire.endTransmission();
if (error == 0)
{
Serial.print("I2C device found at address 0x");
if (address<16)
Serial.print("0");
Serial.print(address,HEX);
Serial.println("  !");
Devices++;
}
else if (error==4)
{
Serial.print("Unknown error at address 0x");
if (address<16)
Serial.print("0");
Serial.println(address,HEX);
}
}
if (Devices == 0)
Serial.println("No I2C devices found\n");
else
Serial.println("done\n");
delay(5000);
}
Upload this code to Arduino Board no matter any model or version, just keep in mind the pin connections. And open Serial Monitor to check the Address and output.

As soon as you open serial monitor, you’ll see that it starts scanning the I2C address of the module connected to I2C pins of Arduino.
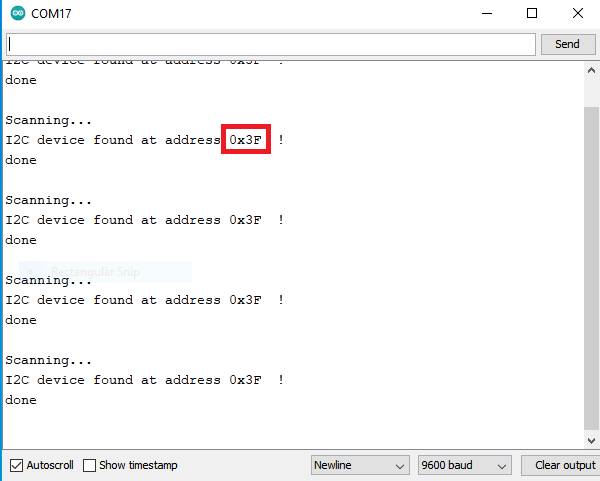
Now you’ve successfully noted and got your device I2C Address for further programming. So now we have demonstrated the I2C Scanner code for searching I2C devices addresses via Arduino code. I hope you successfully got it. Feel free to ask for doubts.