
Table of Contents
Introduction
Hi Guys, Hope you are doing well, and to cheer up your mood, I’m back with another interesting article on the IoT platform.
Blynk LPG Detector is today’s target. I know many of you may find it simple and very easy. But Although it is simple, yet it is a very popular topic nowadays.
We’ll be using NodeMCU and Blynk App for remote notifications of LPG detection in this IoT project. It is very easy to build and didn’t take much time to set up. So, without wasting time. Let’s start!!!
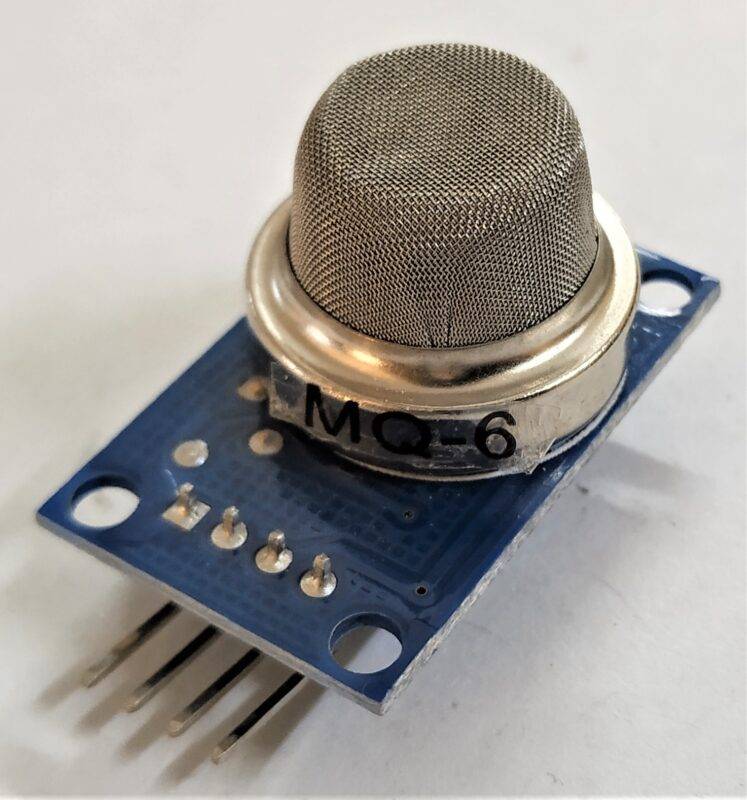
MQ-6 – Introduction
There is a variety of sensors which are like MQ-X. X represents various numbers. Each sensor is for various purposes,
you can view its datasheet for more information. It gives only single output, i.e., digital output. The pin will be pulled to high or 5v whenever the MQ6 sensor detects LPG gas. Else it will give 0(zero)V output.
The module is very easily available in the market also many alternatives are available. You can visit its Arduino tutorial for more information.
Working
The working of this sensor is very simple. Actually,
- it measures the resistance between two probes.
- There is a heater that heats up the sensor a little and then checks resistance.
- When the sensor come in contact with LPG gas, its resistance changes between the two probes of the sensor and hence gives 5V on the output pin.
- this IoT project comes under the security project for homes.
Due to some limitations,
it causes some delay in the sensor also distance is a big factor in determining the value so try to keep the sensor in contact with the source. Not this much that it can cause accidents, but at a minimum distance.

Material Required:
- NodeMCU (ESP8266 MOD)
- MQ-6 sensor
- Breadboard
- Jumper wires
- Blynk App installed on a device with Wi-Fi connection
| NodeMCU (ESP8266) | BUY LINK |
| MQ-6 sensor | BUY LINK |
| Breadboard | BUY LINK |
| Jumper wires | BUY LINK |
| Blynk App installed on a device with Wi-Fi connection |
You can buy all components together-BUY LINK

Blynk LPG Detector circuit diagram:
lpg detector circuit diagram consists of LPG sensor and nodemcu. as you can see the connections are very easy.

Connection Table
| Nodemcu esp8266 | MQ-6 LPG Sensor |
| VV, Vin | VCC |
| G, GND | GND |
| A0 Pin | A0 Pin |
Blynk LPG Detector Code:
Explanation:
First, we initialize some important libraries which are required like ESP8266WiFi, BlynkSimpleEsp8266, SimpleTimer. Along with this,
we also initialize a serial object and save our Wi-Fi details along with the Auth-Code in a char datatype variable. Then we define Pin for MQ-6 Sensor.
In setup section, we start communication with serial and Blynk App interfaces. In loop section we run main loops i.e., timer.run() & Blynk.run().
void setup()
{
  Serial.begin(115200);
  Blynk.begin(auth, ssid, pass);
  timer.setInterval(1000L, getSendData);
}

void loop()
{
  timer.run(); // Initiates SimpleTimer
  Blynk.run();
}
Then we create a custom function getSendData(), in which we read a value from MQ-6 sensor and send it to the Blynk App for remote notification of LPG detection.
void getSendData()
{
data = analogRead(mq6);
Blynk.virtualWrite(V2, data); // Blynk INPUT Connect V2 Pin
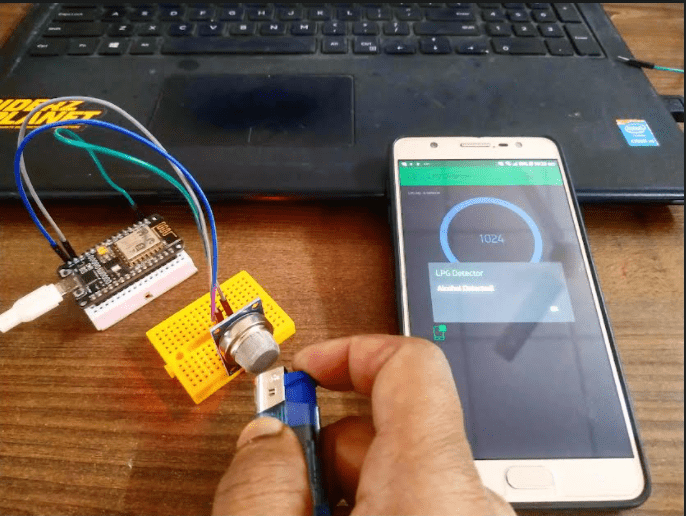
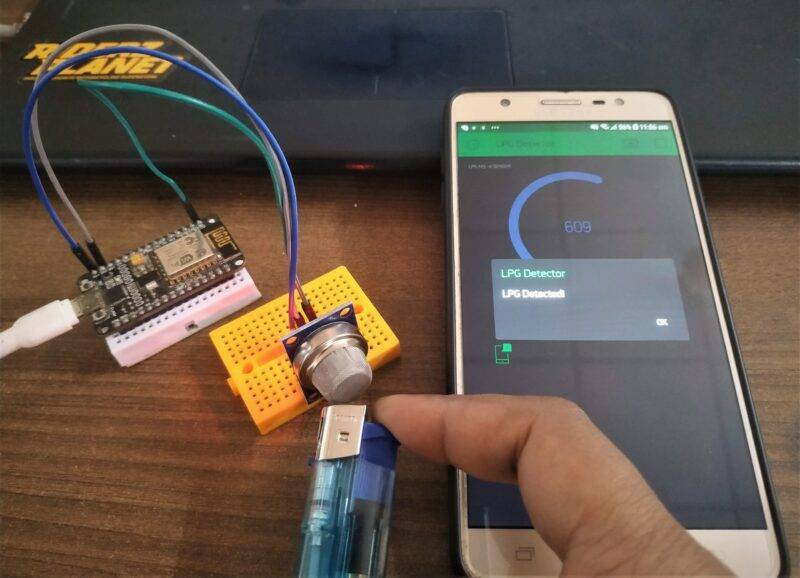
if (data > 700 )
{
Blynk.notify("LPG Detected!");
}
}Final Code:
Here is the main code
//TECHATRONIC.COM
// BLYNK LIBRARY
// https://github.com/blynkkk/blynk-library
// ESP8266 LIBRARY
// https://github.com/ekstrand/ESP8266wifi

#include <ESP8266WiFi.h>
#include <BlynkSimpleEsp8266.h>
#include <SimpleTimer.h>
#define BLYNK_PRINT Serial    // Comment this out to disable prints and save space
char auth[] = "your-auth-code"; //Enter Authentication code sent by Blynk


char ssid[] = "your-wifi-ssid"; //Enter WIFI Name
char pass[] = "your-wifi-password"; //Enter WIFI Password

SimpleTimer timer;

int mq6 = A0; // LPG sensor MQ -6 is connected with the analog pin A0
int data = 0;
void setup()
{
  Serial.begin(115200);
  Blynk.begin(auth, ssid, pass);
  timer.setInterval(1000L, getSendData);
}

void loop()
{
  timer.run(); // Initiates SimpleTimer
  Blynk.run();
}

void getSendData()
{
data = analogRead(mq6);
  Blynk.virtualWrite(V2, data); // Blynk INPUT Connect V2 Pin

  if (data > 700 )
  {
    Blynk.notify("LPG Detected!");
  }

}
Login & Setup:

Download Blynk app from any App Store PlayStore | Apple AppStore. Log in into the App with any of your social accounts. Remember, the email-id which is registered will be used to send Auth-Code for upcoming projects.

After this you’ll reach the main interface of the App through which you’ll create a new project. Now click on New Project for
create a new project.

Now enter a name using which you’ll create the project as shown in above. Here I’ve used ‘LPG Detector’.
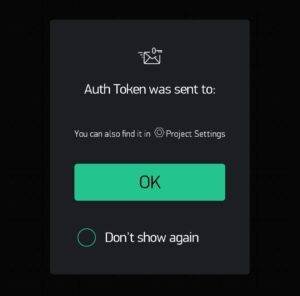
Auth-Code will be sent to the registered email-id which you’ve used at the time of registering on the app. Copy that code and put it in the code defined above for NodeMCU.

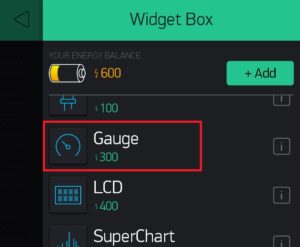
Now click on + symbol to add widgets which will be used to show values, and then follow the steps as shown below.
Add Monitor Notification


Follow above steps and create an interface like below. But carefully set all the setting for each button. You may change the pin for connecting the sensor.
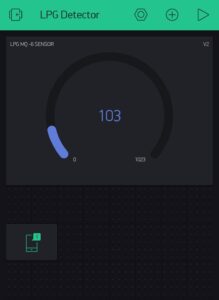
With this you’ve completed App task and now good to go for final task.
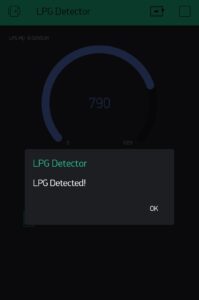
Now connect the power supply to the NodeMCU and wait for the system to startup. As soon as values start changing on App bring the sensor near the LPG gas for detection. And you’ll see notifications like this on the app of LPG detection.
With this, we have completed another tutorial on IoT i.e., Blynk LPG Detector. Let me know below if you face any problems, else enjoy this project.
Video Sample