
Hey guys, welcome back to Techatronic. So today we are making Interface LCD with Arduino Activity Tutorial.
which is most important in the series of learning activities. There is the full course we are making on the Arduino.
so the guys The visual sense is very important in every project this may make more understanding,
because even if our ears would give us some sense of our surroundings but our eyes give us the clearest image of our surroundings so if we add the display.
We have seen that every small device is fixed with a display or some visual indicator to give the current status. So, we have decided to make a tutorial on Interfacing Arduino LCD.
like power banks, chargers, or water level overflow alarms. there are two methods to interface LCD one is directly another is using LCD connect with i2c.

Display some information on some kind of display device can be very easy or very complicated but it totally depends on the interface it uses to communicate with the microcontroller to display content on it.
There is various display available in the market from a simple one to touch or from monochromatic to multicolor OLED in various sizes.
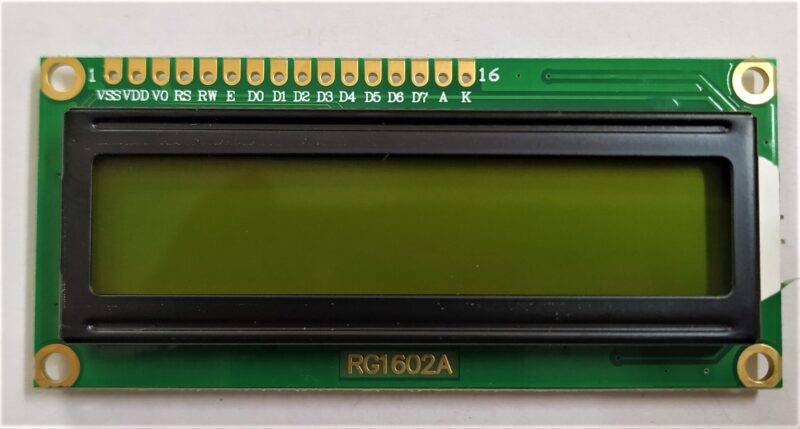
Table of Contents
What is 16×2 LCD display
- An LCD (Liquid Crystal Display) screen is an electronic display module and has a wide range of applications. It’s having a Hitachi driver.
- 16×2 LCD display content 2 rows and 16 columns. where you can print 16 characters into one row. There are RW and RS pin. so, to interface LCD with Arduino you need to know some pin on the LCD.
- RS ( Resistor selected, enables a user to select the instruction mode or the character mode)
- R/w ( Read/write, enables a user to select the Read or Write mode)
- E( Enable, Enable driver to on the LCD)
- From D0 to D7 all pins are used for data transfer.
How does liquid crystal display it Work?
LCD stands for liquid crystal display and there are crystals inside the display which illuminates the full display and the character as those which crystals are not illuminated. if you see the display carefully it works as reverse as other displays.
here the character is not illuminating they are inactive when we apply the signal to them. for example, if we are sending character A then the A-shaped crystal remains inactive, and the remaining crystal activates.

Why this activity?
As we discussed earlier. The visual sense is very important in every living being.
So, we will learn how can we display what do we want so anyone can read the status. it can be very helpful in all the projects or products.
for example, if you have a temperature sensor then you can make your own thermometer with the display. same as this you can make many more projects.
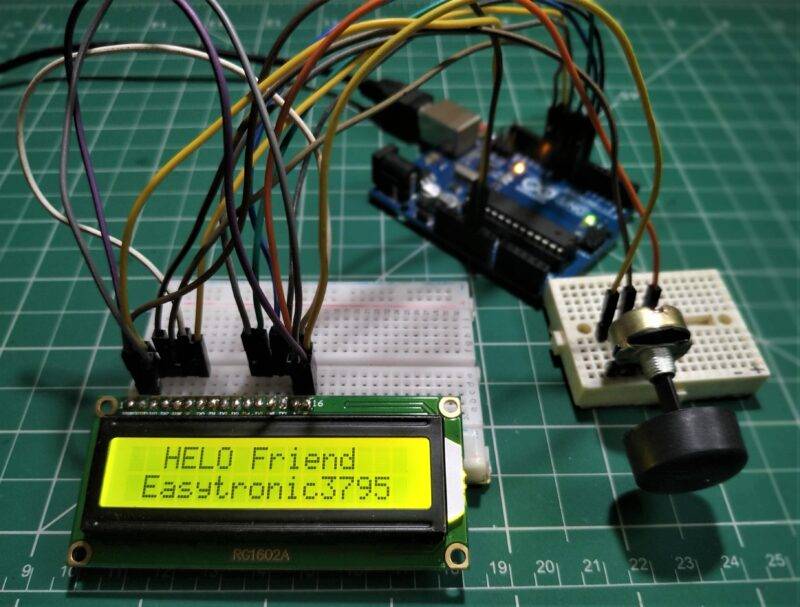
Arduino LCD Circuit diagram
Components Required
- Arduino Uno
- I2C module
- 16×2 LCD
- display
- breadboard
- Jumper wires
- 10k potentiometer

Arduino LCD connection:-

Connection table
| Arduino UNO | 16*2 LCD | 10K Potentiometer |
| GND | VSS (Ground) | Terminal 1 |
| +5V | VDD ( +5V ) | Terminal 3 |
| VEE ( Contrast ) | Terminal 2 | |
| D10 Pin | RS ( Register Select ) | |
| GND | RW ( Read\Write ) | |
| D9 Pin | E ( Enable ) | |
| D8 Pin | D4 | |
| D7 Pin | D5 | |
| D6 Pin | D6 | |
| D5 Pin | D7 |
arduino lcd Code Explain
#include <LiquidCrystal.h>
The above lines include the header file for the LCD
const int rs = 10, en = 9, d4 = 8, d5 = 7, d6 = 6, d7 = 5;
Here at the above line assign the variable to the pins which will be connected to the Arduino.
LiquidCrystal lcd(rs, en, d4, d5, d6, d7);
Above line state that which pins of LCD we are using in connection.
lcd.begin(16, 2);
Here, we begin the LCD to start work.
lcd.print(“hello, world!”);
The above statement is to print the hello, world! into the LCD.
lcd.setCursor(0, 1);
We are setting the cursor at the mentioned place.
lcd.print(millis() / 1000);
print the number of seconds since reset:
Arduino LCD Code
 // include the library code:
 //techatronic.com
 #include <LiquidCrystal.h>
 const int rs = 10, en = 9, d4 = 8, d5 = 7, d6 = 6, d7 = 5;
 LiquidCrystal lcd(rs, en, d4, d5, d6, d7);
 void setup() {
  lcd.begin(16, 2);
  lcd.print("hello, world!");
 }
 void loop() {
  lcd.setCursor(0, 1);
  lcd.print(millis() / 1000);
 }
Upload the given code into the Arduino with the help of Arduino IDE software. if you are not aware of the software you can refer to our latest post on how to upload programs in Arduino.
