
Alcohol detector using Arduino
INTRODUCTION: –
Nowadays drinking and driving is the most common threat to their as well as others’ life. We cannot stop people from drinking but we can avoid these accidents by checking the person of drinking also we can put these types of small devices in vehicles to assure that no drink and drive can further take place. Today we are going to make a simple alcohol indicator that can be used in small devices or for the demonstration of simple small projects for an Alcohol detector using Arduino.
Many advanced alcohol sensors are available in the market for a reasonable price but we are here to make it with the help of some basic stuff like Arduino, LED, and Alcohol sensors. This is a very simple project and you can make this project simply by follow the given instructions.
Hey guys, welcome back to Techatronic. we are here to learn you the basic electronics and embedded system project. bookmark our website to learn the latest projects.

what is an Alcohol detector using Arduino
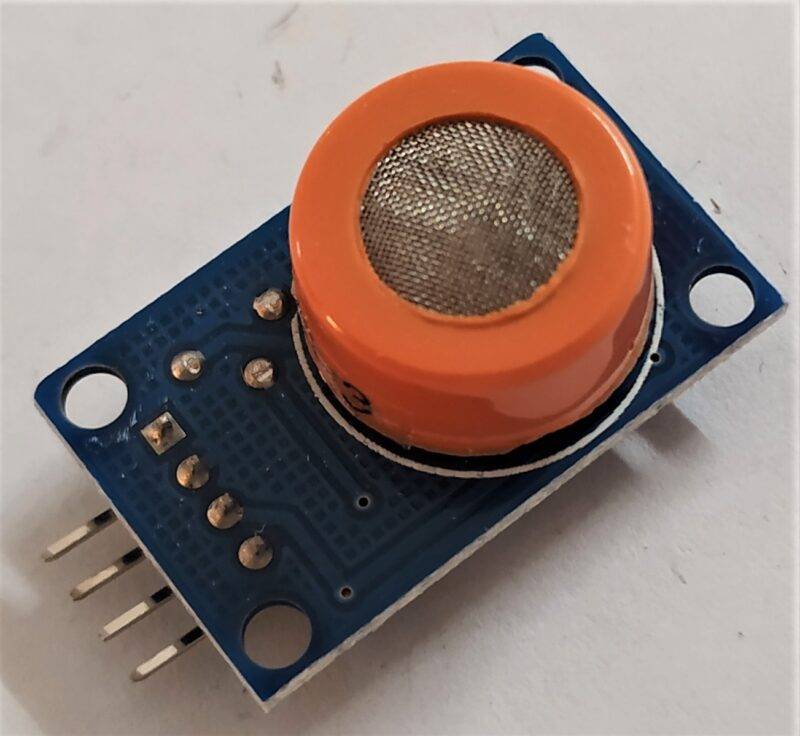
The stuff we are going to used today to build an alcohol indicator is Arduino, LEDs, and an MQ-3 Alcohol sensor. There are many MQ-X sensors is available in the market for different uses but we are here going to use MQ-3 because it is best for detecting alcohol. The working of most of the MQ sensors is the same. They all contain a heating element that heats up a layer of conducting material whose resistance is continuously measured. Its resistance changes when fumes or smell from alcohol comes in contact with the MQ-3 sensor. Arduino based alcohol detector having the mq3 sensor the specification given above. which can be monitor in our IoT based alcohol detector project.
The sensor also has an onboard power led and also an onboard Status led which will blink whenever the sensor detects alcohol(fumes).

The sensor gives both digital and analog output. The difference between the two is very simple in digital output only high or low means either 1 or 0 is transmitted to a microcontroller but in the analog signal, a wide range of values from 0 to 1023 is transmitted to the microcontroller which corresponds to the intensity of alcohol in the nearby environment. The sensor is built out of LM393 IC which has an inbuilt amplifier that amplifies the voltage signal to the detectable range. Also, it has voltage comparators for efficient amplification. The amount of amplification can be adjusted with the help of potentiometers given on the sensor.
*NOTE: – THE SENSOR VALUES DEPEND ON THE DISTANCE OF THE SOURCE TO THE SENSORS AND MAY VARY ON DISTANCE.
MQ3 SENSOR SCHEMATIC DIAGRAM: –

FEATURES AND APPLICATIONS: –
- Sensitivity of Alcohol, Ethanol is good
- Easy to use and fix
- Adjustable value
- Low price
- Can be used in various alcohol detection projects
You can buy all components together-BUY LINK
COMPONENTS NEEDED: –
| Arduino uno | BUY LINK |
| red led | BUY LINK |
| MQ-3 Alcohol sensor | BUY LINK |
| breadboard | BUY LINK |
| Jumper wires | BUY LINK |
| 220ohm resistor | BUY LINK |
| Buzzer | BUY LINK |

ARDUINO MQ3 CIRCUIT DIAGRAM:

| Arduino UNO | MQ-3 Alcohol Sensor | |
| ( +5V ) | VCC | |
| GND | GND | |
| D3 Pin | OUT Pin | |
| Arduino | LED R | 220 Ohm Resistor |
| D9 Pin | Anode Pin | |
| GND | Terminal 1 | |
| Cathode Pin | Terminal 2 |
the above circuit with the LED so it can only notify with the LED light and if you want to add the sound also follow the next circuit diagram.
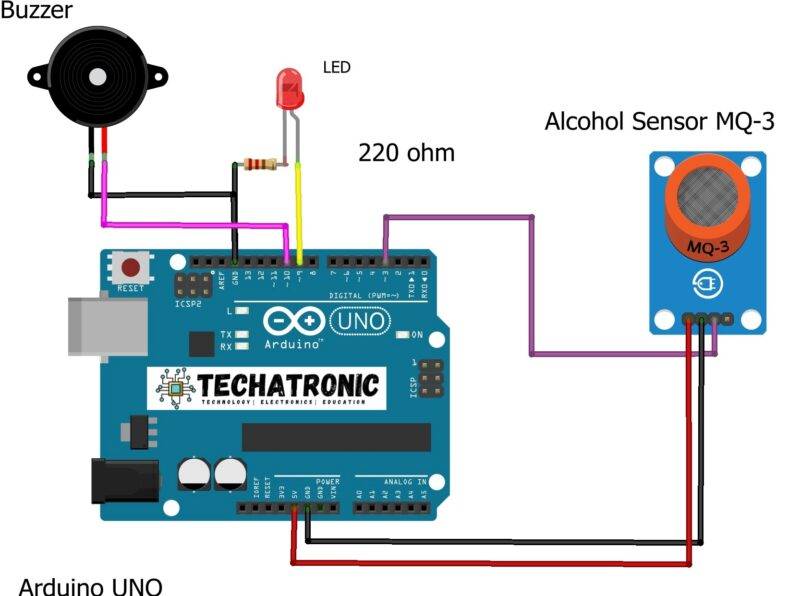
| Arduino UNO | MQ-3 Alcohol Sensor | |
| ( +5V ) | VCC | |
| GND | GND | |
| D3 Pin | OUT Pin | |
| Arduino UNO | Buzzer | |
| D10 Pin | Positive | |
| GND | Negative | |
| Arduino | LED R | 220 Ohm Resistor |
| D9 Pin | Anode Pin | |
| GND | Terminal 1 | |
| Cathode Pin | Terminal 2 |
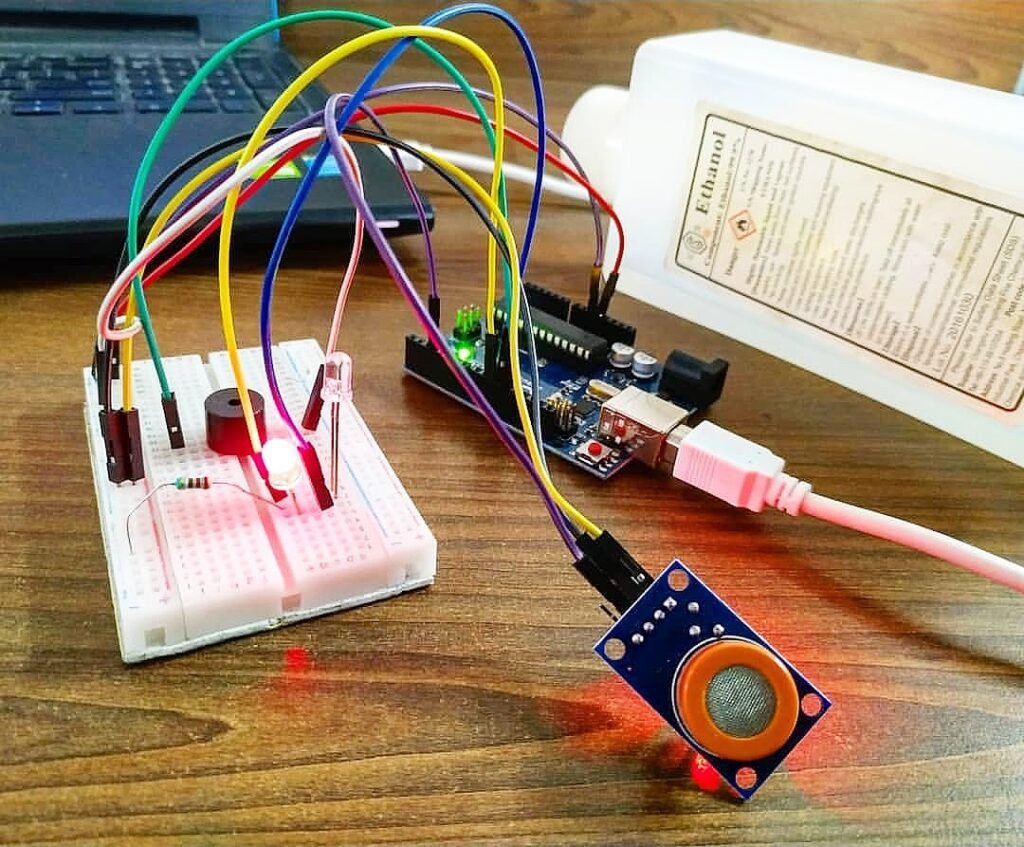
First take the power lines onto the breadboard from the microcontroller
VCC/5v–>+ line and GND–> – line.
Then connect the sensor onto the breadboard and connect power to the sensor from powerlines using jumper wires.
Now connect D0 PIN OF SENSOR TO MICROCONTROLLER DIGITAL PIN 3.
Now connect led to the breadboard + to digital pin 13 of Arduino and – to gnd in series with 220-ohm resistor. Moreover, we can enhance this version by adding a buzzer to it also like in the above diagram. Connect -tive of the buzzer to GND on a breadboard, and +tive to 5V on a breadboard.
ARDUINO MQ3 CODE: –
 //put this code for LED in the ide of arduino from this line
   int LED = 9;
      int ALCOHOL_sensor = 3;// MQ-6 SENSOR
      int ALCOHOL_detected;
      void setup()
       {
         Serial.begin(9600);
         pinMode(LED, OUTPUT);
         pinMode(ALCOHOL_sensor, INPUT);
       }
       void loop()
       {
         ALCOHOL_detected = digitalRead(ALCOHOL_sensor);
          Serial.println(ALCOHOL_detected);
         if (ALCOHOL_detected == 1)
         {
           Serial.println("ALCOHOL detected...");
           digitalWrite(LED, HIGH);
         }
         else
         {
           Serial.println("No ALCOHOL detected ");
           digitalWrite(LED, LOW);
         }
       }
 //For buzzer put this code in Arduino IDE
    int LED = 9;
    int BUZZER = 10;
    int ALCOHOL_sensor = 3;// MQ-3 SENSOR
    int ALCOHOL_detected;
    void setup()
    {
     Serial.begin(9600);
     pinMode(LED, OUTPUT);
     pinMode(BUZZER, OUTPUT);
     pinMode(ALCOHOL_sensor, INPUT);
    }
    void loop()
    {
      ALCOHOL_detected = digitalRead(ALCOHOL_sensor);
      Serial.println(ALCOHOL_detected);
     if (ALCOHOL_detected == 1)
     {
      Serial.println("ALCOHOL detected...");
      digitalWrite(LED, HIGH);
      digitalWrite(BUZZER, HIGH);
     }
     else
     {
      Serial.println("No ALCOHOL detected.");
      digitalWrite(LED, LOW);
      digitalWrite(BUZZER, LOW);
     }
    }
ALCOHOL DETECTOR WORKING: –
As the code starts it initializes the pin to which the sensor sends its data. Then is setup we define the type of function we want on the initialized pins like input or output. Then in the loop, we read the data available on pin 3 and then print that value on our monitor. We also check for the condition of sensor data to be either high or low and according to the condition led glows and turns off.
In the buzzer code, we also initialize the buzzer pin to pin 13 and set pin mode to OUTPUT in the setup section. In the loop section along with the led we switch Buzzer also high and low. By this a simple DIY alcohol detector is complete and it can be used in various places.

Blynk MQ3 Alcohol Sensor| Alcohol Detector IoT project
LPG gas sensor interface with Arduino (MQ6)
Rain sensor Arduino Mini Project