
Hey guy, welcome back to Techatronic, there is many applications where we need to DC motor direction control for example in washing machine we need both direction anti clock wise and clockwise. When we control the DC motor direction manually,once clockwise then anti clockwise. Required the DPDT switch. in many Application we need to control the DC motor direction automatically.
I made one project there is statue connected with the motor and the statue move left and right where we were using the dc motor. the dc motor rotate clockwise then after 10 seconds the motor will rotate anticlockwire. same as there si many more example. Washing machine do the same work.
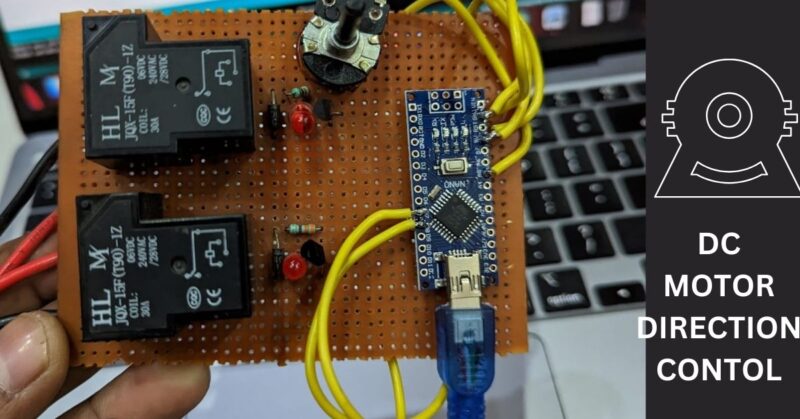
Table of Contents
How DC motor direction controls works?
There is very basic to control the dc motor direction. all we know there is two wires in the DC motor. one is positive and other is negative. when we connect positive wire to positive terminal and negative wire to negative terminal the motor will rotate clock wise.
and when we connect negative wire of motor with positive terminal and positive wire with the negative terminal then the motor will rotate anti clock wise.
what does inside the motor during direction change.
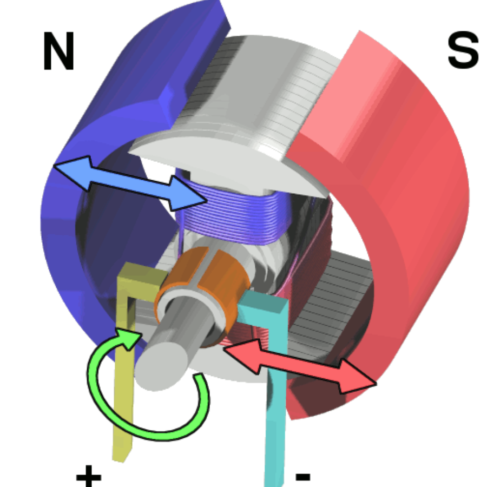
There is two permanent magnet place inside the Dc motor. these two magnet align in a way that the both magnet opposite poles will arrange opposite to each other. as you can see in the above image. north is always in front of the south. in the coil where the positive is connected where the north pole will be generate.
and in negative side the south pole will be generate. So the north pole of magnet attract the north pole of coil and south pole attract south pole of coil. so the coil will rotate antilock woise according to the image. if we change the polarity of the wire. the north and south pole of coil will be interchange. now the south pole of magnet attract the south pole of coil and motor start to rotate but this time the direction will be change.
SO, we get the reason to change the direction of dc motor. now, we can easily change the motor rotation direction. if we can change the polarity we can change the motor rotation direction.
DPDT switch can do it easily but it is manual. if you need the same but automatically you need to do it by code.
Here in this activity Arduino can help. arduino programming is very simple that’s why we choose Arduino. as of now all we know we can do it by Arduino let get make the project. first of all we need components detail.
Components for DC motor Direction Control
| Arduino UNO | BUY LINK |
| Potentiometer | BUY LINK |
| 5v Relay -4 | BUY LINK |
| Zero PCB board | BUY LINK |
| BC547 transistor | |
| 1k resistor | BUY LINK |
| IN4007 Diode | BUY LINK |
Arduino :- Arduino uno acts here as a brain of this project. it will send data for clockwise and antilclockwise direction. We will connect the Relay with Arduino. here we connect a positive wire in common pin of relay and NO wire of relay will be connect to the + terminal of the motor . and negative wire will connect the same way to the other relay.
now two more relay need to be connect in thee same way
| Relay 1 | Relay 2 | Relay 3 | Relay 3 | |
| Power Supply + | NO (Normally Open) | NO (Normally Open) | ||
| Motor – | Common R2 | Common R4 | ||
| Motor + | Common R1 | Common R3 | ||
| Power Supply – | NO (Normally Open) | NO (Normally Open) |
DC motor Direction Control Circuit diagram
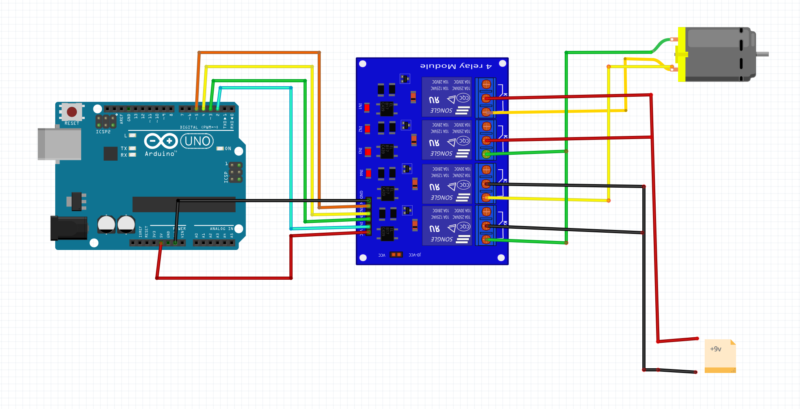
The connection or this project is very simple. this project will help to make the DC motor direction control project.
- Connect Arduino pin2 with Relay input 1
- Connect Arduino pin3 with Relay input 2
- Connect Arduino pin4 with Relay input 3
- Connect Arduino pin5 with Relay input 4
- Connect Arduino 5v with relay Vcc pin
- Connect Arduino Ground with relay Gnd pin
Arduino DC motor direction control Code
void setup()
{
pinMode(2, OUTPUT);
pinMode(3, OUTPUT);
pinMode(4, OUTPUT);
pinMode(5, OUTPUT);
}
void loop()
{

digitalWrite(2, HIGH);
digitalWrite(3, HIGH);
digitalWrite(4, LOW);
digitalWrite(5, LOW);
delay(100000);
digitalWrite(2, LOW);
digitalWrite(3, LOW);
digitalWrite(4, HIGH);
digitalWrite(5, HIGH);
delay(100000);
}
After getting the code. upload this code into the Arduino, if you have any doubt or query you can ask in the comment section.
The code is very simple.
void setup()
{
pinMode(2, OUTPUT);
pinMode(3, OUTPUT);
pinMode(4, OUTPUT);
pinMode(5, OUTPUT);
}
Here, we are assigning the output pins of the Arduino. in void setup we need to assign the pins how we are going to use these pins output or input.
digitalWrite(2, HIGH);
digitalWrite(3, HIGH);
digitalWrite(4, LOW);
digitalWrite(5, LOW);
delay(100000);
digitalWrite (2, HIGH); means we are writing high on pin 2. HIGH means 5v voltage in c language.
there is many applications of this dc motor direction project. in washing machine also we need both direction.