
In this Modern Time, all we know is that everything is modern and techy. we see many things in our homes too like an automatic water pump system or Stair lights. If you buy these automatic stair light it will expensive and tough to install. So, we have decided to make our own automatic stair lights project. install this project in our home. Here we will explain in detail how to make automatic stair lights project using sensor and controller.

here we will use two proximity IR sensor and Arduino microcontroller to make this project. this is also known motion sensor stair light. because it control by the motion. we use 2 sensor at the both side one sensor to get thee motion input to the controller. because wee needed to detect the presence from both side of the stair.
Table of Contents
Here we can use this Automatic Stair Lights project at our home?
There are two sensors in this project one will be place at the starting of the stair and one at the end of the stairs. place the sensors at the place where it can get the presence easily. once sensors has been placed then, connect lights from the given two wires for each stairs. we will make this project for 10 stairs. you can add or remove the stairs from the code as well as from the project.
There will be 10 port for 10 stairs. and it will power from 12v power supply. here we are going to start the project and make a tutorial on how to make automatic stair light using Arduino and relays.
Here, we are going to share all the details like code and circuit. also we are making a required components list.
Automatic Stair Lights Components Required
| Proximity sensor | |
| Arduino Uno | BUY LINK |
| 12v Strip light | |
| 12v power supply | BJUY LINK |
| Arduino Cable | BUY LINK |
| Relay module 8 channel relay. | BUY LINK |
Here, all the parts are given.
have an overview of use of all components.
Proximity Ir sensor:- Here we need two proximity sensor. one will be use at the start of the stairs and other will will use at the end fo the stairs. these sensors have some infrared transmitter and receiver. and continuously transmit and receive the data. if any things comes in the range of the transmitted data then the output from the proximity sensors will change automatically. by this change the Arduino get to know there is a presence recorded.
Arduino Uno:- Arduino Uno is a main controller in this Automatic Stair Lights project which controls all the light. like if there is any presence at the stairs the sensors give information to the Arduino uno. Arduino uno save that information and compare the information with the pre-defined values.
If the condition will true the led will glow one by one by some desired speed.
12V Strip Light:- 12v stip light will help to lighten up the stairs. there will be 10 small piece for attach in the stairs. which need to be connect to the respective port from the controller. it gives you a good light at the stairs. so the visibility will be good to step on the stairs.
Now, we will make a circuit diagram for the project.
Automatic Stair lights Circuit diagram
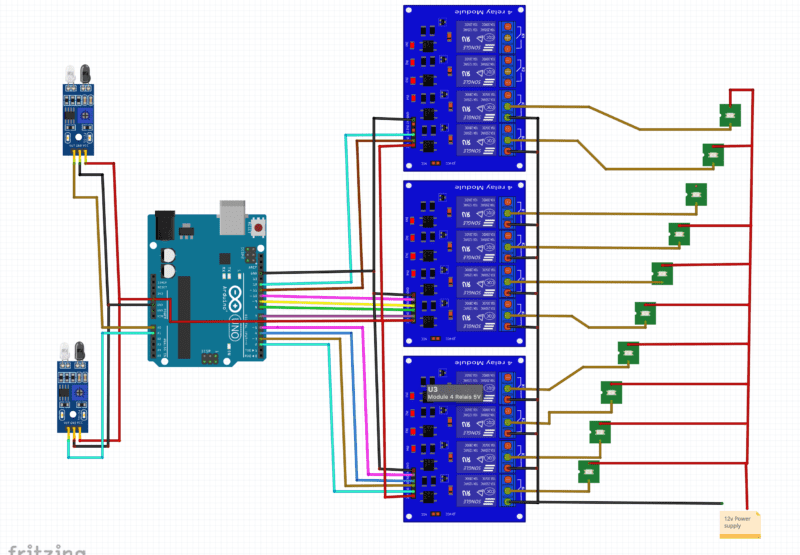
Here, you can see the circuit diagram. you need to make your circuit same as given in the circuit diagram.
- Connect Arduino pin 2- 5 to Relay 1 relay module pin IN1 – IN4 respectively
- Connect Arduino pin 6- 9 to Relay 2 relay module pin IN1 – IN4 respectively
- Connect Arduino pin 10- 11 to Relay 3 relay module pin IN1 , IN2 respectively
- Connect Arduino Ground pin to All relay module ground pin
- Connect Arduino 5V pin to All relay module Vcc pin
- all Relay Output NO Normally open pin will common and connect to the 12v supply ground pin.
- All relay Common pin will be connect to Led positive pin. relay 1 common pin will be connected to light 1
- Connect all IR sensor Ground to the Arduino Ground
- Connect all IR sensor Vcc to the 5v to the Arduino
- Connect 1st IR sensor output to the Arduino A0 pin
- Connect 2nd IR sensor output to the Arduino A1 pin
| Arduino Uno | IR Sensor 1 | IR Sensor 2 | Relay Input |
| A0 | output | ||
| A1 | output | ||
| 2 | IN1 (Relay 1) | ||
| 3 | IN2 (Relay 1) | ||
| 4 | IN3 (Relay 1) | ||
| 5 | IN4 (Relay 1) | ||
| 6 | IN1 (Relay 2) | ||
| 7 | IN2 (Relay 2) | ||
| 8 | IN3 (Relay 2) | ||
| 9 | IN4 (Relay 2) | ||
| 10 | IN1 (Relay 3) | ||
| 11 | IN2 (Relay 3) | ||
| Gnd | Gnd | Gnd | Gnd(R1, R2, R3) |
| 5v | Vcc | Vcc | Vcc (R1, R2, R3) |
So, here we have completed the Automatic Stair Lights project circuit. the connection of this how to make automatic stair lights. Now the next step is to make the Code for this project.
In this project the code is very simple to make. Here simply we are using Input and output logic. where thee Sensors are the input and giving the data continuously. and Led strip is Output. If you want to learn the input and output of Arduino you can refer our Push button activity where we have given all the basic.
Now, we will talk about the Code.
Automatic Stair lights Arduino Code
void Setup()
{
pinMode(A0,INPUT_PULLUP);
pinMode(A1,INPUT_PULLUP);
pinMode(2,OUTPUT);
pinMode(3,OUTPUT);
pinMode(4,OUTPUT);
pinMode(5,OUTPUT);
pinMode(6,OUTPUT);
pinMode(7,OUTPUT);
pinMode(8,OUTPUT);
pinMode(9,OUTPUT);
pinMode(10,OUTPUT);
pinMode(11,OUTPUT);
}

void loop ()
{
int m = digitalRead(A0); //starting sensor
int n = digitalRead(A0);  //end sensor

if (m==0 && n==1)
{
for (int i =2; i<=11 : i ++)

{
digitalWrite(i, HIGH);
delay(500);
}
delay(5);
for (int i =2; i<=11 : i ++)

{
digitalWrite(i, LOW);
delay(500);
}

}
else if (m==1 && n==0)
{


for (int i =11; i>=2 : i --)

{
digitalWrite(i, HIGH);
delay(500);
}
delay(5);
for (int i =11; i>=2 : i --)

{
digitalWrite(i, LOW);
delay(500);
}


}
Here, we have completed the Arduino step Light code. According to the code. if someone comes near to the start of the stairs then the led strip glow one by one.
To upload the code you need Arduino IDE software first. After downloading the Arduino Ide just copy and paste the given code there and click on upload. if you have any doubt you can refer to our given article on how to upload code in Arduino.
and if someone comes near to the end of the stairs then the light will start from this side.
void Setup()
{
pinMode(A0,INPUT_PULLUP);
pinMode(A1,INPUT_PULLUP);
pinMode(2,OUTPUT);
pinMode(3,OUTPUT);
pinMode(4,OUTPUT);
pinMode(5,OUTPUT);
pinMode(6,OUTPUT);
pinMode(7,OUTPUT);
pinMode(8,OUTPUT);
pinMode(9,OUTPUT);
pinMode(10,OUTPUT);
pinMode(11,OUTPUT);
}
In this given piece of code we are assigning the pin. mean we are setting the A0,A1 pin as input pins and pin 2- 11 are the output pins.
int m = digitalRead(A0); //starting sensor
int n = digitalRead(A0);  //end sensor
Here, we are storing the both sensor values in the m & n integers.
if (m==0 && n==1)In this line of code, we are checking the sensor output and comparing to our condition.
if the condition will true the given below code will execute.
for (int i =2; i<=11 : i ++)

{
digitalWrite(i, LOW);
delay(500);
}
Here, after the condition getting true, the for loop will be executed. where the Arduino will send a high signal on pin 2 to 1 1 after 500 milliseconds interval.
So this is, the full tutorial of step light if you have any doubts you can ask us in the comment section.