
Welcome back to Techatronic, in this article, I am gonna do a brief description of the Arduino Button tutorial. if you are a learner and want to learn Arduino by this Arduino tutorial series.
recently we have uploaded blink led with Arduino tutorial.
Table of Contents
Introduction
Arduino is an open-source multipurpose development board that can be used to learn and automate small things in daily life like a curtain riser.
and there are many other applications like stepper motor rotation and pixel-led driving with the Arduino. push button with Arduino helps you to learn to control the project with one push-button or switch and
it will also help you to learn the Coding part. so .let’s start the tutorial.
What is Push Button with Arduino Activity?
So first we will understand the working principle of this experiment. There are a lot of communication pins on an Arduino but in this experiment,
we will use the digital pins of the Arduino. there are 14 digital pins in the Arduino Uno so we will use that digital pins in this experiment. we can use digital pins as input pins as well as output pins.
so now we will use both functions of the pins in this experiment which is push-button interfacing with the Arduino. there are two devices to interface with the Arduino one is push-button and the other is an LED bulb.
the push button has to be connected to the Arduino input pins and the LED to be connected to the output pin. This Arduino button Led associated. so when we push the button the LED will glow.
The Push-button has to be connected to the input pins so It can read the push button.
when you press the push button then the edge of the attitude will change.
for example the voltage change from 5v to 0 in binary 1 to 0, in assembly HIGH to LOW you can use the last two in the Arduino language.
How does it work? working
in a push-button with Arduino when you press that button the input voltage will change from high to low.
then the pin connected to the push button gets to recognize and send to the Arduino that it get some value on the input pins.
now the code start to process and the led connected to the Arduino will start to glow. you need to press the push button only the rest of the work will be done by the Arduino and the system.
so,
this is the lesson in the article to learn the input and the output peripheral of the Arduino and the Arduino coding. you need only a few components to make it run.
it will help you to learn the basics of robotics and sensor interfacing.

Components Required for Interface push button with Arduino
- Arduino Uno –BUY LINK
- UNO to A type cable –BUY LINK
- Jumper wires –BUY LINK
- LED – BUY LINK
- Push Button-BUY LINK
- Resistor-BUY LINK
- Breadboard- BUY LINK
You Can Buy All Components To Together –BUY LINK
Components Table
You can buy the whole components from the given link we have to share the amazon link. from where you can get a good discount on the components.
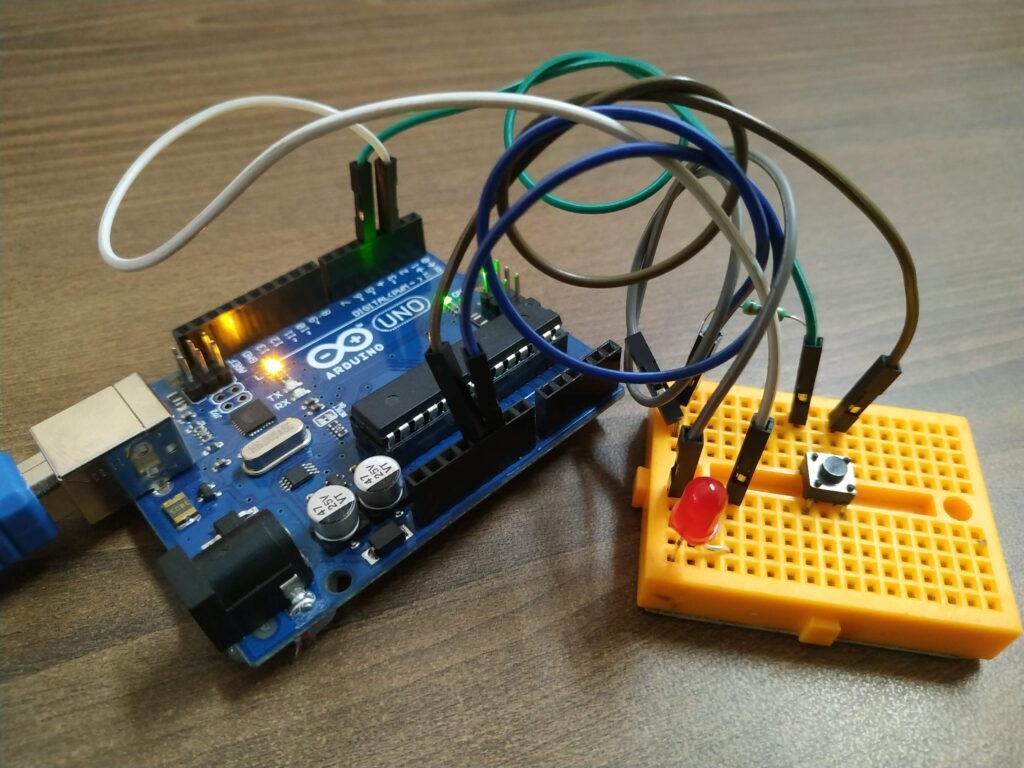
Arduino button wiring.

Proteus Daigram

Connection Table
| Arduino UNO | Push Button 1 | 220 Ohm Resistor |
| 2 Pin | Terminal 1 | Terminal 1 |
| +5, VCC | Terminal 2 | |
| GND | Terminal 2 | |
| Arduino UNO | LED | 220 Ohm Resistor |
| 12 Pin | Anode Pin | |
| Cathode Pin | Terminal 1 | |
| GND | Terminal 2 |
Now it turns to code the Arduino for the project. if you don’t know how to operate Arduino software install and setup the Arduino IDE app.
Arduino push Button Code
// constants won't change. They're used here to
// set pin numbers:
const int buttonPin = 2;     // the number of the pushbutton pin
const int ledPin =  12;      // the number of the LED pin

// variables will change:
int buttonState = 0;         // variable for reading the pushbutton status

void setup() {
  // initialize the LED pin as an output:
  pinMode(ledPin, OUTPUT);
  // initialize the pushbutton pin as an input:
  pinMode(buttonPin, INPUT);
}

void loop() {
  // read the state of the pushbutton value:
  buttonState = digitalRead(buttonPin);

  // check if the pushbutton is pressed.
  // if it is, the buttonState is HIGH:
  if (buttonState == HIGH) {
    // turn LED on:
    digitalWrite(ledPin, HIGH);
  } else {
    // turn LED off:
    digitalWrite(ledPin, LOW);
  }
}
upload the given code in the Arduino with the given step. all the best.
Video Sample
Buy Our ebook