
How to make Self-balancing robot
Hey guys, welcome back to the Techatronic. In this new project, we are going to describe how to make self-balancing robot in the simplest procedure. Only you have to read the full article. We will explain all the information to make this awesome project only you need to know some basics of the electronic and Arduino. And if you don’t have that you can learn that basic from our last project which you can see in the blog section there we have uploaded all the basic tutorials to learn electronics and the Arduino. So, now if you really want to learn How to make the self-balancing robot you are in the right place. Only you need to read the full article. I hope you will make this awesome project with the last of the article. Now let’s get started.
What is a Self-balancing robot?
As you all are familiar with the robot and robotics. A robot is a machine that runs on the preprogrammed chips. Such as Bluetooth control car also a robot. Now we discuss the self-balancing robot. The robot has only two-wheel on which it has to balance without any support. The self-balancing robot is the robot that balances itself self we don’t need to give any command to it. Only you need to put that robot onto the surface it will start balancing itself on the same. There is a lot of Arduino self-balancing robot differentiate according to the motors and mechanism used in the robot. So it depends on you which material and electronics preferred to make the same robot.
How does The self-balancing robot works
Initially, when we put the robot on the surface it will start to move and try to balance itself on the surface with its two wheels. It will start to move in the forward direction and if the robot disbalance in the backward direction it will start backward and uses the same the for the forward direction. There is a sensor name gyroscope MPU6050 which helps to balance. The gyroscope gives some analog value for each direction acceleration. Self-balancing robots always need calibration. If the sensor tilts In the forward direction variable changes and the same for the backward direction. And we calibrate the sensor with the robot.
Calibration of the self-balancing robot for balancing
MPU6050 gives value on every position and when it tilts in the forward direction there are some changes in the values given by the robot. So we notice the minimum angle of the robot om which it can tilt and map that angle with the MPU6050 value and find out the desired value at which the motor will start to move according to the angle tilt. For example, if the robot cut of the tilt angle is 10 degrees then we notice the changes in MPU6050 values and noticed now we will calculate this for forward and backward direction and we will sync that value with the motor rotation clockwise and anti-clockwise.
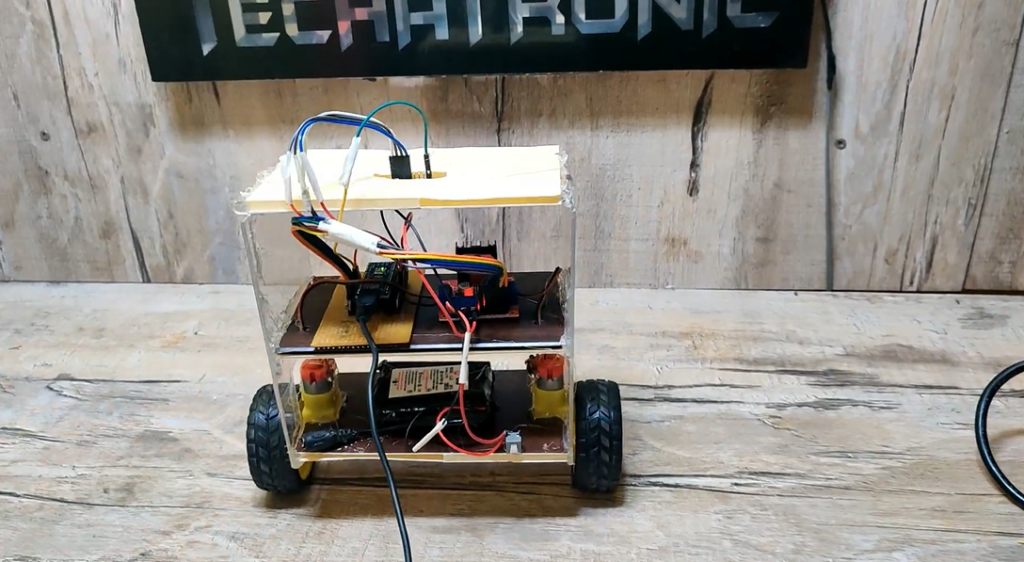
Components Required to make Self-balancing robot
- Arduino UNO –BUY LINK
- Arduino Cable –BUY LINK
- Jumper wire –BUY LINK
- 5-12v battery –BUY LINK
- ON-Off switch –BUY LINK
- MPU6050 Gyro Sensor –BUY LINK
- L298N Motor Driver Module –BUY LINK
- BO motors –BUY LINK
- Wheels –BUY LINK
- Breadboard –BUY LINK
You Can Buy All Components To Together –BUY LINK
Circuit Diagram
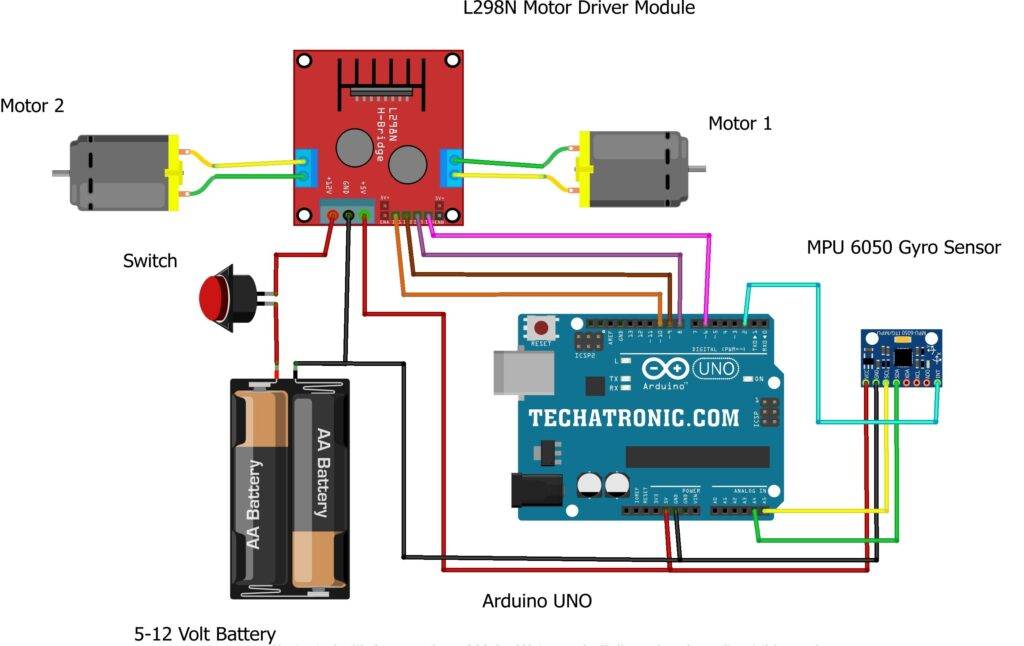
| Arduino UNO | MPU6050 Gyro Sensor | |
| ( +5V ) | VCC | |
| GND | GND | |
| A5 Pin | SCL Pin | |
| A4 Pin | SDA Pin | |
| D2 Pin | INT Pin | |
| Arduino UNO | L298N Motor Module | |
| 6 Pin | IN 1 | |
| 8 Pin | IN 2 | |
| 9 Pin | IN 3 | |
| 10 Pin | IN 4 | |
| Arduino UNO | L298N Motor Module | |
| ( +5V ) | +5 Volt | |
| GND | GND | |
| 9 – 12 V Battery | Switch | L298N Motor Module |
| Positive | Terminal 1 | |
| Terminal 2 | 12 Volt | |
| Negative | GND |
Code
 void setup() {
 pinMode(6,OUTPUT);
 pinMode(8,INPUT);
 pinMode(9, OUTPUT);
 pinMode(10, OUTPUT);
 pinMode(A2, INPUT_PULLUP);
 pinMode(A0,INPUT_PULLUP);
 }
 void loop() {
 int m= analogRead(A0);
 if(m==XXX) //calibrate your accelerometer and findout the value when your bot is tilt forward
 {
 digitalWrite(6, HIGH);
 digitalWrite(8, LOW);
 digitalWrite(9, HIGH);
 digitalWrite(10, LOW);
 }
 else if(m==XXX) //calibrate your accelerometer and findout the value when your bot is tilt backward
 {
 digitalWrite(6, LOW);
 digitalWrite(8, HIGH);
 digitalWrite(9, LOW);
 digitalWrite(10, HIGH);
 }
 else
 {
 digitalWrite(6, LOW);
 digitalWrite(8, HIGH);
 digitalWrite(9, LOW);
 digitalWrite(10, HIGH);
 }
 }
Upload the code in the Arduino by the Arduino IDE software. If you don’t know how to upload code in Arduino you can see it here.