

Recently we have made a useful project with the MLX90614 IR Temperature sensor. MLX90614 sensor is the most useful sensor nowadays. after the pandemic, it is the trending cause of its usage. you can measure the temperature from a particular distance. So, we make this tutorial on how can we use Arduino with MLX90614 IR temperature Sensor. this is the most popular sensor used recently in the temperature monitoring devices during pandemic.
Table of Contents
Introduction
The MLX90614 is an infrared temperature sensor developed by Melexis. It is designed to measure the temperature of any object without direct contact. The sensor uses infrared radiation to determine its temperature.
Here are some key features of the MLX90614 sensor:
- Non-contact temperature measurement: The MLX90614 can measure temperatures without physically touching the object, making it suitable for applications where contact is not desired or not possible.
- Infrared thermopile detection: The sensor uses a thermopile, which is an array of thermocouples, to detect the infrared radiation emitted by an object. The thermopile generates a voltage proportional to the temperature difference between the object and the sensor.so, we made this interfacing between Arduino with MLX90614 IR temperature Sensor
- Wide temperature measurement range: The MLX90614 can measure temperatures in the range of -70°C to 380°C (-94°F to 716°F), depending on the specific variant of the sensor.
- Two-in-one sensor: The MLX90614 incorporates both a thermopile for object temperature measurement and an integrated ambient temperature sensor. This allows for compensation of ambient temperature variations and provides more accurate temperature readings.
- I2C interface: The sensor communicates with a microcontroller or other devices using the I2C (Inter-Integrated Circuit) interface. This makes it easy to integrate the sensor into various projects and systems.
- Low power consumption: The MLX90614 is designed for low-power applications, making it suitable for battery-powered devices.
The MLX90614 sensor is commonly used in various applications such as industrial temperature control, medical equipment, automotive, home automation, and robotics. Its non-contact measurement capability and wide temperature range make it useful in many scenarios where accurate temperature monitoring is required.
This sensor can be use in many applications.
for example:- noncontact thermometer, fever scanning in AI system and much more.
Here we are providing code, circuit and instructions which will needed to complete the project.
Components required.
| Arduino nano | BUY LINK |
| MLX90614 Sensor | BUY LINK |
| Breadboard | BUY LINK |
| Jumper wire | BUY LINK |
| 16X2 display | BUY LINK |
Circuit Diagram
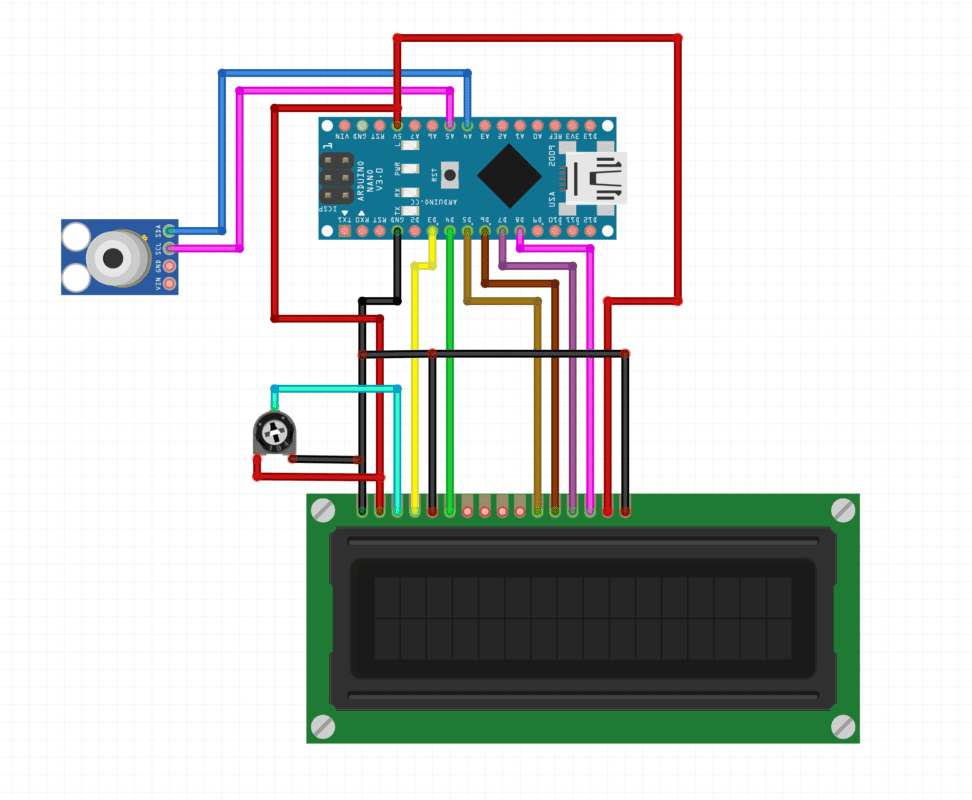
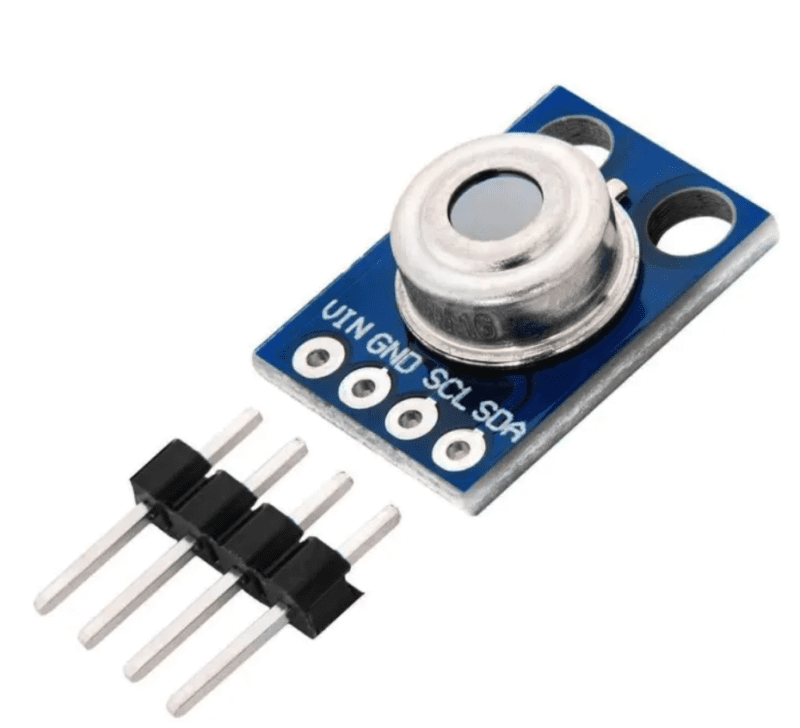
MLX 90614 sensor has four pins. SDA , SCL, VCC, GND.
SDA stands for serial data pin. which communicates with the controller
SCL pin is a Serial clock pin.
Vcc need to be connect to the 5v
Gnd should connect to the GND pin.
Arduino with MLX90614 Code
#include <Adafruit_MLX90614.h>

Adafruit_MLX90614 mlx = Adafruit_MLX90614();


#include <LiquidCrystal.h>

// initialize the library by associating any needed LCD interface pin
// with the arduino pin number it is connected to
const int rs = 3, en = 4, d4 = 5, d5 = 6, d6 = 7, d7 = 8;
LiquidCrystal lcd(rs, en, d4, d5, d6, d7);

void setup() {
  Serial.begin(9600);
  while (!Serial);

  if (!mlx.begin()) {
    Serial.println("Error connecting to MLX sensor. Check wiring.");
    while (1);
  };
   lcd.begin(16, 2);
   lcd.clear();
   lcd.setCursor(0,1);
   lcd.print("Temperature Sensor")
}

void loop() {
  Serial.print("Ambient = "); Serial.print(mlx.readAmbientTempC());
  Serial.print("*C\tObject = "); Serial.print(mlx.readObjectTempC()); Serial.println("*C");
  Serial.print("Ambient = "); Serial.print(mlx.readAmbientTempF());
  Serial.print("*F\tObject = "); Serial.print(mlx.readObjectTempF()); Serial.println("*F");
lcd.clear();
   lcd.setCursor(0,1);
   lcd.print(mlx.readObjectTempF())
  Serial.println();
  delay(500);
}