
Hey guys, welcome back to Techatronic. Are you searching for a robot that can be controlled using wifi without the internet? If so then follow the procedure that we are going to discuss for making wifi controlled robot using a NodeMCU esp8266 IoT development board. Before starting set up your Arduino IDE to upload the code in NodeMCU. You can control this robot with the help of an IP address. The robot can move in different directions. You can control the direction of the robot by tapping on the given buttons. Also, check different projects on IoT made by us. For controlling the wheels we are using an L298N motor driver module. You can also check out the mobile phone-controlled SPY robot.
How Does it Work?
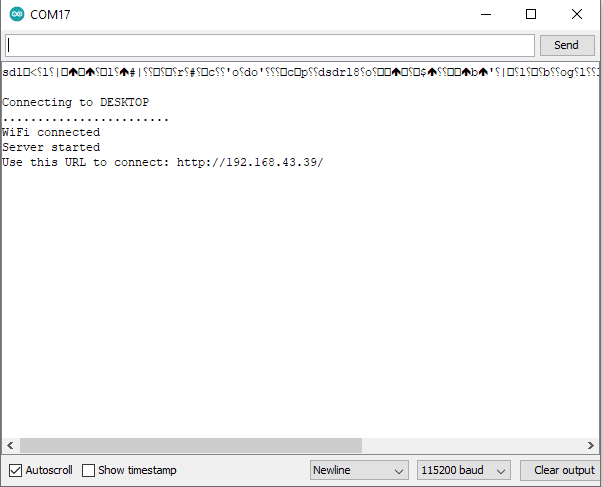
You have to write your network’s (mobile hotspot) SSID and PASSWORD in the given code so that NodeMCU can connect to it. The NodeMCU will generate an IP address which you can see on the serial monitor screen. Note this IP address and write it inside the box which you can see in the image given below. Also, check our human following robot.

The robot will move according to the buttons on which you are tapping. It can move forwards, backward, left, and right. Just switch on your robot and enjoy it.

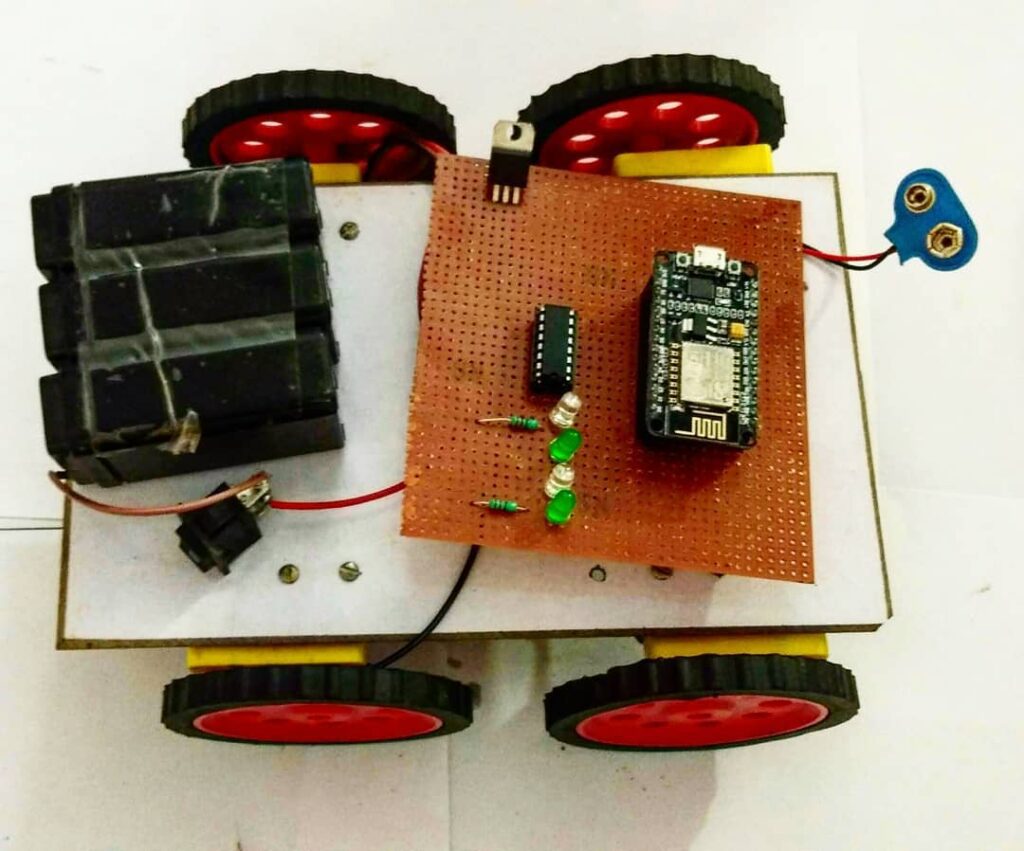
This is how our robot looks like.
Components Required
- NodeMCU esp8266
- 4 DC gear motors with wheels
- L298N motor driver module
- A switch and a 9 – 12-volts DC power supply
- Smartphone with a good internet connection
- USB cable for uploading the code
- Jumper wires and a Breadboard
- On-Off switch
- Jumper wire
- Breadboard
Link of the Application
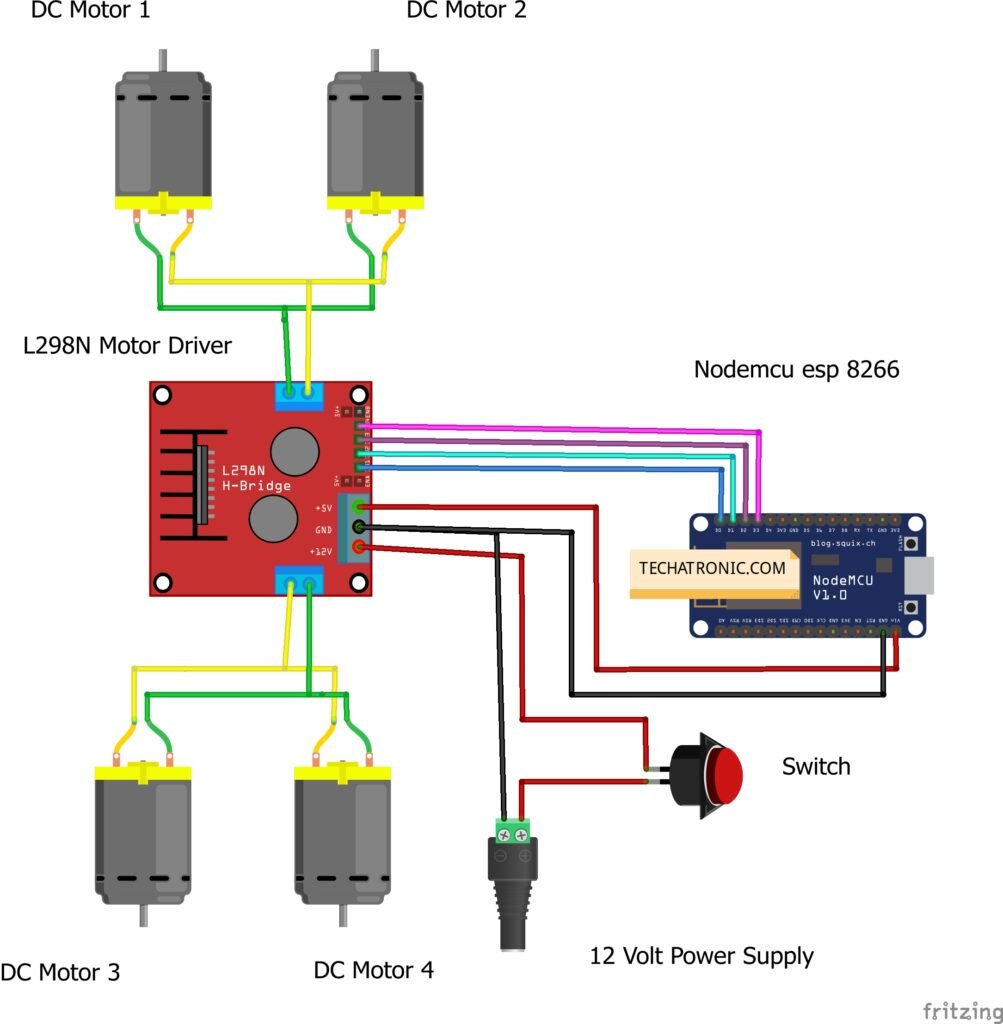
wifi controlled robot Circuit Diagram
| Nodemcu esp8266 | L298N Motor Driver | |
| D0 Pin | IN 1 | |
| D1 Pin | IN 2 | |
| D2 Pin | IN 3 | |
| D3 Pin | IN 4 | |
| Vin, VV | + 5 Volt | |
| GND | GND | |
| Switch | L298N Motor Module | 12-9 Volt Battery |
| Terminal 1 | Positive | |
| Terminal 2 | + 12 Volt | |
| GND | Negative | |
| Motor 1, 2 | Motor 3, 4 | L298N Motor Driver |
| Terminal 1 | Terminal 1 Output | |
| Terminal 2 | Terminal 2 Output | |
| Terminal 1 | Terminal 3 Output | |
| Terminal 2 | Terminal 4 Output |
Combine the positive and negative wires of both the dc motors on one side and connect the wires to the one side output of the L298N motor driver. Repeat the same for the second pair of dc motors and connect the wires to the other output of the L298N motor driver. Join the IN-1 pin of the L298N module with the D-0 pin of the NodeMCU and the IN-2 pin of the L298N module with the D-1 pin of the NodeMCU. Connect the IN-3 pin of the L298N module with the D-2 pin of the NodeMCU and the IN-4 pin of the L298N module with the D-3 pin of the NodeMCU. Join the 5-volts pin of the L298N module with the VIN pin of the NodeMCU and the GND pin of the L298N module with the GND pin of the NodeMCU. Attach the positive wire of the 12-volts supply to a switch and then to the 12-volts pin of the L298N module. Now connect the negative wire of the 12-volts supply to the GND pin of the NodeMCU.
wifi controlled robot Code
NOTE: Please upload the code given below to the NodeMCU. First, you have to install <ESP8266WiFi.h> in your IDE software. Check here how to install a zip library in your Arduino IDE.
 //TECHATRONIC.COM
 // ESP8266 LIBRARY
 // https://github.com/ekstrand/ESP8266wifi
 #include <ESP8266WiFi.h>
 String i;
 WiFiServer server(80);
 void setup()
 {
  i = "";
  Serial.begin(9600);
  pinMode(16, OUTPUT); // GPIO pin16=D0 of NodeMCU 12E or in place of '16' you can write'D0' directly || -->Connected to motordriver
  pinMode(5, OUTPUT); // GPIO pin5= D1 of NodeMCU 12E or in place of '16' you can write 'D0' directly || -->Connected to motordriver
  pinMode(4, OUTPUT); // GPIO pin4= D2 of NodeMCU 12E or in place of '16' you can write 'D0' directly || -->Connected to motordriver
  pinMode(0, OUTPUT); // GPIO pin0= D3 of NodeMCU 12E or in place of '16' you can write 'D0' directly || -->Connected to motordriver
   WiFi.disconnect();
  delay(2000);
  Serial.println("Connecting to WIFI");
   WiFi.begin("DESKTOP","asdfghjkl"); //Enter WIFI Name & Password
  while ((!(WiFi.status() == WL_CONNECTED))){
   delay(300);
   Serial.print("..");
  }Serial.println("I am Connected");
  Serial.println("My Local IP is : ");
  Serial.print((WiFi.localIP()));
  server.begin();
 }
 void loop()
 {
   WiFiClient client = server.available();
   if (!client) { return; }
   while(!client.available()){ delay(1); }
   i = (client.readStringUntil('\r'));
   i.remove(0, 5);
   i.remove(i.length()-9,9);
   if (i == "forward") {
    digitalWrite(16,HIGH);
    digitalWrite(5,LOW);
    digitalWrite(4,HIGH);
    digitalWrite(0,LOW);
    client.println("HTTP/1.1 200 OK");
    client.println("Content-Type: text/html");
    client.println("");
    client.println("<!DOCTYPE HTML>");
    client.println("<html>");
    client.println("forward");
    client.println("</html>");
    client.stop();
    delay(1);
   }
   if (i == "reverse") {
    digitalWrite(16,LOW);
    digitalWrite(5,HIGH);
    digitalWrite(4,LOW);
    digitalWrite(0,HIGH);
    client.println("HTTP/1.1 200 OK");
    client.println("Content-Type: text/html");
    client.println("");
    client.println("<!DOCTYPE HTML>");
    client.println("<html>");
    client.println("reverse");
    client.println("</html>");
    client.stop();
    delay(1);
   }
   if (i == "right") {
    digitalWrite(16,LOW);
    digitalWrite(5,LOW);
    digitalWrite(4,HIGH);
    digitalWrite(0,LOW);
    client.println("HTTP/1.1 200 OK");
    client.println("Content-Type: text/html");
    client.println("");
    client.println("<!DOCTYPE HTML>");
    client.println("<html>");
    client.println("right");
    client.println("</html>");
    client.stop();
    delay(1);
   }
   if (i == "left") {
    digitalWrite(16,HIGH);
    digitalWrite(5,LOW);
    digitalWrite(4,LOW);
    digitalWrite(0,LOW);
    client.println("HTTP/1.1 200 OK");
    client.println("Content-Type: text/html");
    client.println("");
    client.println("<!DOCTYPE HTML>");
    client.println("<html>");
    client.println("left");
    client.println("</html>");
    client.stop();
    delay(1);
   }
   if (i == "stop") {
    digitalWrite(16,LOW);
    digitalWrite(5,LOW);
    digitalWrite(4,LOW);
    digitalWrite(0,LOW);
    client.println("HTTP/1.1 200 OK");
    client.println("Content-Type: text/html");
    client.println("");
    client.println("<!DOCTYPE HTML>");
    client.println("<html>");
    client.println("stop");
    client.println("</html>");
    client.stop();
    delay(1);
   }
 }
We hope that you liked this project and try to make it on your own so you can understand it’s working better. Feel free to ask your queries in the comments section below. You can also check tutorials on Arduino and Raspberry Pi written by us.
HAPPY LEARNING!