
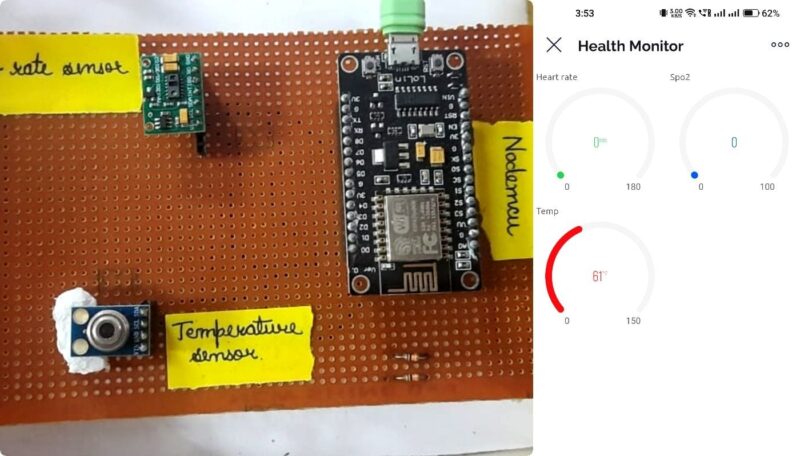
Monitor Spo2 , Heart rate and Temperature with our newly made Health monitoring project on IoT. We monitor all these things on our mobile via the Internet of Things. This is really a very interesting project. if you want to make or learn this health monitoring project follow all the steps we are going to share all the required information at this page.

Table of Contents
Introduction
This is basically for the patient who is not able to go to the doctor to check their medical status. They can check at their home and all the data will be sent to the doctor on the same application. only doctors need to open the application with the Internet. although both site the internet will be needed.
We are using a third-party server here which is blynk the nodemcu or device contnously send the data to the server and the mobile application receive that data on the mobile phone and show the data to the user.
There are a lot of devices available in the market which can be able to monitor your health but this time we have made this project to monitor your data from anywhere in the world only need a working internet there. this health monitoring IoT project for remote patient monitoring is really useful. We are going to share all the detail here only you. need to know some basics of ESP8266 and electronics to learn and make this.
Required Components
Here we have provided the components list which will be used in this project. Esp8266 (NodeMCU) which is the main component of this project. it will control all the things in this project. programming, sending data to the server, and calibration of sensor.
Max30100 is a sensor that can sense the heart rate and Spo2 in our blood. there are some IR rays transmitted from the sensor. and this help the sensor to find the information.
MLX6014 is the IR temperature sensor which can monitor the temperature using the IR technology. it transmit the IR rays and after some post processing it will get the temperature reading.
Health Monitoring using NodeMCU Circuit Diagram
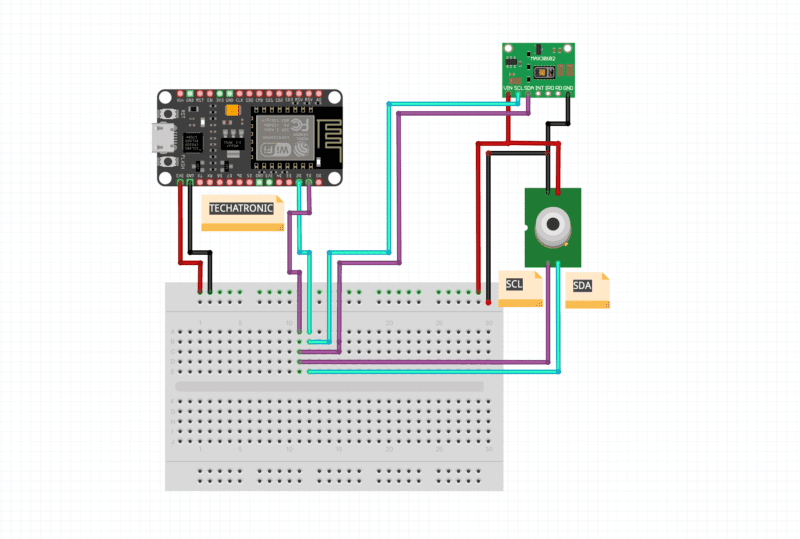
Now it turns to Connect the wires together. As we know both the sensor supports only I2C communication.
in I2C communication we used SDA and SCL pins of the sensor as well as the controllers. we need to connect both SDAs from MAX30100 (pulse sensor) and MAX6014 (IR temperature Sensor) to the NodeMCU SDA pin which is location at D2.
and same for the SCL pins from both the devices should be connect to the D1 pin of the NodeMCU that is SDA pin of NodeMCU.
To complete the Connections of the health monitoring project you need to connect Vcc of both device to the 3v3 pin at NodeMCU and connect all Gnd together.
All the things are given here in the circuit diagram.
Health Monitoring IoT Project Code.
To upload the code you need to do some pre-activities such as installing libraries and setup the Blynk application which will help to code the system.
But first, you need to set up your Arduino ide with Nodemcu to program the board.
After that you need to download the given
Libraries:-
Now upload this code into the esp8266
 #include <Wire.h>
 #include <Adafruit_MLX90614.h>
 Adafruit_MLX90614 mlx = Adafruit_MLX90614();
 #include <ESP8266WiFi.h>
 #include <BlynkSimpleEsp8266.h>
 #include "MAX30100_PulseOximeter.h"
 #include <SimpleTimer.h>
#define BLYNK_PRINT Serial


 char auth[] = "Yke06TwjsD6ncVZZFAfCXEAvLFPXPOMV";  // You should get Auth Token in the Blynk App.
 char ssid[] = "DESKTOP";              // Your WiFi credentials.
 char pass[] = "asdfghjkl";               // Your WiFi Password.
 #define MS   300
 BlynkTimer timer;
 PulseOximeter pox;
 uint32_t tsLastReport = 0;


 void onBeatDetected() {
    Serial.println("♥ Beat!");
}


 void setup()
 {


  Serial.begin(115200);
  Serial.print("device initilize");
  Blynk.begin(auth, ssid, pass);
   Serial.print("wifi connected");


  if (!mlx.begin())
  {
    Serial.println("Error connecting to MLX sensor. Check wiring.");
    while (1);
  };


  //Blynk.begin(auth, ssid, pass);
  Serial.print("Initializing pulse oximeter..");
  if (!pox.begin()) {
   Serial.println("FAILED");

  for (;;);
  }

  else
  {
   Serial.println("SUCCESS");

  }

  //Blynk.begin(auth, ssid, pass);
  pox.setIRLedCurrent(MAX30100_LED_CURR_24MA);           //Register a callback for the beat detection
  pox.setOnBeatDetectedCallback(onBeatDetected);
  timer.setInterval(300L, getSendData);
  Serial.print("Emissivity = ");
Serial.println(mlx.readEmissivity());
  Serial.println("================================================");

 }


 void loop()
 {


  timer.run(); // Initiates SimpleTimer
  pox.update();

  if (millis() - tsLastReport > MS) {
   // to android cell phone application
   Serial.print("BPM: ");
   Serial.print(pox.getHeartRate());

   //Blynk.virtualWrite(V2, pox.getHeartRate() );

   Serial.print("  SpO2: ");
   Serial.print(pox.getSpO2());
    Serial.print("%");
   Serial.print("   ");

   //Blynk.virtualWrite(V3, pox.getSpO2());


   Serial.print("Temperature");
   Serial.print(" ");
   Serial.println(mlx.readObjectTempF());

   //Blynk.virtualWrite(V4, mlx.readObjectTempF());


    Blynk.run();
    Blynk.virtualWrite(V2, pox.getHeartRate() );
    Blynk.virtualWrite(V3, pox.getSpO2());


   tsLastReport = millis();
  }


  }


 void getSendData()

 {
  Blynk.virtualWrite(V4, mlx.readObjectTempF());


 }
After uploading the code you have to set up the Blynk app.
How to setup up the Blynk app
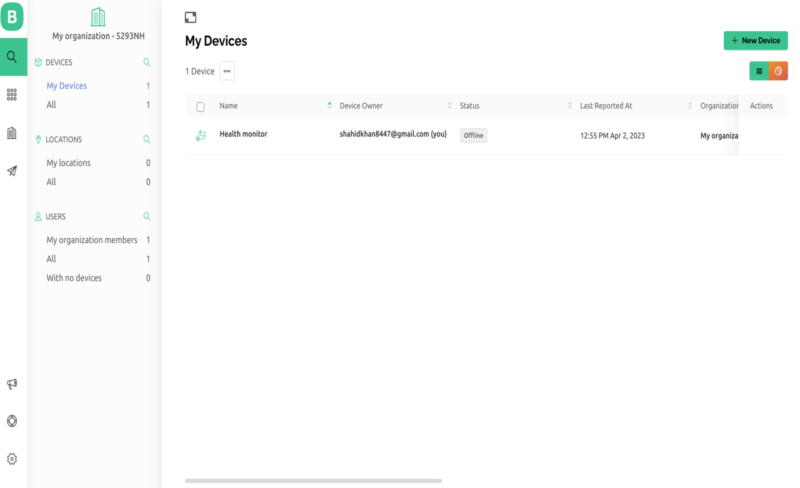
Click on the 9 dot after the search bar in left upper side.

Click on the new template. and create new template as per your requirements.

Now add data stream in your template.

Copy authorised token from your device info.

Copy this authorised token in your code and upload the code again.
Now download Blynk application in your mobile phone. and follow the given instructions.

SO, here we have completed our health monitoring project with blynk application. we have shared all the details and data if you have any questions or any query you can ask us in the comment section.