
Volt Hello there, do you want to make your own Fire Security System Using Flame Sensor and Arduino. If so, you have come to the right destination. In this article, we will learn how the Flame Sensor works with Arduino.
If you are new to this field and want to make such cool Arduino projects then click here. The security system we proposed for protection against fire consist of a Flame Sensor that detects fire. Check more projects on Flame Sensor.
Arduino is a microcontroller that uses ATmega328p IC for its functioning. There are many types of Arduino boards available but in this project, we use Arduino UNO. The system detects the fire and alerts the surrounding by turning on the LED and protect the place by turning on the dc fan.
Just follow the simple steps as discussed below to make your own Fire Security System. Also, check Digitalize GSM-based forest fire alert system.

How does the Security System work?
The Fire Security System we made uses a flame sensor to detects fire and is controlled using Arduino. When the sensor detects fire then a dc fan connected to Arduino through a single channel Relay starts moving and blows air towards the fire.
At the same time, LED goes on which is controlled by Arduino. To protect the LED from high voltage, we connect a 100-ohm resistor on its leg and then to the breadboard. You can also use a buzzer in place of an LED.
In this way, the system works and alert about the fire. This project can be used in industries, offices, schools, and also in hotels. Make the circuit according to the circuit diagram given below and just upload the given Arduino code. Provide power to the Arduino so that the project starts working.
Also check latest Arduino Projects and Iot Projects.


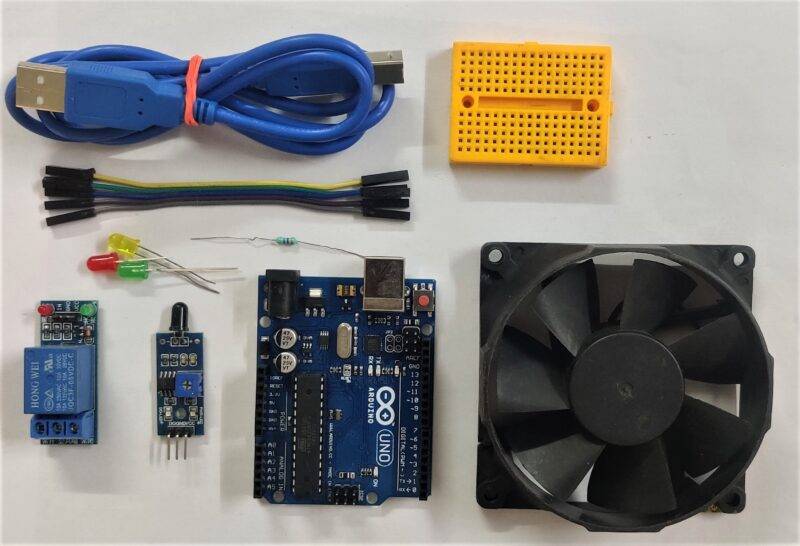
Components Required
| Arduino UNO | BUY LINK |
| Flame sensor | BUY LINK |
| LED | BUY LINK |
| 100-ohm Resistor | BUY LINK |
| single channel relay | BUY LINK |
| connecting wires | BUY LINK |
| Breadboard | BUY LINK |
| Arduino UNO cable | BUY LINK |
| DC Fan | BUY LINK |
| 9 volt battery | BUY LINK |
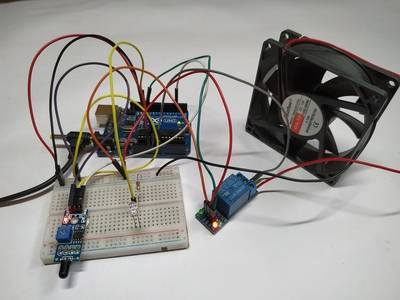
Circuit Diagram of the Project

| Arduino UNO | Flame Sensor | |
| D3 Pin | DO Pin | |
| ( +5V ) | + ( Positive ) | |
| GND | G ( Negative ) | |
| Arduino UNO | 5v Single Relay Module | |
| D12 Pin | IN 1 | |
| ( +5V ) | VCC | |
| GND | GND | |
| Arduino UNO | LED | 220 Ohm Resistor |
| D8 Pin | Terminal 1 | |
| GND | Terminal 1 | |
| Terminal 2 | Terminal 2 | |
| D8 Pin | Terminal 3 | |
| Arduino UNO | DC Fan | 5v Single Relay Module |
| Normally Open | ||
| VCC | Common | |
| Terminal 1 | Normally Closed | |
| GND | Terminal 2 |
Connect the 5-volt pin and ground(GND) pin of the Arduino to the positive and negative rails of the breadboard.
Attach Vin of the Arduino to the given pin of the Relay Module. Join the digital 3 pin of the Arduino to the D0 pin of the Flame sensor, digital 12 pin to the Relay Module, and digital 13 pin to the positive leg of the LED.
Use a 100-ohm resistor to connect LED and negative rail on the breadboard. Join the positive wire of the DC fan to Relay as shown and the negative wire to the negative rail of the breadboard.
Connect the ground of the Relay and Flame sensor to the negative rail on the breadboard and the VCC of the Relay and Flame sensor to the positive rail on the breadboard. Once the circuit is completed upload the given code.

Code of the Project
NOTE – Upload the code given below to the Arduino.
 int LED = 13;
 int RELAY = 12;
 int Flame_sensor = 3;
 int Flame_detected;
 void setup()
 {
  Serial.begin(9600);
  pinMode(LED, OUTPUT);
  pinMode(RELAY, OUTPUT);
   digitalWrite(RELAY, HIGH);
  pinMode(Flame_sensor, INPUT);
 }
 void loop()
 {
  Flame_detected = digitalRead(Flame_sensor);
   Serial.println(Flame_detected);
   //delay(100);
  if (Flame_detected == 0)
  {
   Serial.println("Flame detected...! take action immediately.");
   digitalWrite(LED, HIGH);
    digitalWrite(RELAY, LOW);
    delay(500);
  }
  else
  {
   Serial.println("No Flame detected. stay cool");
   digitalWrite(LED, LOW);
   digitalWrite(RELAY, HIGH);
  }
 }
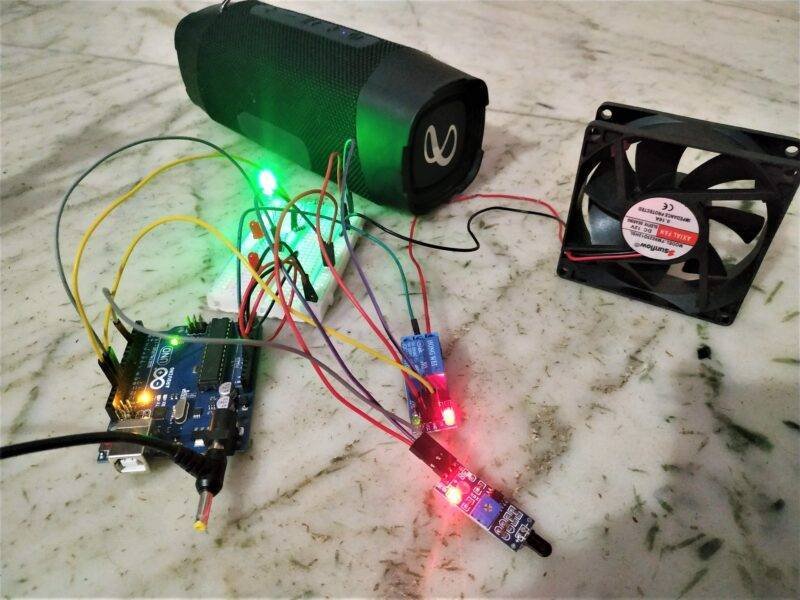
Final Project Looks Like
This is how the final project looks. Hope you understand the project well and if you are facing any errors do inform us in the comment section below. Please check out more Arduino Tutorials , Raspberry Pi Projects & IOT projects.
HAPPY LEARNING!