
Flame detector Using Arduino
FIRE is a small world but causes many disasters every year in many parts of the world. Like forest fires in amazon are very common we couldn’t stop them completely but take some preventive measures to control them so today we are going to make a fire alarm that will detect even small fires within an acceptable range of sensors. for that, we are making a flame detector using Arduino. Most of the buildings are now built with a fitted flame sensor along with an automatic water pump sprinkler which turns on whenever the sensor detects a fire, also many advanced cars also now come with the inbuilt flame sensor in case the car catches fire.
The sensor we are using today to demonstrate the flame sensor working is very simple and easy to available in the market but there are many more advanced sensors available in the market which can be used in professional projects as it may yield better results.
how does a Flame detector using Arduino works?

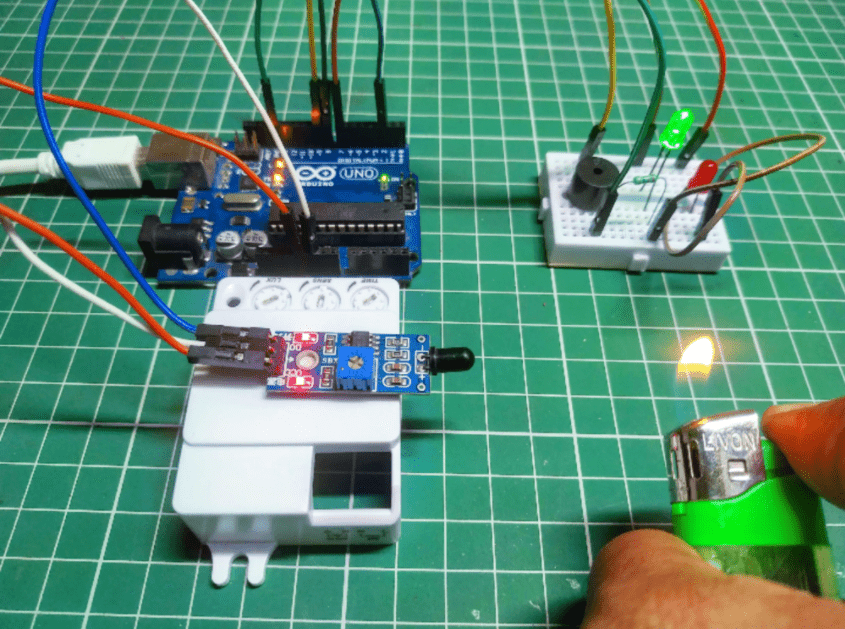
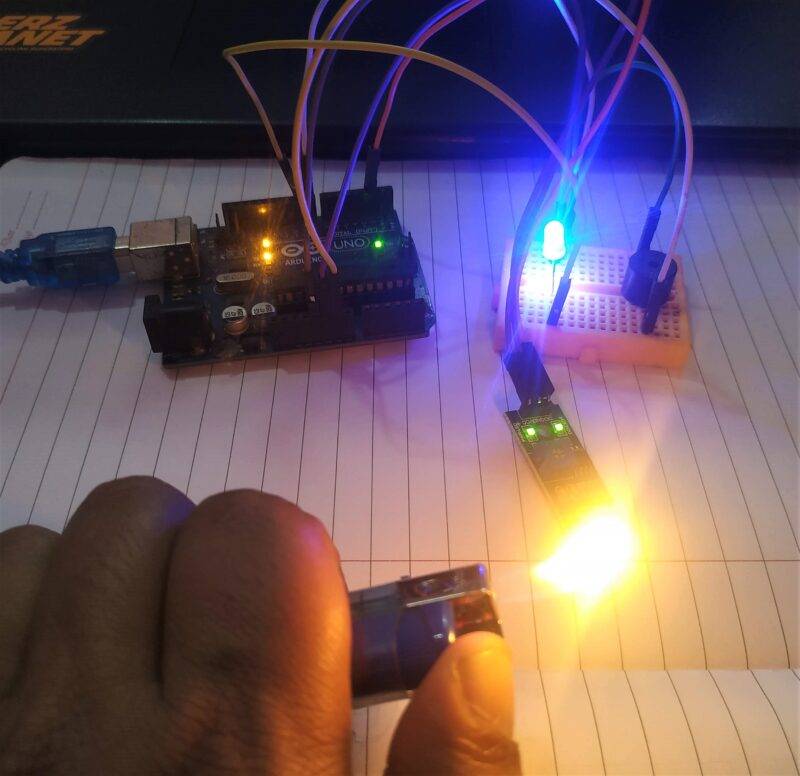
The components we use are always basic ones like Arduino UNO, LED’s, buzzer, and of course a flame sensor which is the most important thing in today’s DIY section. So, let’s discuss the sensor, as always, this sensor is built out of LM393 IC which is most common in various sensors available in the market due to its voltage comparator and amplifier. The working of this flame detector Arduino is almost similar to that of IR sensor interface but there is a difference instead of IR light emitted by IR emitter led it detects the IR light coming out the fire which is then amplified and digital and analog signal id then send to the microcontroller to do further processing.
The sensor also has an onboard power led and also an onboard Status led which will blink whenever the sensor detects fire in its nearby environment
The sensor gives both digital and analog output. The difference between the two is explained by me in many articles previously uploaded it you haven’t read them just go for it. The amount of amplification can be adjusted with the help of potentiometers given on the sensor PCB
*NOTE: – THE SENSOR VALUES DEPEND ON THE DISTANCE OF THE SOURCE TO THE SENSORS AND MAY VARY ON DISTINCT SOURCE FROM FIRE.
Arduino flame sensor schematic

FEATURES AND APPLICATIONS: –
- Sense of fire is very accurate and fast
- Small body and easy to fix
- Adjustable value
- Low price
- Used in almost every fire-related project to avoid disasters
SENSOR SPECIFICATIONS: –
COMPONENTS NEEDED: –
| Arduino Uno | BUY LINK |
| red led | BUY LINK |
| Flame sensor | BUY LINK |
| breadboard | BUY LINK |
| Jumper wires | BUY LINK |
| 220ohm resistor | BUY LINK |
| buzzer | BUY LINK |
| 9 Volt Battery | BUY LINK |
You can buy all components together-BUY LINK

Arduino flame sensor circuit diagram:-

| Arduino UNO | Flame Sensor | |
| D2 Pin | DO Pin | |
| ( +5V ) | + ( Positive ) | |
| GND | G ( Negative ) | |
| Arduino UNO | Buzzer | |
| D9 Pin | Positive Terminal | |
| GND | Negative Terminal | |
| Arduino UNO | LED | 220 Ohm Resistor |
| D8 Pin | Terminal 1 | |
| GND | Terminal 1 | |
| Terminal 2 | Terminal 2 |
First, take the power lines onto the breadboard from the microcontroller
VCC/5v–>+ line and GND–> – line.
Then connect the sensor onto the breadboard and connect power to the sensor from powerlines using jumper wires.
Now connect D0 PIN OF SENSOR TO MICROCONTROLLER DIGITAL PIN 3.
Now connect led to the breadboard + to digital pin 13 of Arduino and – to gnd in series with 220-ohm resistor. Moreover, we can enhance this version by adding a buzzer to it also like in the above diagram. Connect -live of the buzzer to GND on a breadboard, and +tive to 5V on a breadboard.
flame sensor Arduino code:-
 //put this code in the ide of Arduino from this line
  int val = 0 ;
    void setup()
    {
      Serial.begin(9600);
      pinMode(2,INPUT); // Flame sensor output pin connected
      pinMode(8,OUTPUT); // Led
      pinMode(9,OUTPUT); // Buzzer
    }
    void loop()
    {
     val = digitalRead(2); // Flame sensor output pin connected
     Serial.println(val); // see the value in serial mpnitor in Arduino IDE
     delay(10);
     if(val == 0 )
     {
      digitalWrite(8,HIGH); // Led ON
      digitalWrite(9,HIGH); // Buzzer ON
     }
     else
     {
      digitalWrite(8,LOW); // Led OFF
      digitalWrite(9,LOW); // Buzzer OFF
     }
     }

flame sensor with Arduino working
On code with buzzer, the code starts with initializing a variable in the setup section we begin serial communication and we assign pins and pin mode to which sensor, led, and the buzzer is connected.
In the loop section, we read the value of the sensor on the analog pin, and then according to the condition above we turn the led and buzzer on or off.
In code with led only the working is same but in loop section instead of the buzzer, we print text on the serial monitor