Table of Contents
Introduction
Hey guys, hope you are doing fine. In this post, we are going to make an GSM based home security system using Arduino UNO. This project can detect any type of obstacle present in front of it.
For detection of the obstacles, we are using an IR sensor with Arduino. You can read more articles on Arduino and IoT written by us. We are using AT commands for sending the SMS via the GSM module.
You just have to complete the circuit and then upload the given code to the Arduino.

Description
- For sending the notifications to the mobile phone we are using a GSM module.
- You have to write the mobile number in the code so that Arduino can process the code and successfully send the notification on it.
- When the IR sensor detects something in front of it then the LED will turn on.
- You can also view the live working of this project by opening the serial monitor tab in the Arduino IDE.
- When the SMS is successfully sent to your phone a message will display on the serial monitor that ‘ message has been sent ‘.
- You can also check the GSM based fire alarm project made by us.


Components Required for GSM based home security system
- Arduino UNO
- IR sensor
- LED
- 220 ohm resistor
- Jumper wires and a breadboard
- GSM sim 900 module
- USB cable for uploading the code

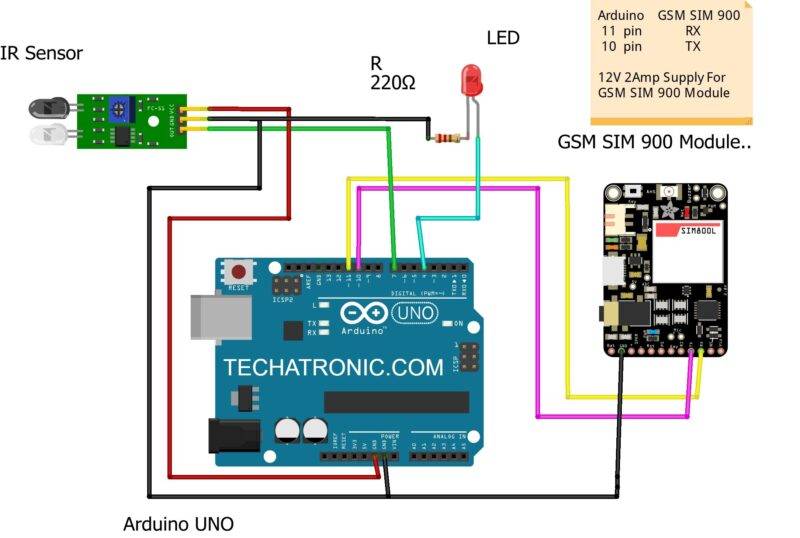
GSM based home security system Circuit diagram

| Arduino UNO | GSM SIM 900 Module | |
| 11 Pin | RX Pin | |
| 10 Pin | TX Pin | |
| GND | GND | |
| Arduino UNO | IR Sensor | |
| 7 Pin | OUT Pin | |
| 5 V | VCC | |
| GND | GND | |
| Arduino UNO | LED | 220 Ohm Resistor |
| 4 Pin | Anode Terminal | |
| GND | Terminal 1 | |
| Cathode Terminal | Terminal 2 |
- If you are not famalier with the interfacing of a GSM module with Arduino then do check it first.
- Take a GSM sim 900 module and connect its GND pin with the GND pin of the Arduino.
- Join the RX pin of the GSM module with the digital-11 pin of the Arduino.
- Attach the digital-10 pin of the Arduino with the TX pin of the GSM module.
- You have to provide a 12 volts 2 amp DC power supply to the GSM module.
- Now take an IR sensor and connect its VCC pin with the 5 volts pin of the Arduino.
- Join the GND pin of the IR sensor with the GND pin of the Arduino. Attach the OUT pin of the IR sensor with the digital-7 pin of the Arduino.
- Connect the negative leg of the LED with the GND pin of the Arduino via a 220 ohm resistor.
- Join the positive leg of the LED with the digital-4 pin of the Arduino.
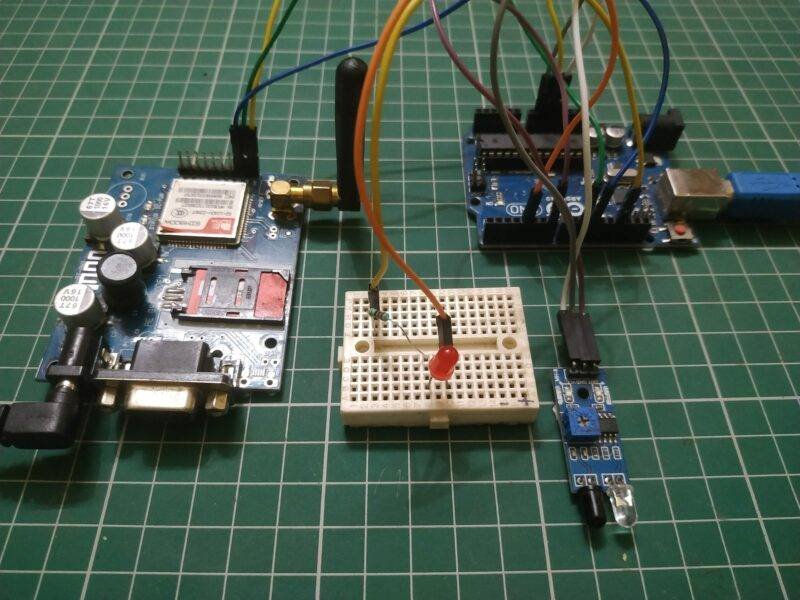
- Your circuit is ready to use now.
- now you can our latest project

Code for GSM Project
NOTE: Please upload the code which is given below to the Arduino. First of all install <SoftwareSerial.h> library to the Arduino IDE. If you don’t know how to install a zip library in the Arduino IDE then check it out first.
// Techatronic.com
 // Download Library of SoftwareSerial link given
 // https://github.com/PaulStoffregen/SoftwareSerial

  #include <SoftwareSerial.h>
  SoftwareSerial SIM900A(10,11);  // SoftSerial( RX , TX );
 // 10 pin connect to TX of GSM SIM 900 Module
 // 11 pin connect to RX of GSM SIM 900 Module

int val = 0 ;
void setup()
{

    Serial.begin(9600);   // sensor buart rate
    SIM900A.begin(9600);  // GSM buart rate
    pinMode(4,HIGH);      // LED connect D4


}
void loop()
{
  val = digitalRead(7);  //  IR sensor output pin connected D7
  Serial.println(val);   // see the value in serial mpnitor in Arduino IDE
  delay(1000);

  if (Serial.available()>0)
   switch(Serial.read())

    if (SIM900A.available()>0)
   Serial.write(SIM900A.read());

  if(val == 0 )  // Check your sensor Value 1 or 0
  // in my case IR sensor detect then value is 0 otherwise 1 you can change value
  {
     Serial.println ("Obstacle Detecting");
     digitalWrite(4,HIGH);   // LED ON
    Serial.println ("Sending Message");
  SIM900A.println("AT+CMGF=1");    //Sets the GSM Module in Text Mode
  delay(1000);
  Serial.println ("Set SMS Number");
   SIM900A.println("AT+CMGS=\"xxxxxxxxxx\"\r"); //Mobile phone number to send message, replace x by your number
  delay(1000);
  Serial.println ("Set SMS Content");
  SIM900A.println("Some one IS comming, be safe");// Messsage content
  delay(100);
  Serial.println ("Finish");
  SIM900A.println((char)26);// ASCII code of CTRL+Z

  delay(1000);
  Serial.println ("Message has been sent ");
  digitalWrite(4,LOW);   // LED OFF

  }
  }
We hope that you liked this project and understand the concept behind it. If you have any doubts regarding this project then feel free to ask them in the comments section which is given below. Also, do check out more projects on Arduino and Raspberry Pi.
Thanks for reading.


Can I get the write up for this project???
Please, can I get the write up for this project?
it doesnt work it is fake
the gsm part not working at all
Hi Will this work in Europe with a suitable SIM card ?
Message is not sending by gsm