
Hello Techies, We are back with a new project which can help you in your home , office and many other place. this is our whether monitoring system using Arduino . in this project we are using Arduino as the main board which will process all the instruction. This weather monitoring system will monitor the temperature and humidity of the surrounding. weather monitoring station will use the nrf transreceiver to transmit and receive the data. this Arduino weather station system can be used to monitoring the temperature of remote area where you can not survive or stay. So, this weather station using arduino can help there. for example you want to monitor the temperature and humidity at the mountain then it can really help.
Table of Contents
Introduction
Weather monitoring station or weather monitoring system using Arduino is the simplest arduino project which can help us to monitoring the temperature and humidity by using one sensor. there we are using the DHT11 sensor which is easily capable to measure the temperature and humidity. also we are using the arduino uno there which help to calculate & display the information to the display. DHT11 sensor have two things inside one is for detecting the temperature and other one is detecting the humidity. also, there are two system in this project one is transmitter and other is receiver. both have NRF for communication.
nrf have good range for data transmission that’s why we are using nrf module for communication. At the side of transmitter there are dht11 sensor which gives the output to the transmitter microcontroller and transmitter microcontroller of weather monitoring system send this information to the receiver via transmitter nrf. Now the receiver nrf receive the same information and send it to the Arduino microcontroller attached at the receiver end. Now the arduino of weather station display this information to the Display.
Also check oue lastest Arduino projects and IOT projects.
Construction of weather monitoring system
Components required
| Arduino UNO | BUY LINK |
| DHT11 Sensor | BUY LINK |
| NRF Module | BUY LINK |
| 16X2 LCD Display | BUY LINK |
| Jumper wires | BUY LINK |
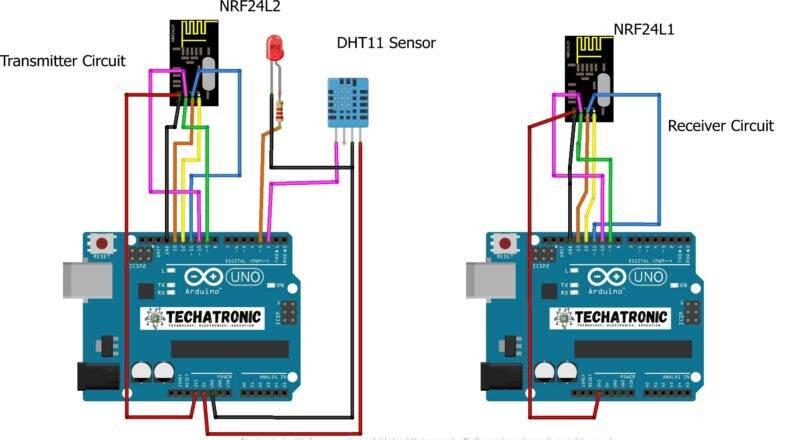
At the Transmitter site connect DHT11 sensor and NRF with Arduino to complete the transmitter. first, you have to connect all these components as per the given circuit diagram. after that you have to upload the code in the same Arduino.
At the receiver, site connect LCD and NRF to the Arduino and connect these all components according to the given weather monitoring circuit diagram. and after that upload the code into the same Arduino.
Weather monitoring station circuit diagram

Weather monitoring station Arduino Code
Transmitter Code
#include "DHT.h"
#include <SPI.h>
#include "RF24.h"
#include <nRF24L01.h>

#define DHTPIN 2
#define DHTTYPE DHT11

RF24 radio (9, 10); // CE, CSN
const byte address[6] = "00001";
//const int led_pin = 13;

struct package
{
  float temperature ;
  float humidity ;
};


typedef struct package Package;
Package data;

DHT dht(DHTPIN, DHTTYPE);

void setup()
{
    Serial.begin(9600);
//    pinMode(led_pin, OUTPUT);
    dht.begin();
    radio.begin();                  //Starting the Wireless communication
radio.openWritingPipe(address); //Setting the address where we will send the data
radio.setPALevel(RF24_PA_MIN);  //You can set it as minimum or maximum depending on the distance between the transmitter and receiver.
radio.stopListening();
}


void loop()
{
//  digitalWrite(led_pin, HIGH); // Flash a light to show transmitting
  readSensor();
  Serial.print("HUmidity   ");
  Serial.print(data.humidity);
  Serial.print("    Temperature  ");
  Serial.println(data.temperature);
  radio.write(&data, sizeof(data));
//  digitalWrite(led_pin, LOW);
  delay(1000);
}

void readSensor()
{
 data.humidity = dht.readHumidity();
 data.temperature = dht.readTemperature();
}
Receiver code
#include <SPI.h>
#include <nRF24L01.h>
#include <RF24.h>
RF24 radio(9, 10); // CE, CSN
const byte address[6] = "00001";
struct package
{
  float temperature ;
  float humidity ;
};

typedef struct package Package;
Package data;


void setup() {
  Serial.begin(9600);
  radio.begin();
  radio.openReadingPipe(0, address);
  radio.setPALevel(RF24_PA_MIN);
  radio.startListening();
}
void loop() {
  if (radio.available()) {
   // char text[32] = "";
    radio.read(&data, sizeof(data));
    Serial.print("Humidity  ");
    Serial.print(data.humidity);
    Serial.print("      Temperature  ");
    Serial.println(data.temperature);


  }

}
Weather monitoring station working
DHT11 sensor in weather monitoring system measure the temperature and humidity by the inbuilt sensors. there are two sensor one of them measure the temperature and other one always measure the humidity. There is an IC too which send the data in the multiplex form and we always connect this dht11 sensor with the Arduino and Arduino get this information. after getting the information the Arduino works on the data. according to the code and inbuilt sensor library. to make this weather monitoring system Arduino calibrate the sensor by using the coding which we will upload it to the Arduino. check this iot base weather station.
Now, after diffrenciation the arduino get two different values and then Arduino sends this information to the NRF in the transmitter by the SPI protocol in which we are using MOSI, MISO, SCK , RST pins of the Arduino and NRF module. Arduino weather station is not that easy to made. but you can make it by the given information. Now, Transmitting side NRF connected to the Receiving side NRF by the address programmed into the both NRF’s.
Now the receiver receive the data and extract the temperature and humidity. and receiver Arduino display that data at the 16X2 LCD display.
related project
Arduino Weather Station | Rain Sensor of Arduino | DHT11
IoT Weather Monitoring System | IoT project
DHT11 Temperature and Humidity Sensor | DHT11 sensor
What is Rain Sensor? Rain sensor explanation, Working & Uses