
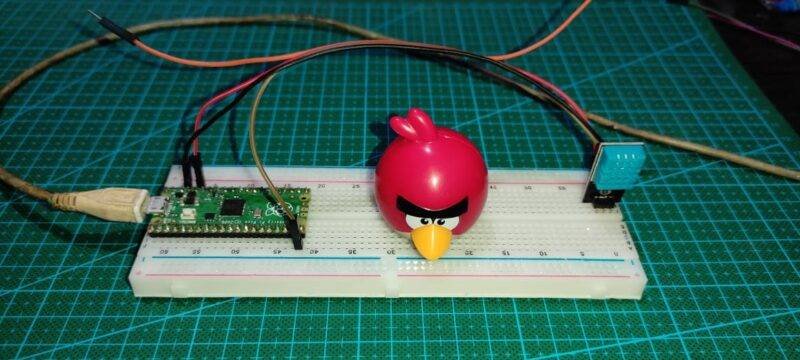
Hello Folks, Welcome back to another interesting article on Raspberry Pi PICO. In this article, we’ll discuss Interfacing DHT 11 Sensor with Raspberry Pi PICO. DHT 11 sensor is very famous for collecting data about temperature and humidity near you. This is very easy to hook up to any Boards like Arduino also to Raspberry Pi which you can visit for more detailed information. So let’s start.
Table of Contents
Material Required
If you want to know more about the raspberry pi pico you can visit our page – Raspberry Pi PICO
For rest we have covered in below paragraph as you can see. The main highlight of this sensor we are covering here because we have to interface this dht11 sensor with Arduino.
DHT11

This sensor is very famous among hobbyists and makers to make projects which require collecting data on nearby temperature and Humidity. Due to its simplicity and single-pin data communication, it and compact size, it is the most valuable one. So, we are monitoring the temperature and humidity via Raspberry pi pico with DHT11 Sensor. Although it gives accurate data but due to its simplicity in structure and formation of the sensor as it measures the resistance between two wires to measure temperature and humidity packed in an enclosed structure. Yet it is not recommended by me for high quality and important, or you may say professional projects with this pair of raspberry pi pico with dht11 .
In PICO, we’ll be using this sensor to check temperature and humidity using code in MicroPython and Thonny IDE. It is as simple as in Arduino but only due to the new language you may find it difficult. Also, I’ll try to make a separate library for it. So it’ll be easy for you guys to use it using simple statements to interface dht11 sensor with raspberry pi pico.

Circuit Diagram
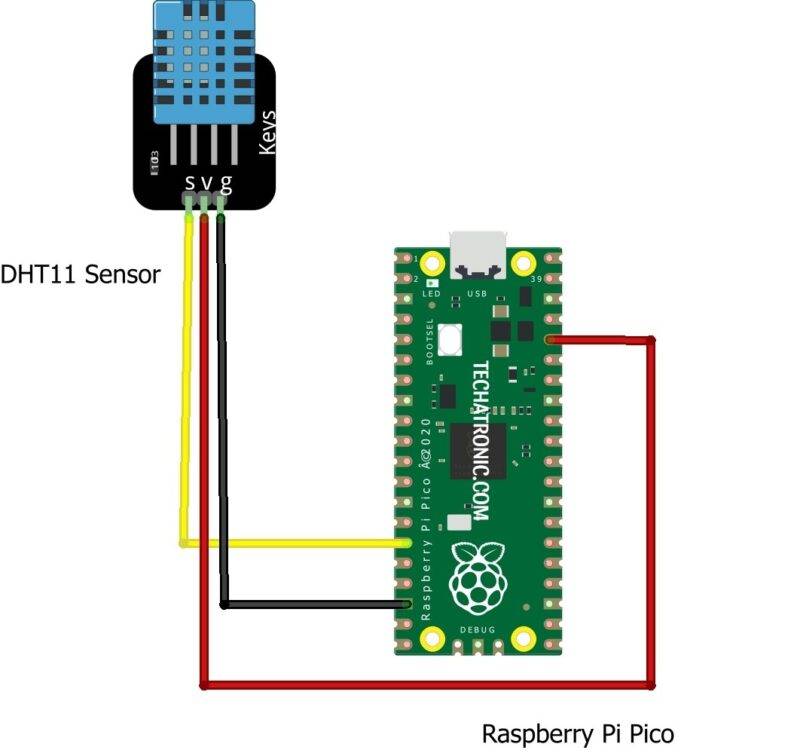
DHT11 OUT Pin to GPIO 15 of Raspberry Pi PICO
|
Raspberry Pi PICO |
DHT11 Sensor |
|
GPIO 15 Pin |
S ( Signal Pin ) |
|
3V3 Volt |
V (Power) |
|
GND |
G (Ground ) |
Dht11 with Raspi pico Code & Explanation
Explanation
To make the code work we have to make a module for the sensor and the code for it is given below. Save this code with the dht22.py in Raspberry Pi PICO. Also, this code works for DHT11 module also.
 import utime
 import rp2
 from rp2 import PIO, asm_pio
 from machine import Pin
 @asm_pio(set_init=(PIO.OUT_HIGH),autopush=True, push_thresh=8)
 def DHT22_PIO():
   # clock set at 500Khz Cycle is 2us
   # drive output low for at least 20ms
   set(y,1)          # 0
   pull()           # 1
   mov(x,osr)         # 2
   set(pindirs,1)       # 3 set pin to output
   set(pins,0)         # 4 set pin low
   label ('waitx')
   jmp(x_dec,'waitx')     # 5 decrement x reg every 32 cycles
   set(pindirs,0)       # 6 set pin to input
   # STATE A. Wait for high at least 80us. max should be very short
   set(x,31)          # 7
   label('loopA')
   jmp(pin,'got_B')      # 8
   jmp(x_dec,'loopA')     # 9
   label('Error')
   in_(y,1)          # 10
   jmp('Error')        # 11 Infinity loop error
   # STATE B. Get HIGH pulse. max should be 40us
   label('got_B')
   set(x,31)          # 12
   label('loop_B')
   jmp(x_dec,'check_B')    # 13
   jmp('Error')        # 14
   label('check_B')
   jmp(pin,'loop_B')      # 15
   # STATE C. Get LOW pulse. max should be 80us
   set(x,31)          # 16
   label('loop_C')
   jmp(pin,'got_D')      # 17
   jmp(x_dec,'loop_C')     # 18
   jmp('Error')        # 19
   # STATE D. Get HIGH pulse. max should be 80us
   label('got_D')
   set(x,31)          # 20
   label('loop_D')
   jmp(x_dec,'check_D')    # 21
   jmp('Error')        # 22
   label('check_D')
   jmp(pin,'loop_D')      # 23
   # STATE E. Get Low pulse delay. should be around 50us
   set(x,31)          # 24
   label('loop_E')
   jmp(pin,'got_F')      # 25
   jmp(x_dec,'loop_E')     # 26
   jmp('Error')        # 27
   # STATE F.
   # wait 40 us
   label('got_F')
   nop() [20]         # 28
   in_(pins,1)         # 29
   # now wait for low pulse
   set(x,31)          # 30
   jmp('loop_D')        # 31
 class DHT22:
   def __init__(self,dataPin, powerPin=None,dht11=False,smID=1):
     self.dataPin = dataPin
     self.powerPin = powerPin
     self.dht11 = dht11
     self.smID = smID
     self.dataPin.init(Pin.IN, Pin.PULL_UP)
     if self.powerPin is not None:
       self.powerPin.init(Pin.OUT)
       self.powerPin.value(0)
     self.sm= rp2.StateMachine(self.smID)
   def read_array(self):
     if self.powerPin is not None:
       self.powerPin.value(1)
     utime.sleep_ms(100)
     #start state machine
     self.sm.init(DHT22_PIO,freq=500000,
            set_base=self.dataPin,
            in_base=self.dataPin,
            jmp_pin=self.dataPin)
     if self.dht11:
       self.sm.put(10000)
     else:
       self.sm.put(1000)
     self.sm.active(1)
     value = []
     for i in range(5):
       value.append(self.sm.get())
     self.sm.active(0)
     return value
   def read(self):
     value = self.read_array()
     sumV = 0
     for i in range(4):
       sumV += value[i]
     if (sumV & 0xff) == value[4]:
       if self.dht11:
         humidity=value[0] & 0x7f
         temperature=value[2]
       else:
         humidity=((value[0]<<8) + value[1])/10.0
         temperature=(((value[2] &0x7f) << 8) + value[3]) /10.0
       if (value[2] & 0x80) == 0x80:
         temperature = -temperature
       return temperature, humidity
     else:
       return None, None
 if __name__ == "__main__":
   from machine import Pin
   from DHT22 import DHT22
   import utime
   dht_data = Pin(15,Pin.IN,Pin.PULL_UP)
   dht_sensor=DHT22(dht_data,Pin(14,Pin.OUT),dht11=False)
   while True:
     T,H = dht_sensor.read()
     if T is None:
       print(" sensor error")
     else:
       print("{:3.1f}'C {:3.1f}%".format(T,H))
     #DHT22 not responsive if delay to short
     utime.sleep_ms(500)
Then after this, we write our main code in which we first import some important modules like the pin function from the machine module, time module, and dht22 module which we have just created. Then we define the data pin which assigns the pin number and type.
After that, we put the main code in the while loop in the try & except form which runs the code in an infinite loop. but we have to give some delay in the loop to maintain the time interval of the DHT11 sensor Projects. This is important, else the PI PICO will read the sensor as unresponsive. and the program will terminate with an error.
Code
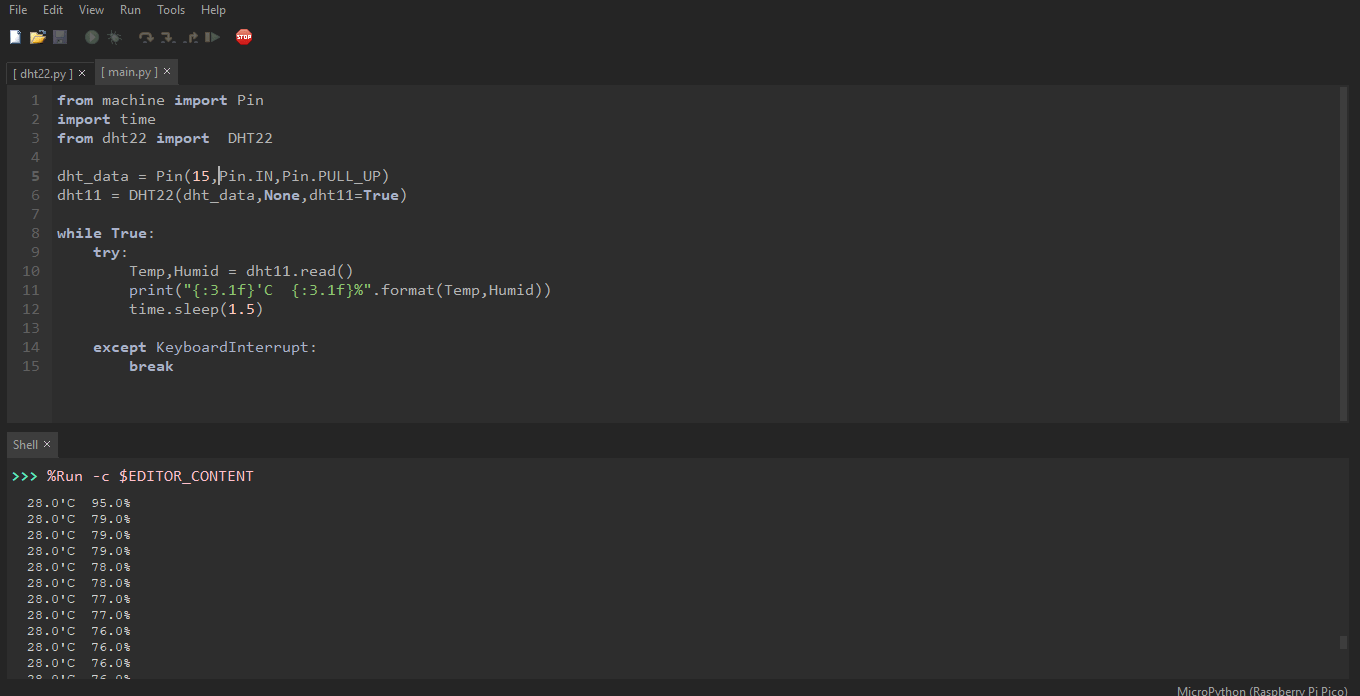
from machine import Pin
import time
from dht22 import  DHT22

dht = Pin(15,Pin.IN,Pin.PULL_UP)
dht11 = DHT22(dht,None,dht11=True)

while True:
    try:
        Temp,Humid = dht11.read()
        print("{:3.1f}'C  {:3.1f}%".format(Temp,Humid))
        time.sleep(1.5)

    except KeyboardInterrupt:
        break
With this we have completed the DHT11 tutorial with Raspberry Pi PICO. For any issues, comment down below. Until then, enjoy articles like this.
also check the Raspberry Pi Projects and Raspberry Pi PICO Projects.