

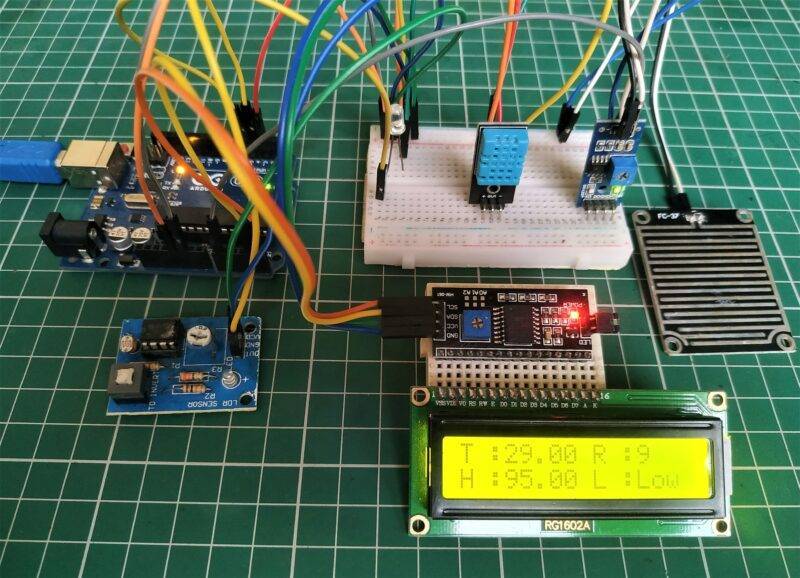
Hello-tech Folks, Today I am back with another interesting topic, i.e., Arduino Weather Station. As for the name, you might have guessed it. Yes, it displays weather conditions in your nearby area by using some sensors, also it displays it on the 16 x 2 LCD. It sounds interesting to hear that also working on it. Also, this project is on NodeMCU as IoT Weather Station. So, let us begin building it up.
What is Arduino Weather Station Rain Sensors?
We have used some basic sensors which can be found easily in local shops or on the internet also with this we will Arduino UNO Microcontroller for this purpose. Let us discuss the sensors we have used in this project.
DHT11 is a combined sensor for temperature and humidity. Using this sensor, we will calculate the temperature and humidity around you. This sensor comes in enclosed packing. Which does not reveal the inside packing of it. But here I will tell you that it simply measures the resistance between two probes inside it to measure temperature and humidity as for different temperature and humidity conditions resistance will be different and, on the value, we gather data of temperature and humidity.

Rain sensor, this sensor is used to detect rain in your area. It is not any type of hi-tech thing, but a simple contact pas included with Op-Amp to boost out the signal for the microcontroller. When rains fall on the provided pad it conducts some current and voltage and the Op-Amp detects it. But due to the very small value, it can be directly detected by the microcontroller to boost or amplify the signal, we use Op-Amp for this purpose. Also, it has a Potentiometer to control the amplifying times or gain of Op-Amp.

LDR, this module s used to detect the day and night condition and turn on the LCD backlight accordingly.
16×2 LCD with I2C Module, this is used to display data that we have gathered through various sensors.
Material Required for Rain Sensor:
| Arduino UNO with Cable | BUY LINK |
| 16 x 2 LCD with I2C Module | BUY LINK |
| DHT11 Sensor | BUY LINK |
| Rain Sensor | BUY LINK |
| LDR Sensor | BUY LINK |
| Breadboard | BUY LINK |
| Jumper wires | BUY LINK |
| LED | BUY LINK |
| 220 ohm Resistor | BUY LINK |
| A programming system with Arduino IDE installed |
Can you Buy all components together –BUY LINK

Arduino Weather Station Circuit Diagram:

| Arduino UNO | Rain Drop Sensor | |
| A0 Pin | AO Pin ( Signal Pin ) | |
| ( +5V ) | VCC ( Positive ) | |
| GND | GND ( Negative ) | |
| Arduino UNO | DHT 11 Temperature & Humidity Sensor | |
| D3 Pin | S ( Signal ) | |
| ( +5V ) | V ( VCC ) | |
| GND | G ( GND ) | |
| Arduino UNO | LDR Sensor Module | |
| D4 Pin | DO Pin ( Signal Pin ) | |
| ( +5V ) | VCC | |
| GND | GND | |
| Arduino UNO | I2C LCD Module | |
| A4 Pin | SDA Pin | |
| A5 Pin | SCL Pin | |
| ( +5V ) | VCC | |
| GND | GND | |
| 16 * 2 LCD | I2C LCD Module | |
| 16 Connect | 16 Connect | |
| Arduino UNO | LED | 220 Ohm Resistor |
| D5 Pin | Anode Pin | |
| Cathode Pin | Terminal 1 | |
| GND | Terminal 2 |
MODULES –> ARDUINO PINS
LCD I2C (SCL) –> A5
LCD I2C (SDA) –> A4
RAIN SENSOR (A0) –> A0
DHT11 (OUT) –> PIN 3
LDR MODULE (D0) –> PIN 4
GREEN LED (ANODE) –> PIN 5
Arduino Weather Station & Rain Sensor CODE & Working:
 // TECHATRONIC.COM
 // I2C LIBRARY
 // https://github.com/fdebrabander/Arduino-LiquidCrystal-I2C-library
 // Adafruit DHT sensor library:
 // https://github.com/adafruit/DHT-sensor-library
 #include <Wire.h>
 #include <LiquidCrystal_I2C.h>
 LiquidCrystal_I2C lcd(0x3F, 16, 2);
 // IF IN LCD IS NOT PRINTED ANY THING THEN CHANGE THIS VALUE 0x3F TO 0x27
 #include <DHT.h>
 DHT dht(3, DHT11); // DHT11 Sensor pin D3
 void setup()
 {
  Serial.begin(9600); // See the connection status in Serial Monitor
  lcd.init();
  lcd.backlight();
  dht.begin();
  // Setup a function to be called every second
  pinMode(5,OUTPUT); // LED pin
 }
 void loop()
 {
  float h = dht.readHumidity();
  float t = dht.readTemperature();
  int r = analogRead(A0);    // Rain Drop Sensor Pin A0
  bool l = digitalRead(4);    // LDR sor Pin D4
  delay(100);
  r = map(r, 0, 1023, 100, 0);
  if (l == 0)
  {
   lcd.setCursor(9, 1);
   lcd.print("L :");
   lcd.print("High");
   lcd.print(" ");
   Serial.print("LDR Sensor : ");
   Serial.println("High");
   digitalWrite(5, HIGH);    // LED ON
  }
  else if (l == 1)
  {
   lcd.setCursor(9, 1);
   lcd.print("L :");
   lcd.print("Low");
   lcd.print(" ");
   Serial.print("LDR Sensor : ");
   Serial.println("Low");
   digitalWrite(5, LOW);     // LED OFF
  }
  lcd.setCursor(0, 0);
  lcd.print("T :");
  lcd.print(t);
   Serial.print("Temperature : ");
  Serial.println(t);
  lcd.setCursor(0, 1);
  lcd.print("H :");
  lcd.print(h);
  Serial.print("Humidity : ");
   Serial.println(h);
  lcd.setCursor(9, 0);
  lcd.print("R :");
  lcd.print(r);
  lcd.print(" ");
  Serial.print("Rain Sensor : ");
  Serial.println(r);
  Serial.println("   " );
 }


As the code starts, we initialize some basic libraries needed for the code to function, then we create an LCD object needed for I2C communication. Also, we create a DHT11 object to create communication with the sensor.
In the setup section, we begin serial communication and DHT11 communication also we initialize and turn on the LCD backlight. This section also defines pinMode for LED pin.

Well, in the loop section we read data from the DHT11 sensor, Rain sensor & LDR sensor. And according to the condition defines displays data on the LCD. Data refreshes every 100 ms. Now open the Serial monitor to see the output of the data received from the sensor. Also, you can see this info on the LCD attached to the project.
With this, we have completed our today’s project on Arduino Weather Station. I hope you like it and if you face any issues ask me in a comment.