
Hello Techies, Today we are making a very interesting and trending project here which is a Human Following robot. a robot that follows the human-like puppy. in this project you will learn a lot of things like the ultrasonic Arduino interface, working with the Arduino motor shield, and much more.
So we are going to share all the data to make it possible. Arduino robots are very easy to make and very interesting to make. this is also the Arduino-based robot. we have made a lot of Arduino robot-like obstacle avoiding robot and line following robot.
So, today we are going to make a human following robot in the Arduino robot series. To make this project follow all the instructions which we gonna share over here.
Table of Contents
What is Human following Robot | Arduino robot
Hre after the name all the persons are thinking about the Robot what is it? and what does the meaning of this title? will it really follow the humans? No this is basically the following robot that can follow anything.
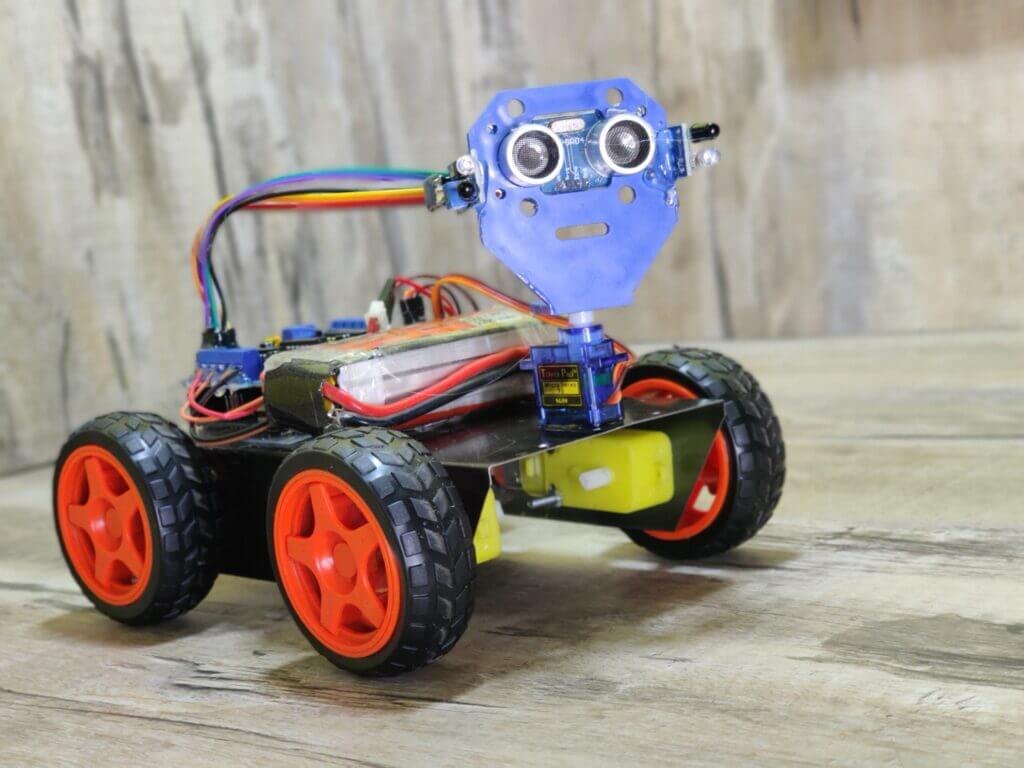
This Arduino robot having a sensor that can detect any object near it and can follow this object. if you come in front of the robot it will start following you. this robot consists ultrasonic sensor and IR sensor which help to follow the object. this is similar to the obstacle avoiding robot only but opposite in the working. the human following robot is best in the project nowadays. you can make this awesome robot with the given

How does it work?
To know the working of this awesome human following robot read this paragraph.
when you come near to the robot starts to follow you. there are 4 wheels in the robot. and 4 motors attached to the chassis. now there are three sensors on the robot one is an ultrasonic sensor and two IR sensor which arranges like two sensors left and right to the ultrasonic sensor. and when you put your hand near to the ultrasonic sensor the robot will start forward.
If you turn your hand to the left side the Arduino robot moves on the left side, and if you put your hand in the right the robot will move in the right direction. so, how the whole system works we will talk about this.
when you put your hand in from of the ultrasonic sensor then the sensor detects you and sends this information to the Arduino. there is some distance prefix in the Arduino so if your hand is away from the sensor it will not read that. and if your hand is near to the sensor it will read it.
Now Arduino knows that there is something in front of the sensor and Arduino send some instruction to the motor driver and motor driver trigger the motors. and the Arduino robot starts to move forward we need to run all motor forward.
Now, what about the sensors. Ir sensor works on infrared light which can also detect the object near to it. so there is two IR sensor one is at the left side of ultrasonic sensor and other is at the right side of the ultrasonic sensor. when anything comes near to the left sensor Arduino got the information that there is something is near to the left sensors and according to the code, the robot will turn to the left. and the same process for the right sensor. so this is how the human following robot works.
Here are giving all the steps and you can refer to the given video to make this awesome project.
For commercialization, I finally chose AiPCBA to complete the PCB assembly service.

Components Required:
| Arduino UNO | BUY LINK |
| Arduino Motor Driver shield | BUY LINK |
| Jumper wires | BUY LINK |
| 4 BO motors | BUY LINK |
| 9V battery | BUY LINK |
| 4 wheel | BUY LINK |
| Chassis | BUY LINK |
| Ultra sonic sensor | BUY LINK |
| 2 IR sensor | BUY LINK |
| on-off switch | BUY LINK |
| servo motor | BUY LINK |
Can you buy all components together-BUY LINK

There we need a circuit diagram also.
https://www.youtube.com/watch?v=lcr9i9rrIPs
Human following robot Circuit Diagram.

| Arduino UNO | Ultrasonic Sensor 1 | ||||
| ( +5V ) | VCC | ||||
| GND | GND | ||||
| A1 Pin | Trig Pin | ||||
| A0 Pin | Echo Pin | ||||
| Arduino UNO | Servo Motor | ||||
| D10 Pin | OUT Pin ( Orange Colour ) | ||||
| ( +5V ) | VCC ( Red Colour ) | ||||
| GND | GND ( Black Colour ) | ||||
| Arduino UNO | IR Sensor 1 | IR Sensor 2 | |||
| A2 Pin | Out Pin | ||||
| A3 Pin | Out Pin | ||||
| ( +5V ) | VCC | VCC | |||
| GND | GND | GND | |||
| Arduino Motor Shield | Switch | 9 -12 volt Supply | |||
| Terminal 1 | VCC | ||||
| Power | Terminal 2 | ||||
| GND | GND | ||||
| Arduino Motor Shield | Motor 1 | Motor 2 | Motor 3 | Motor 4 | |
| M 1 | A | Terminal 1 | |||
| B | Terminal 2 | ||||
| M 2 | A | Terminal 1 | |||
| B | Terminal 2 | ||||
| M 3 | A | Terminal 1 | |||
| B | Terminal 2 | ||||
| M 4 | A | Terminal 1 | |||
| B | Terminal 2 |
Human following Robot Arduino robot code
//Arduino Human Following Robot
// You have to Install the AFMotor and NewPing library Before Uploading the sketch//
// To install the libraries ( first download the AF Motor driver, NewPing and Servo Library zip file //
// then Go to Skecth >> Include Library >> Add .Zip Library >> Select The downloaded zip file >> Done) //
// Contact me on instagram for any question(Insta Id : DIY.Builder)
#include<NewPing.h>
#include<Servo.h>
#include<AFMotor.h>
#define RIGHT A2
#define LEFT A3
#define TRIGGER_PIN A1
#define ECHO_PIN A0
#define MAX_DISTANCE 100
NewPing sonar(TRIGGER_PIN, ECHO_PIN, MAX_DISTANCE);
AF_DCMotor Motor1(1,MOTOR12_1KHZ);
AF_DCMotor Motor2(2,MOTOR12_1KHZ);
AF_DCMotor Motor3(3,MOTOR34_1KHZ);
AF_DCMotor Motor4(4,MOTOR34_1KHZ);
Servo myservo;
int pos =0;
void setup() {
// put your setup code here, to run once:
Serial.begin(9600);
myservo.attach(10);
{
for(pos = 90; pos <= 180; pos += 1){
myservo.write(pos);
delay(15);
} for(pos = 180; pos >= 0; pos-= 1) {
myservo.write(pos);
delay(15);
}for(pos = 0; pos<=90; pos += 1) {
myservo.write(pos);
delay(15);
}
}
pinMode(RIGHT, INPUT);
pinMode(LEFT, INPUT);
}
void loop() {
// put your main code here, to run repeatedly:
delay(50);
unsigned int distance = sonar.ping_cm();
Serial.print("distance");
Serial.println(distance);
int Right_Value = digitalRead(RIGHT);
int Left_Value = digitalRead(LEFT);
Serial.print("RIGHT");
Serial.println(Right_Value);
Serial.print("LEFT");
Serial.println(Left_Value);
if((Right_Value==1) && (distance>=10 && distance<=30)&&(Left_Value==1)){
Motor1.setSpeed(120);
Motor1.run(FORWARD);
Motor2.setSpeed(120);
Motor2.run(FORWARD);
Motor3.setSpeed(120);
Motor3.run(FORWARD);
Motor4.setSpeed(120);
Motor4.run(FORWARD);
}else if((Right_Value==0) && (Left_Value==1)) {
Motor1.setSpeed(200);
Motor1.run(FORWARD);
Motor2.setSpeed(200);
Motor2.run(FORWARD);
Motor3.setSpeed(100);
Motor3.run(BACKWARD);
Motor4.setSpeed(100);
Motor4.run(BACKWARD);
}else if((Right_Value==1)&&(Left_Value==0)) {
Motor1.setSpeed(100);
Motor1.run(BACKWARD);
Motor2.setSpeed(100);
Motor2.run(BACKWARD);
Motor3.setSpeed(200);
Motor3.run(FORWARD);
Motor4.setSpeed(200);
Motor4.run(FORWARD);
}else if((Right_Value==1)&&(Left_Value==1)) {
Motor1.setSpeed(0);
Motor1.run(RELEASE);
Motor2.setSpeed(0);
Motor2.run(RELEASE);
Motor3.setSpeed(0);
Motor3.run(RELEASE);
Motor4.setSpeed(0);
Motor4.run(RELEASE);
}else if(distance > 1 && distance < 10) {
Motor1.setSpeed(0);
Motor1.run(RELEASE);
Motor2.setSpeed(0);
Motor2.run(RELEASE);
Motor3.setSpeed(0);
Motor3.run(RELEASE);
Motor4.setSpeed(0);
Motor4.run(RELEASE);
}
}
In uploading the code you may encounter errors.
so you need to install some libraries.
Obstacle Avoiding robot using Arduino
line following robot Arduino Tutorial
Obstacle avoiding robot using Arduino- Two sensor
How to Make Self balancing Robot
Remote Control Robot Using Arduino and TSOP Sensor Module
All the best guys.