
Table of Contents
Introduction
Hey guys, welcome back to Techatronic. This time we are with the latest project which could be a major project in the IoT section.
This is smart farming using IoT in this project we will use the server to store the sensor data this is similar to our recent smart agriculture using IoT project. but in this project, we are going to use more than 6 sensors.
although, this will be going to be very tough Cause we are going to use 7 sensors with the esp8266. there is 1 analog pin in the nodemcu but we will use many. this is very not easy but we have done it and going to share all the details and information with you guys.
This is the advanced idea for iot farming. this could be used in agriculture as well. all the data is available on the server so you can monitor it from anywhere.

What is Smart farming using IoT?
Smart farming project is in trend nowadays. everyone wants their farm and land to be smart because it is attractive and techy and also it reduces the manpower they needed to make the system work.
so, if you also want to make such a system follow the given instructions. the IoT farming project sends all the data to the server. now see the working of the project.
- there is some sensor that have to be put in the soil and open thinkspeak website.
- now there you have to log in and create a channel.
- and the channel link you need to put in the code.
- now the update in sensor reading will be updated on the thingspeak server.
- note the time when you have started and then monitor the changes with the time.
- when you change the soil conditioning then the changes you can see at the server like we have done before at the smart agriculture project.
So, this is iot based on smart farming I hope you will deploy it into your garden or farm.
How we can make this smart farming using IoT?
Now, here one question arises how we can make this? what components we need. so we are going to share all the detail and instruction which can help you to make this awesome smart farm IoT project.
here you need to know some basics of NodeMcu, Programming and electronic basic. if you don’t have you can refer our more article on that topics.
Many of the students facing problems to set up the nodemcu in Arduino who can search on our website.
- Here, you need a circuit diagram, code, and thingspeak instruction. so we are going to give you all the things below. follow all the steps and make your circuit as we have given.
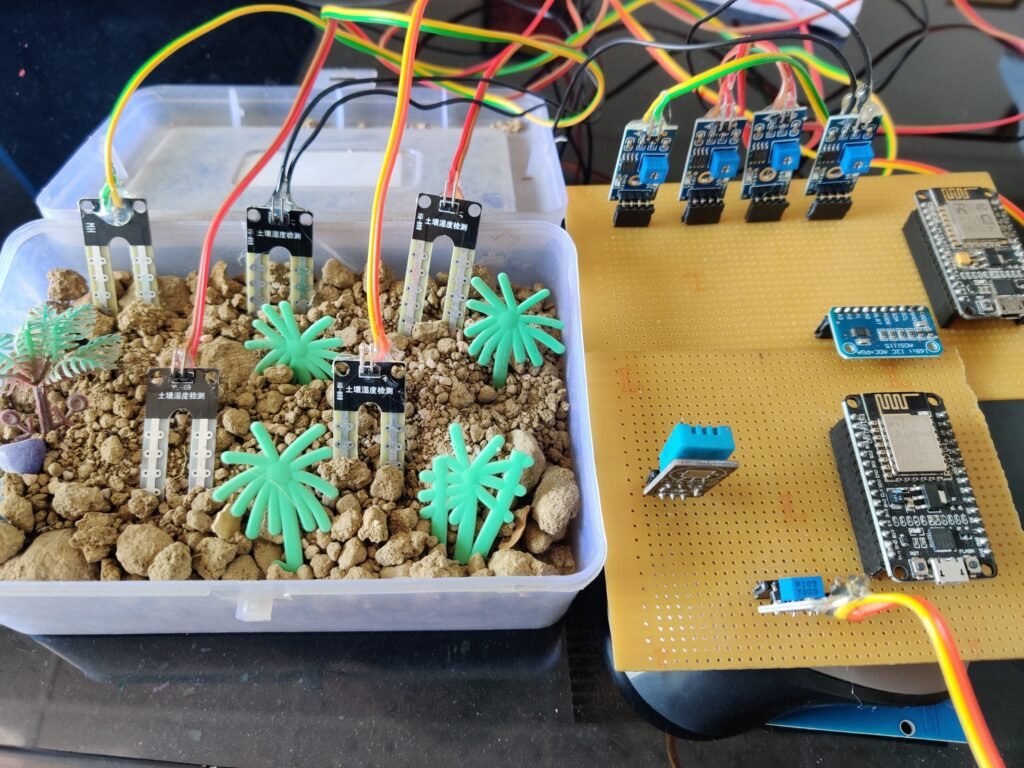
- Here we are going to use two nodemcu.
- because we have here 5 analog sensors and 1 DHT.
- so we will use 4 soil moisture sensors with the Nodemcu 1 and dht11 and 1 soil moisture sensor with the second node MCU.
and there we need two codes for these two nodemcu.
So, make this project carefully. upload first code with the first nodemcu as we have given below.
Components Required:-
| NodeMcu-2 | BUY LINK |
| General-purpose PCB | BUY LINK |
| 4 channel ADC multiplexer | BUY LINK |
| 5 soil moisture sensor | BUY LINK |
| DHT11 | BUY LINK |
| Breadboard | BUY LINK |
| Jumper wires | BUY LINK |
Can you buy all components together-BUY LINK
Smart farming using IoT Circuit Diagram (1st nodemcu)

Connection Diagram
| Nodemcu esp8266 | 4 Channel ADC | |||
| VV, Vin | VCC | |||
| G, GND | GND | |||
| D1 Pin | SCL Pin | |||
| D2 Pin | SDA Pin | |||
| Soil 1 Sensor | Soil 2 Sensor | Soil 3 Sensor | Soil 4 Sensor | 4 Channel ADC |
| VCC | VCC | VCC | VCC | VCC |
| GND | GND | GND | GND | GND |
| A0 | A0 | |||
| A0 | A1 | |||
| A0 | A2 | |||
| A0 | A3 |
- After making all the connections You need to upload the Code.
- Connect all the Soil moisture sensor Vcc to the Nodemcu Vin
- Connect Multiplexer Vcc to the Nodemcu Vin
- Connect all the Soil moisture sensor Gnd to the Nodemcuo Gnd
- Connect Multiplexer Gnd to the Nodemcu Gnd
- Soil moisture sensor Output connects to the Multiplexer as given in the above image
After complete, the connection Upload the given code to the Nodemcu. This code is for the First nodemcu.
Smart farming using IoT Code( first nodemcu)
 // TECHATRONIC.COM
 // library
 // https://github.com/adafruit/Adafruit_ADS1X15
 // https://github.com/manrueda/ESP8266HttpClient
 // https://github.com/ekstrand/ESP8266wifi
 #include <ESP8266WiFi.h>
 #include <ESP8266HTTPClient.h>
 #include <Adafruit_ADS1015.h>
 WiFiClient client;
 String thingSpeakAddress= "http://api.thingspeak.com/update?";
 String writeAPIKey;
 String tsfield1Name;
 String request_string;
 HTTPClient http;
  Adafruit_ADS1115 ads;
 void setup()
 {
  Serial.begin(115200);
  delay(3000);
  WiFi.disconnect();
  Serial.println("START");
  WiFi.begin("DESKTOP","asdfghjkl");   // Wifi ("ID","Password")
  while ((!(WiFi.status() == WL_CONNECTED))){
  delay(300);
  Serial.println("...");
  }
  Serial.println("I AM CONNECTED");
   Serial.println("Hello!");
  Serial.println("Getting single-ended readings from AIN0..3");
  Serial.println("ADC Range: +/- 6.144V (1 bit = 3mV/ADS1015, 0.1875mV/ADS1115)");
  ads.begin();
 }
 void loop()
 {
  int16_t adc0, adc1, adc2, adc3;
  Serial.println(" ");
   adc0 = ads.readADC_SingleEnded(0);
   adc0 = adc0 / 25;
   adc1 = ads.readADC_SingleEnded(1);
   adc1 = adc1 / 25;
   adc2 = ads.readADC_SingleEnded(2);
   adc2 = adc2 / 25;
   adc3 = ads.readADC_SingleEnded(3);
   adc3 = adc3 / 25;
   Serial.print("SOIL MOISTURE in persent 1% : "); Serial.println(adc0);
   Serial.print("SOIL MOISTURE in persent 2% : "); Serial.println(adc1);
   Serial.print("SOIL MOISTURE in persent 3% : "); Serial.println(adc2);
   Serial.print("SOIL MOISTURE in persent 4% : "); Serial.println(adc3);
   Serial.println(" ");
   if (client.connect("api.thingspeak.com",80))
   {
    request_string = thingSpeakAddress;
    request_string += "key=";
    request_string += "2YGO2FHN3XI3GFE7";
    request_string += "&";
    request_string += "field1";
    request_string += "=";
    request_string += adc0;
    http.begin(request_string);
    http.GET();
    http.end();
   }
 delay(10);
   if (client.connect("api.thingspeak.com",80))
   {
    request_string = thingSpeakAddress;
    request_string += "key=";
    request_string += "2YGO2FHN3XI3GFE7";
    request_string += "&";
    request_string += "field2";
    request_string += "=";
    request_string += adc1;
    http.begin(request_string);
    http.GET();
    http.end();
   }
 delay(10);
  if (client.connect("api.thingspeak.com",80))
   {
    request_string = thingSpeakAddress;
    request_string += "key=";
    request_string += "2YGO2FHN3XI3GFE7";
    request_string += "&";
    request_string += "field3";
    request_string += "=";
    request_string += adc2;
    http.begin(request_string);
    http.GET();
    http.end();
   }
 delay(10);
  if (client.connect("api.thingspeak.com",80))
   {
    request_string = thingSpeakAddress;
    request_string += "key=";
    request_string += "2YGO2FHN3XI3GFE7";
    request_string += "&";
    request_string += "field4";
    request_string += "=";
    request_string += adc3;
    http.begin(request_string);
    http.GET();
    http.end();
   }
 delay(10);
 }
For the second NodMCU

Connection table 2
| Nodemcu esp8266 | Dht11 Sensor |
| VV, Vin | ( V ) VCC |
| G, GND | ( G ) GND |
| D3 Pin | ( S ) OUT Pin |
| Nodemcu esp8266 | Soil Moisture Sensor |
| VV, Vin | VCC |
| G, GND | GND |
| A0 Pin | ( A0 ) OUT Pin |
- Connect DHT 11 output pin to the Nodemcu d3
- Soil moisture sensor output to be connected to the A0
- Connect DHT 11 VCC to the Nodemcu Vin
- Connect DHT 11 Gnd to the Nodemcu Gnd
After complete, the connection Upload the given code to the Nodemcu. This code is for the second nodemcu.
For Second NodeMCU:-
 // TECHATRONIC.COM
 // library
 // https://github.com/adafruit/DHT-sensor-library
 // https://github.com/manrueda/ESP8266HttpClient
 // https://github.com/ekstrand/ESP8266wifi
 #include <ESP8266WiFi.h>
 #include <ESP8266HTTPClient.h>
 String thingSpeakAddress= "http://api.thingspeak.com/update?";
 String writeAPIKey;
 String tsfield1Name;
 String request_string,request_string1;
 HTTPClient http;
 #include <DHT.h> // Including library for dht
 // library
 // https://github.com/adafruit/DHT-sensor-library
 #include <ESP8266WiFi.h>
 String apiKey = "77921LPMGM2OAGQE";   // Enter your Write API key from ThingSpeak
 const char *ssid = "DESKTOP";     // replace with your wifi ssid and wpa2 key
 const char *pass = "asdfghjkl";    // WIFI Password
 const char* server = "api.thingspeak.com";
 #define DHTPIN 0     //pin D3 where the dht11 is connected
 DHT dht(DHTPIN, DHT11);
 WiFiClient client;
 void setup()
 {  dht.begin();
   Serial.begin(115200);
  delay(3000);
  WiFi.disconnect();
  Serial.println("START");
   WiFi.begin("DESKTOP","asdfghjkl");
  while ((!(WiFi.status() == WL_CONNECTED))){
   delay(300);
   Serial.println("...");
  }
  Serial.println("I AM CONNECTED");
 }
 void loop()
 {
   if (client.connect("api.thingspeak.com",80))
   {
    request_string = thingSpeakAddress;
    request_string += "key=";
    request_string += "77921LPMGM2OAGQE";
    request_string += "&";
    request_string += "field3";
    request_string += "=";
    request_string += analogRead(A0);
    http.begin(request_string);
    http.GET();
    http.end();
   }
   delay(10);
 float h = dht.readHumidity();
    float t = dht.readTemperature();
        if (isnan(h) || isnan(t))
          {
            Serial.println("Failed to read from DHT sensor!");
            return;
          }
              if (client.connect(server,80))  //  "184.106.153.149" or api.thingspeak.com
            {
                String postStr = apiKey;
                postStr +="&field1=";
                postStr += String(t);
                postStr +="&field2=";
                postStr += String(h);
                postStr += "\r\n\r\n";
                client.print("POST /update HTTP/1.1\n");
                client.print("Host: api.thingspeak.com\n");
                client.print("Connection: close\n");
                client.print("X-THINGSPEAKAPIKEY: "+apiKey+"\n");
                client.print("Content-Type: application/x-www-form-urlencoded\n");
                client.print("Content-Length: ");
                client.print(postStr.length());
                client.print("\n\n");
                client.print(postStr);
                Serial.print("Temperature: ");
                Serial.print(t);
                Serial.print(" degrees Celcius, Humidity: ");
                Serial.print(h);
                Serial.print(" Soil Sensor ");
                Serial.print(A0);
                Serial.println("%. Send to Thingspeak.");
             }
      client.stop();
      Serial.println("Waiting...");
  // thingspeak needs minimum 15 sec delay between updates
  delay(10);
 }
So, here we have given data for both setups now follow the given instruction to make the thingspeak server.
Thingspeak Setup
Step 1
Open Thingspeak website

Step 2
Register or login on the website
Login in Thingspeak


Step 3
Create a new channel here

Step 4
Tick mark in front of the channel and rename as you want

Step 6
Save this Channel

Step 7
Now, you can see your channel here

Step 8
Add Api
Copy your api key from here and paste in your code.

Step 9
Now you can see my channel

Now you can See your project data on the server. All the best for your project. and if you are unable to make this you can buy this project from us. link is given here.