

Hello there, Do you want to know how an ADXL335 or GY61 accelerometer works? Are you working on a DIY project that calls for the use of an accelerometer but you’re not sure how? If so, you’ve come to the right place. In this article, we’ll go over how to function, use, and interface an Arduino with accelerometer in a step-by-step guide. Hence, I hope you find this useful. We at Techatronic have already uploaded several Arduino Tutorials and detailed project guides related to Arduino which will be useful to learn the basics and programming of Arduino.
What Is Accelerometer?
Many Arduino projects, as well as other small electronics, use accelerometers as a sensor module, which outputs the changes in acceleration caused due to different factors. It has a three-axis sensor, which helps it can read changes in three dimensions, namely X, Y, and Z, Along with this there are many other sensors available. Arduino with accelerometer gives us the option to monitor all the 3 axis data on the serial monitor. According to the need, this can be adjusted. These three value helps to make many of electronics project and products. self-balancing robots are in trending nowadays.
The Accelerometer module consists of ADXL335 ic along with a 3.3v voltage regulator and some capacitors and resistors, so it helps the module measure the acceleration in the range of ±3g and output proportional analog values of range 0 t0 1023. based on these changes we have made Gesture Control Car,

How Does it Work?

In fact with the use of ADXl335 accelerometer sensor Arduino and some more sensor modules in addition to these, we can also make many DIY projects such as Quadcopters and Hexacopters, RC planes, etc.
Components Required:-
| Arduino Uno | BUY LINK |
| Adxl335 Accelerometer Module | BUY LINK |
| LEDs(Red, Green, Blue, and Yellow) | BUY LINK |
| 220-ohm Resistor | BUY LINK |
| Breadboard | BUY LINK |
| Jumper Wires | BUY LINK |
| Arduino Uno Cable | BUY LINK |

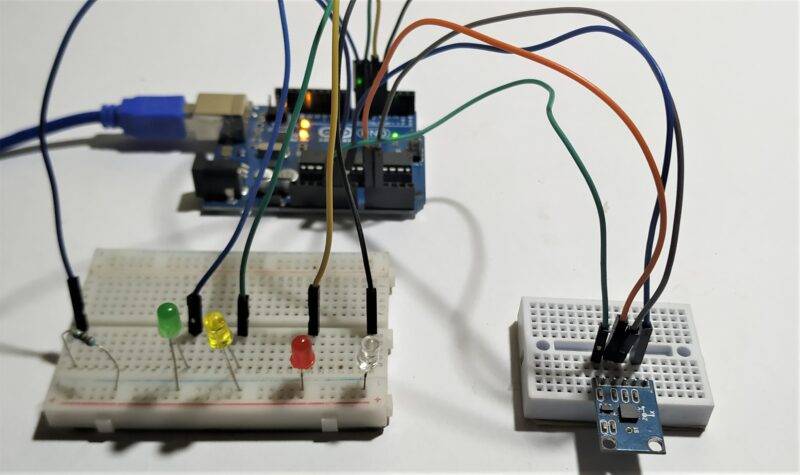
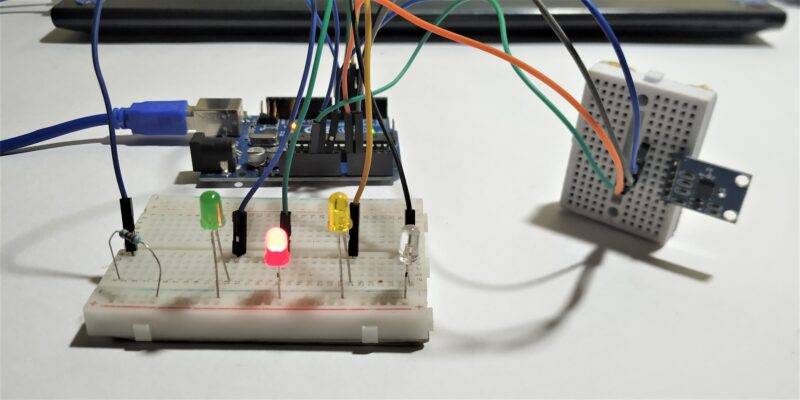
Arduino ADXL335 Circuit Diagram
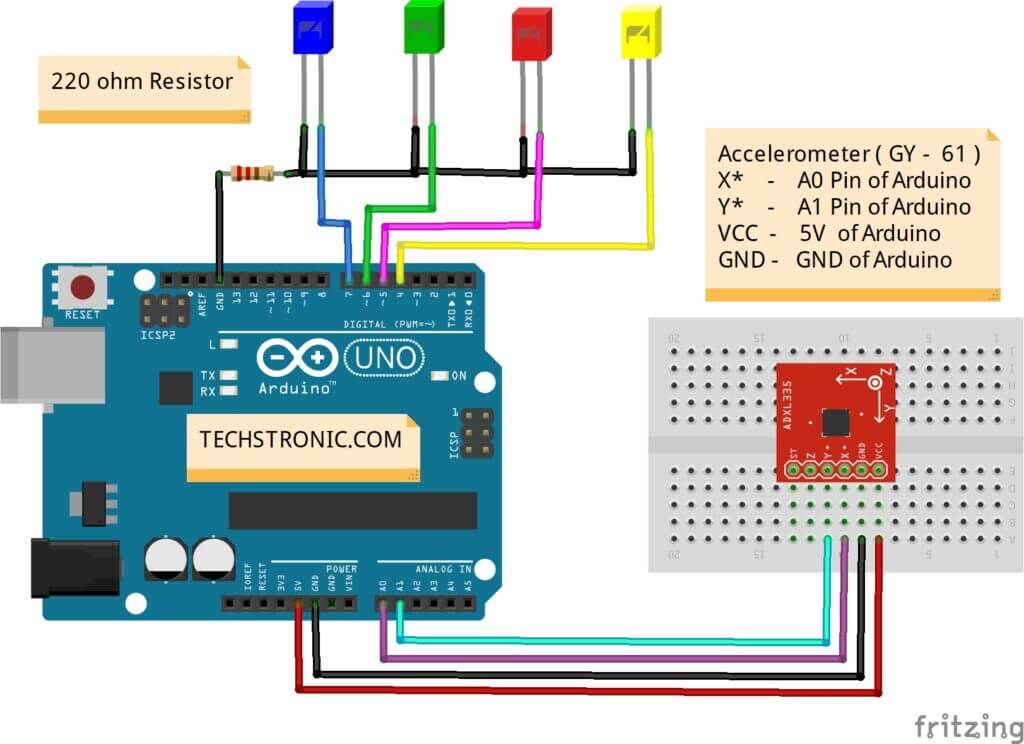
| Arduino UNO | 3 Axis Accelerometer | ||||
| A1 Pin | Y | ||||
| A0 Pin | X | ||||
| ( +5V ) | VCC | ||||
| GND | GND | ||||
| Arduino | LED B | LED G | LED R | LED Y | 220 Ohm Resistor |
| D7 Pin | Anode Pin | ||||
| D6 Pin | Anode Pin | ||||
| D5 Pin | Anode Pin | ||||
| D5 Pin | Anode Pin | ||||
| GND | Terminal 1 | ||||
| Cathode Pin | Cathode Pin | Cathode Pin | Cathode Pin | Terminal 2 |
- VCC of Module to 5V pin of Arduino UNO.
- GND of Module to GND pin of Arduino UNO.
- X* of Module to A0 of Arduino UNO.
- Y* of Module to A1 of Arduino UNO.
- Positive’+’ ends of LEDs to pins 4,5,6,7 of Arduino UNO Respectively.
- Negative ‘-‘ ends of LEDs to GND pin of Arduino UNO using 220-ohm Resistor.
ADXL335 Arduino code
 //TECHATRONIC.COM
 int m=0, n=0;
 void setup()
 {
   pinMode(A0, INPUT);
   pinMode(A1, INPUT);
   pinMode(4,OUTPUT);
   pinMode(5,OUTPUT);
   pinMode(6,OUTPUT);
   pinMode(7,OUTPUT);
   Serial.begin(9600);
 }
 void loop()
 {
   m = analogRead(A0);
   n = analogRead(A1);
   Serial.println(m);
   delay(100);
   Serial.println(n);
   delay(100);
  if(n>=375)
   {
     digitalWrite(4,HIGH);
     Serial.println("F");
   }
   else if(n<=320)
   {
     digitalWrite(5,HIGH);
     Serial.println("B");
   }
  else if(m>=375)
   {
     digitalWrite(6,HIGH);
     Serial.println("R");
   }
  else if(m<=315)
   {
    digitalWrite(7,HIGH);
    Serial.println("L");
   }
   else
   {
    digitalWrite(4, LOW);
    digitalWrite(5, LOW);
    digitalWrite(6, LOW);
    digitalWrite(7, LOW);
    Serial.println("N");
   }
   }
After Uploading the code, the output can be seen by opening the serial monitor in your Arduino IDE. If you need any help, you can ask them in the comment section below. I hope you liked this article.