
Welcome guys, in this article we are going to discuss shortest path finder using Arduino and ultrasonic sensor HC-SR 04. You have to follow the given procedure and paste the given code to the Arduino IDE application. We have already made various Arduino projects, Embedded projects, and Arduino tutorials on our website. You can visit them if you are new to the world of electronics and Arduino. You can also check out our E-book on Arduino.
What is shortest path finder
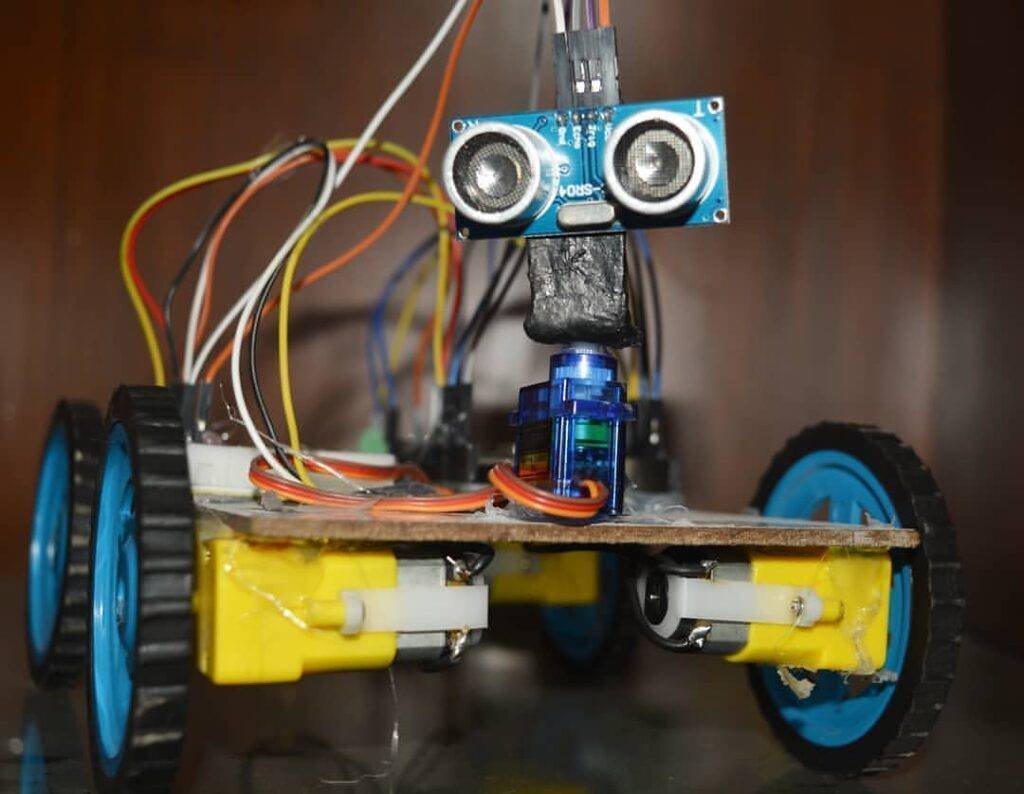
It is basically a robot that uses ultrasound (SONAR) to detect obstacles near it and according to them, it changes its path. By doing so the robot didn’t collapse and move freely in the provided space. Arduino UNO is used for controlling the instructions. We used an L298N motor driver module and 12 volts li-ion battery to power it to control the wheels. The complete setup is fixed on a chassis so that parts didn’t move and the wiring is not disturbed. Here we have made one more project which is known as Radar using Arduino and ultrasonic sensor.
How Does it Work?
The robot uses HC-SR 04 ultrasonic sensor to scan the left, right, and front views. The sensor is mounted on a servo motor that rotates in different directions. The Arduino is programmed in such a way that whenever an obstacle comes in front of the robot it stops and moves backward a little. Then it scans for the free path between left and right and in this way the path finder robot keeps moving. it works like the obstacle-avoiding robot a little. the ultrasonic sensor transmits the ultrasonic wave from one terminal of the ultrasonic sensor and from the other terminal. this is very basic and totally depends on the ultrasonic sensor working if you want to know the ultrasonic sensor working you can refer to our website.
Components Required
| Arduino UNO | BUY LINK |
| HC-SR 04 ultrasonic sensor | BUY LINK |
| Servo motor | BUY LINK |
| L298N motor driver module | BUY LINK |
| 12 volts LI-ion battery | BUY LINK |
| Chassis | BUY LINK |
| Arduino UNO Cable | BUY LINK |
| Jumper wires | BUY LINK |
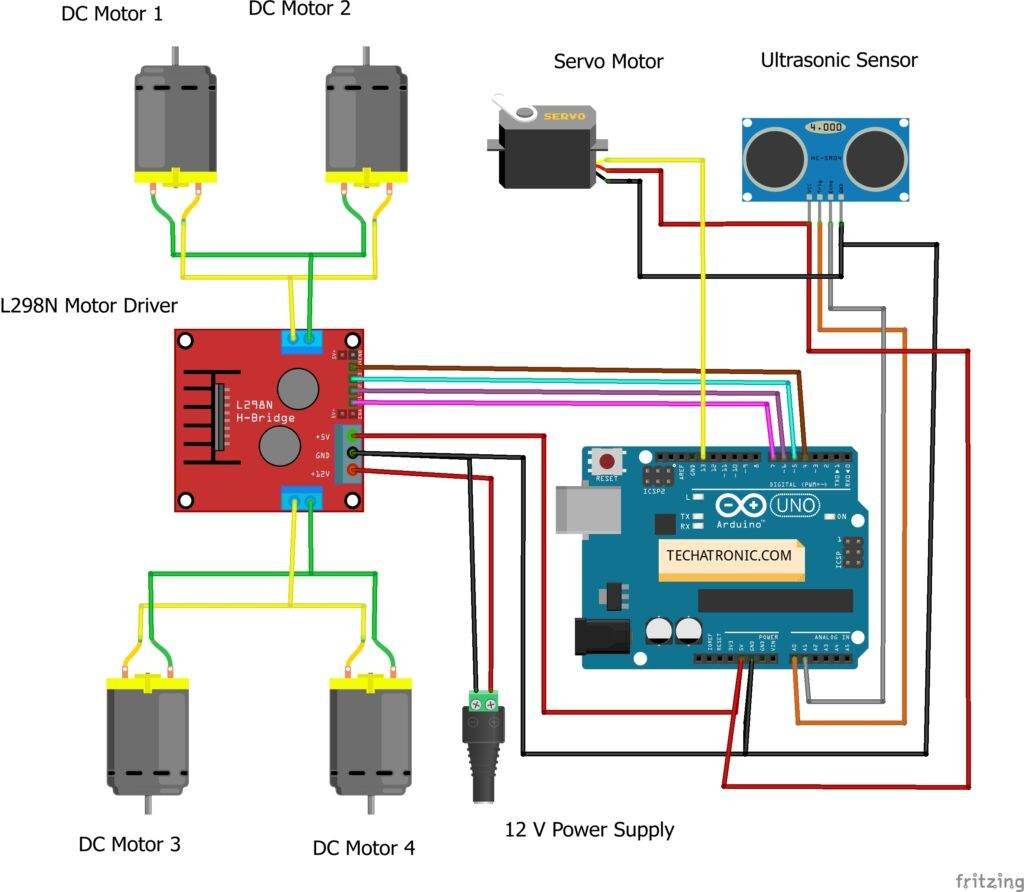
shortest path finder Circuit Diagram
Arduino Code shortest path finder
NOTE: you need to install the two libraries Servo.h, NewPing.h which can be downloaded into your Arduino IDE before uploading the code.
 #include <Servo.h>     //Servo motor library. This is standard library
 #include <NewPing.h>    //Ultrasonic sensor function library. You must install this library
 //our L298N control pins
 const int LeftMotorForward = 7;
 const int LeftMotorBackward = 6;
 const int RightMotorForward = 4;
 const int RightMotorBackward = 5;
 int pos=0;
 //sensor pins
 #define trig_pin A1 //analog input 1
 #define echo_pin A2 //analog input 2
 #define maximum_distance 200
 boolean goesForward = false;
 int distance = 100;
 NewPing sonar(trig_pin, echo_pin, maximum_distance); //sensor function
 Servo servo_motor; //our servo name
 Servo myservo;
 void setup(){
  pinMode(RightMotorForward, OUTPUT);
  pinMode(LeftMotorForward, OUTPUT);
  pinMode(LeftMotorBackward, OUTPUT);
  pinMode(RightMotorBackward, OUTPUT);
  servo_motor.attach(10); //our servo pin
  myservo.attach(13);
  servo_motor.write(115);
  delay(2000);
  distance = readPing();
  delay(100);
  distance = readPing();
  delay(100);
  distance = readPing();
  delay(100);
  distance = readPing();
  delay(100);
 }
 void loop(){
  int distanceRight = 0;
  int distanceLeft = 0;
  delay(50);
  if (distance <= 20){
   moveStop();
   delay(300);
   myservo.write(170);
   delay(300);
   myservo.write(50);
   delay(300);
   myservo.write(170);
   delay(300);
   myservo.write(50);
   delay(300);
   moveBackward();
   delay(400);
   moveStop();
   delay(300);
   distanceRight = lookRight();
   delay(300);
   distanceLeft = lookLeft();
   delay(300);
   if (distance >= distanceLeft){
    turnRight();
    moveStop();
   }
   else{
    turnLeft();
    moveStop();
   }
  }
  else{
   moveForward();
  }
   distance = readPing();
 }
 int lookRight(){
  servo_motor.write(50);
  delay(500);
  int distance = readPing();
  delay(100);
  servo_motor.write(115);
  return distance;
 }
 int lookLeft(){
  servo_motor.write(170);
  delay(500);
  int distance = readPing();
  delay(100);
  servo_motor.write(115);
  return distance;
  delay(100);
 }
 int readPing(){
  delay(70);
  int cm = sonar.ping_cm();
  if (cm==0){
   cm=250;
  }
  return cm;
 }
 void moveStop(){
  digitalWrite(RightMotorForward, LOW);
  digitalWrite(LeftMotorForward, LOW);
  digitalWrite(RightMotorBackward, LOW);
  digitalWrite(LeftMotorBackward, LOW);
 }
 void moveForward(){
  if(!goesForward){
   goesForward=true;
   digitalWrite(LeftMotorForward, HIGH);
   digitalWrite(RightMotorForward, HIGH);
   digitalWrite(LeftMotorBackward, LOW);
   digitalWrite(RightMotorBackward, LOW);
  }
 }
 void moveBackward(){
  goesForward=false;
  digitalWrite(LeftMotorBackward, HIGH);
  digitalWrite(RightMotorBackward, HIGH);
  digitalWrite(LeftMotorForward, LOW);
  digitalWrite(RightMotorForward, LOW);
 }
 void turnRight(){
  digitalWrite(LeftMotorForward, HIGH);
  digitalWrite(RightMotorBackward, HIGH);
  digitalWrite(LeftMotorBackward, LOW);
  digitalWrite(RightMotorForward, LOW);
  delay(500);
  digitalWrite(LeftMotorForward, HIGH);
  digitalWrite(RightMotorForward, HIGH);
  digitalWrite(LeftMotorBackward, LOW);
  digitalWrite(RightMotorBackward, LOW);
 }
 void turnLeft(){
  digitalWrite(LeftMotorBackward, HIGH);
  digitalWrite(RightMotorForward, HIGH);
  digitalWrite(LeftMotorForward, LOW);
  digitalWrite(RightMotorBackward, LOW);
  delay(500);
  digitalWrite(LeftMotorForward, HIGH);
  digitalWrite(RightMotorForward, HIGH);
  digitalWrite(LeftMotorBackward, LOW);
  digitalWrite(RightMotorBackward, LOW);
 }
Thanks for visiting, you can check out more here.