
Radar using Arduino and Ultrasonic sensor
Radar using Arduino and ultrasonic sensors is a very good project in the electronic branch. It can detect any object in the path with the help of an ultrasonic sensor. Ultrasonic sensors rotate over the servo motor and almost cover all directions in rotatory motion. There is processing software that makes it possible. The ultrasonic sensor is very useful in many electronics projects. it uses in distance measuring and object detection. The radar system uses the ultrasonic sensor to detect the object in front of the sensor. and servo motor help to cover the distance by rotating itself slowly.
Hey guys, welcome back to Techatronic. we are Mohd Shahid and Adnan electronics engineers. Make sure to share all the knowledge on a project we have. our main motive is to learn you better. I hope you will learn everything about the project. and if you have any query you can ask in the comment section. In this Arduino Radar project, we will share all the instructions and code, a circuit by which you can make the project by itself. Arduino radar is a very attractive and famous project in electronics and can be made in major projects. although it is only for the learning purpose we can’t use this project in the product as well.
What is Arduino Radar it?
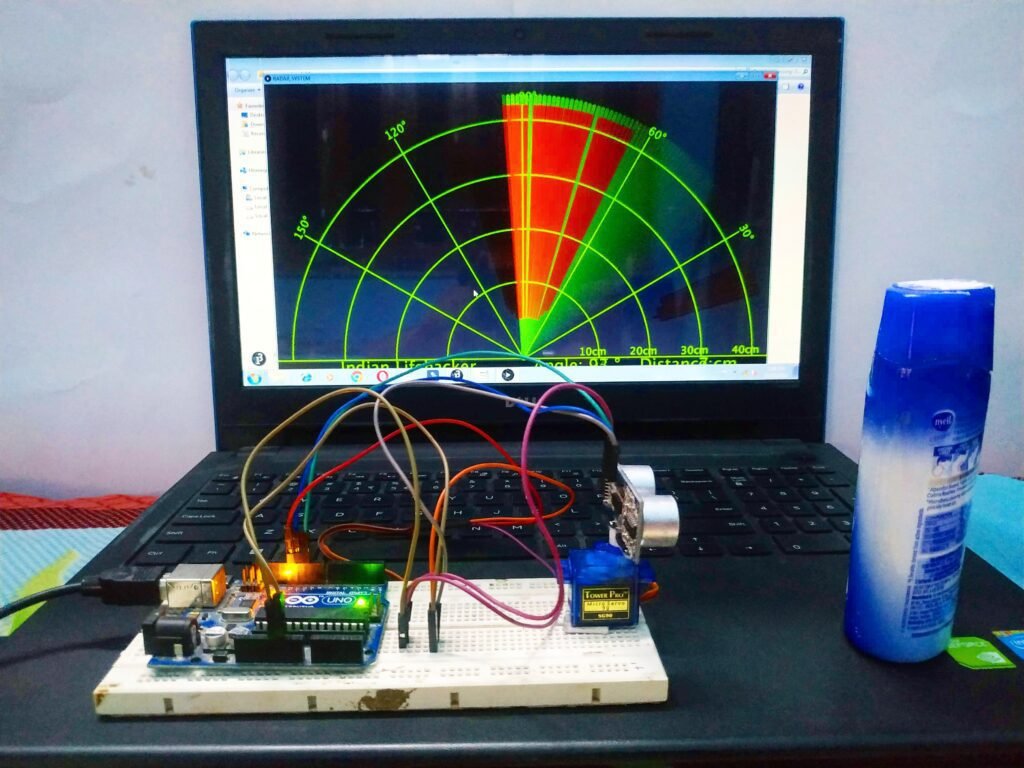
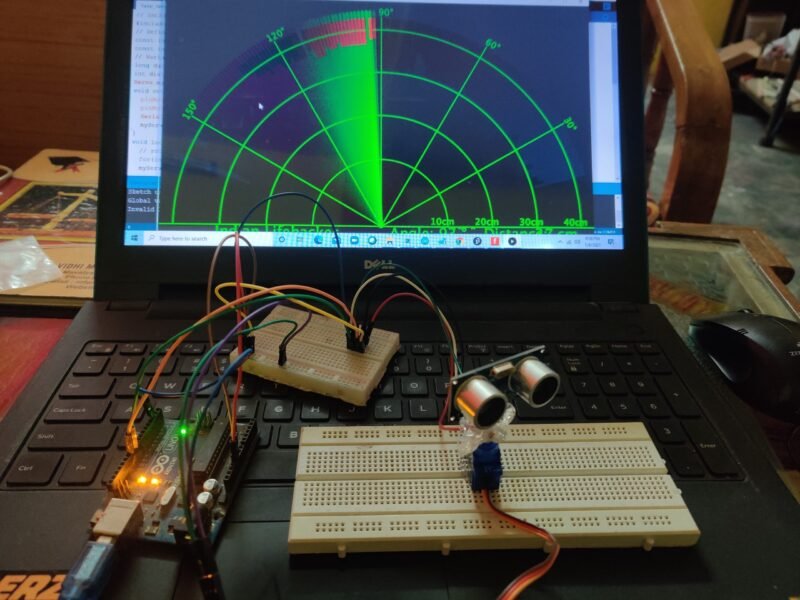
As I mentioned in the above paragraph the Arduino Radar detector project is popular nowadays and now we will understand what actually is it. It is just like mini radar it recognizes the object in the path and makes a red affected area near the object. so, this is called radar and it works on the Ultrasonic frequency. it consists ultrasonic sensor mounted over the servo motor and connected to software that shows the output on the computer screen. the interface of this software is pretty the same as the Radar interface.
How Does Radar using Arduino Works?
The ultrasonic sensor rotates with the servo motor and transmitted the ultrasonic waves during this time. and the whole time a graph interface make in the simulation software. and if any object comes under the range of the ultrasonic sensor it starts to detect the object. at that time the graph interface inside the software becomes red in the object area. ultrasonic sensor work as an object detector in this project. Radar using ultrasonic sensor works in software makes the reaction according to the waves received.
ultrasonic sensors have two terminals one is a transmitter and another is the receiver. The transmitter terminal is known as the Trigger and the receiver terminal is known as the echo. Arduino continuously gives a command to the Servo motor to rotate. and the transmitter transmits the signal parallelly likewise the software also makes the graph. The ultrasonic sensor gave a different signal to the Arduino if anything comes in the path. then Arduino notifies the software for the affected region. the project depends on the ultrasonic sensor working. Radar using Arduino, ultrasonic sensor, and servo motor contents no other major components. we will also give you the processing software link below.
Components Required:-
- Arduino Uno
- Servo motor
- Processing Software
- Breadboard
- Jumper wire
- Arduino cable
Arduino Radar circuit diagram:-
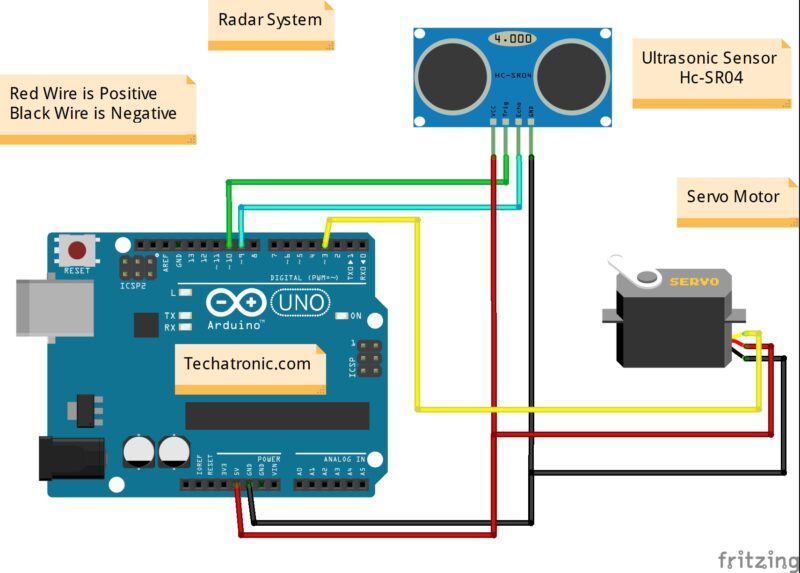
| Arduino UNO | Ultrasonic Sensor |
| ( +5V ) VCC | VCC ( Positive + ) |
| GND ( Ground ) | GND ( Ground – ) |
| D10 Pin | Trig Pin |
| D9 Pin | Echo Pin |
| Arduino UNO | Servo Motor |
| D3 Pin | OUT Pin ( Orange Colour ) |
| ( +5V ) VCC | VCC ( Red Colour ) |
| GND ( Ground ) | GND ( Black Colour ) |
Arduino code for ultrasonic radar:-
 // Techatronic.com
 // Includes the Servo library
 #include <Servo.h>.
 // Defines Tirg and Echo pins of the Ultrasonic Sensor
 const int trigPin = 10;
 const int echoPin = 9;
 // Variables for the duration and the distance
 long duration;
 int distance;
 Servo myServo; // Creates a servo object for controlling the servo motor
 void setup() {
  pinMode(trigPin, OUTPUT); // Sets the trigPin as an Output
  pinMode(echoPin, INPUT); // Sets the echoPin as an Input
  Serial.begin(9600);
  myServo.attach(3); // Defines on which pin is the servo motor attached
 }
 void loop() {
  // rotates the servo motor from 15 to 165 degrees
  for(int i=15;i<=165;i++){
  myServo.write(i);
  delay(30);
  distance = calculateDistance();// Calls a function for calculating the distance measured by the Ultrasonic sensor for each degree
  Serial.print(i); // Sends the current degree into the Serial Port
  Serial.print(","); // Sends addition character right next to the previous value needed later in the Processing IDE for indexing
  Serial.print(distance); // Sends the distance value into the Serial Port
  Serial.print("."); // Sends addition character right next to the previous value needed later in the Processing IDE for indexing
  }
  // Repeats the previous lines from 165 to 15 degrees
  for(int i=165;i>15;i--){
  myServo.write(i);
  delay(30);
  distance = calculateDistance();
  Serial.print(i);
  Serial.print(",");
  Serial.print(distance);
  Serial.print(".");
  }
 }
 // Function for calculating the distance measured by the Ultrasonic sensor
 int calculateDistance(){
  digitalWrite(trigPin, LOW);
  delayMicroseconds(2);
  // Sets the trigPin on HIGH state for 10 micro seconds
  digitalWrite(trigPin, HIGH);
  delayMicroseconds(10);
  digitalWrite(trigPin, LOW);
  duration = pulseIn(echoPin, HIGH); // Reads the echoPin, returns the sound wave travel time in microseconds
  distance= duration*0.034/2;
  return distance;
 }
Now you have to download a processing software from the given link
Here we are sharing the Processing code which you have to upload to the software.
note:- You need to mention the port in the processing software code given below. at which port your Arduino has connected you need to mention the same port.
Processing software code
 import processing.serial.*; // imports library for serial communication
 import java.awt.event.KeyEvent; // imports library for reading the data from the serial port
 import java.io.IOException;
 Serial myPort; // defines Object Serial
 // defubes variables
 String angle="";
 String distance="";
 String data="";
 String noObject;
 float pixsDistance;
 int iAngle, iDistance;
 int index1=0;
 int index2=0;
 PFont orcFont;
 void setup() {
  size (1200, 700); // ***CHANGE THIS TO YOUR SCREEN RESOLUTION***
  smooth();
  myPort = new Serial(this,"COM11", 9600); // starts the serial communication
  myPort.bufferUntil('.'); // reads the data from the serial port up to the character '.'. So actually it reads this: angle,distance.
 }
 void draw() {
  fill(98,245,31);
  // simulating motion blur and slow fade of the moving line
  noStroke();
  fill(0,4);
  rect(0, 0, width, height-height*0.065);
  fill(98,245,31); // green color
  // calls the functions for drawing the radar
  drawRadar();
  drawLine();
  drawObject();
  drawText();
 }
 void serialEvent (Serial myPort) { // starts reading data from the Serial Port
  // reads the data from the Serial Port up to the character '.' and puts it into the String variable "data".
  data = myPort.readStringUntil('.');
  data = data.substring(0,data.length()-1);
  index1 = data.indexOf(","); // find the character ',' and puts it into the variable "index1"
  angle= data.substring(0, index1); // read the data from position "0" to position of the variable index1 or thats the value of the angle the Arduino Board sent into the Serial Port
  distance= data.substring(index1+1, data.length()); // read the data from position "index1" to the end of the data pr thats the value of the distance
  // converts the String variables into Integer
  iAngle = int(angle);
  iDistance = int(distance);
 }
 void drawRadar() {
  pushMatrix();
  translate(width/2,height-height*0.074); // moves the starting coordinats to new location
  noFill();
  strokeWeight(2);
  stroke(98,245,31);
  // draws the arc lines
  arc(0,0,(width-width*0.0625),(width-width*0.0625),PI,TWO_PI);
  arc(0,0,(width-width*0.27),(width-width*0.27),PI,TWO_PI);
  arc(0,0,(width-width*0.479),(width-width*0.479),PI,TWO_PI);
  arc(0,0,(width-width*0.687),(width-width*0.687),PI,TWO_PI);
  // draws the angle lines
  line(-width/2,0,width/2,0);
  line(0,0,(-width/2)*cos(radians(30)),(-width/2)*sin(radians(30)));
  line(0,0,(-width/2)*cos(radians(60)),(-width/2)*sin(radians(60)));
  line(0,0,(-width/2)*cos(radians(90)),(-width/2)*sin(radians(90)));
  line(0,0,(-width/2)*cos(radians(120)),(-width/2)*sin(radians(120)));
  line(0,0,(-width/2)*cos(radians(150)),(-width/2)*sin(radians(150)));
  line((-width/2)*cos(radians(30)),0,width/2,0);
  popMatrix();
 }
 void drawObject() {
  pushMatrix();
  translate(width/2,height-height*0.074); // moves the starting coordinats to new location
  strokeWeight(9);
  stroke(255,10,10); // red color
  pixsDistance = iDistance*((height-height*0.1666)*0.025); // covers the distance from the sensor from cm to pixels
  // limiting the range to 40 cms
  if(iDistance<40){
   // draws the object according to the angle and the distance
  line(pixsDistance*cos(radians(iAngle)),-pixsDistance*sin(radians(iAngle)),(width-width*0.505)*cos(radians(iAngle)),-(width-width*0.505)*sin(radians(iAngle)));
  }
  popMatrix();
 }
 void drawLine() {
  pushMatrix();
  strokeWeight(9);
  stroke(30,250,60);
  translate(width/2,height-height*0.074); // moves the starting coordinats to new location
  line(0,0,(height-height*0.12)*cos(radians(iAngle)),-(height-height*0.12)*sin(radians(iAngle))); // draws the line according to the angle
  popMatrix();
 }
 void drawText() { // draws the texts on the screen
  pushMatrix();
  if(iDistance>40) {
  noObject = "Out of Range";
  }
  else {
  noObject = "In Range";
  }
  fill(0,0,0);
  noStroke();
  rect(0, height-height*0.0648, width, height);
  fill(98,245,31);
  textSize(25);
  text("10cm",width-width*0.3854,height-height*0.0833);
  text("20cm",width-width*0.281,height-height*0.0833);
  text("30cm",width-width*0.177,height-height*0.0833);
  text("40cm",width-width*0.0729,height-height*0.0833);
  textSize(40);
  text("Indian Lifehacker ", width-width*0.875, height-height*0.0277);
  text("Angle: " + iAngle +" °", width-width*0.48, height-height*0.0277);
  text("Distance: ", width-width*0.26, height-height*0.0277);
  if(iDistance<40) {
  text("    " + iDistance +" cm", width-width*0.225, height-height*0.0277);
  }
  textSize(25);
  fill(98,245,60);
  translate((width-width*0.4994)+width/2*cos(radians(30)),(height-height*0.0907)-width/2*sin(radians(30)));
  rotate(-radians(-60));
  text("30°",0,0);
  resetMatrix();
  translate((width-width*0.503)+width/2*cos(radians(60)),(height-height*0.0888)-width/2*sin(radians(60)));
  rotate(-radians(-30));
  text("60°",0,0);
  resetMatrix();
  translate((width-width*0.507)+width/2*cos(radians(90)),(height-height*0.0833)-width/2*sin(radians(90)));
  rotate(radians(0));
  text("90°",0,0);
  resetMatrix();
  translate(width-width*0.513+width/2*cos(radians(120)),(height-height*0.07129)-width/2*sin(radians(120)));
  rotate(radians(-30));
  text("120°",0,0);
  resetMatrix();
  translate((width-width*0.5104)+width/2*cos(radians(150)),(height-height*0.0574)-width/2*sin(radians(150)));
  rotate(radians(-60));
  text("150°",0,0);
  popMatrix();
 }
All the best for the project. if you are stuck anywhere you can ask in a comment.