
Hello there, Today I’m back with another tutorial on TFT display with Raspberry Pi. Today we gonna do ST7789 with Raspberry Pi. Programming and code will be done in Python. We will use the most basic version of TFT available. I have also demonstrated its tutorial on Raspberry Pi Pico also. if you want you can visit that page by clicking here. So for today’s interesting topic, why should we waste time. LET’S BEGIN!!!
ST7789:
ST7789 is the driver IC of the TFT display. These types of displays come in various sizes. 128×240, 240×240, 240×320 are the resolution in which it is available. Also sizes are 1.3′, 1.54′ and 2.0′. The one which we are going to use is 240×240 resolution and 1.3′ size. You can see the datasheet of the driver IC (if want) for more information by clicking here. ST7789 Raspberry PI interfacing in this tutorial.
The display uses SPI communication to transfer data between the microcontroller and the display. The pins which are used in connection are SCK (SCL), MOSI (SDA), RST, and DC. There is another pin that can be used for a specific function i.e., BLK or Backlight pin. tis pin triggers the backlight of the display which results in display on or off.
Apart this display also has various mode, one of which includes sleep mode. Using sleep mode you can make power consumption lesser to a great amount. This type of feature is useful when you are making a mobile device or project which runs on a small battery and need to be saved power for better battery backup.
Material required:
- Raspberry Pi with screen keyboard and mouse
- 240×240, 1.8′ ST7789 Display ( thinkrobotics )
- Jumper wires
- Breadboard
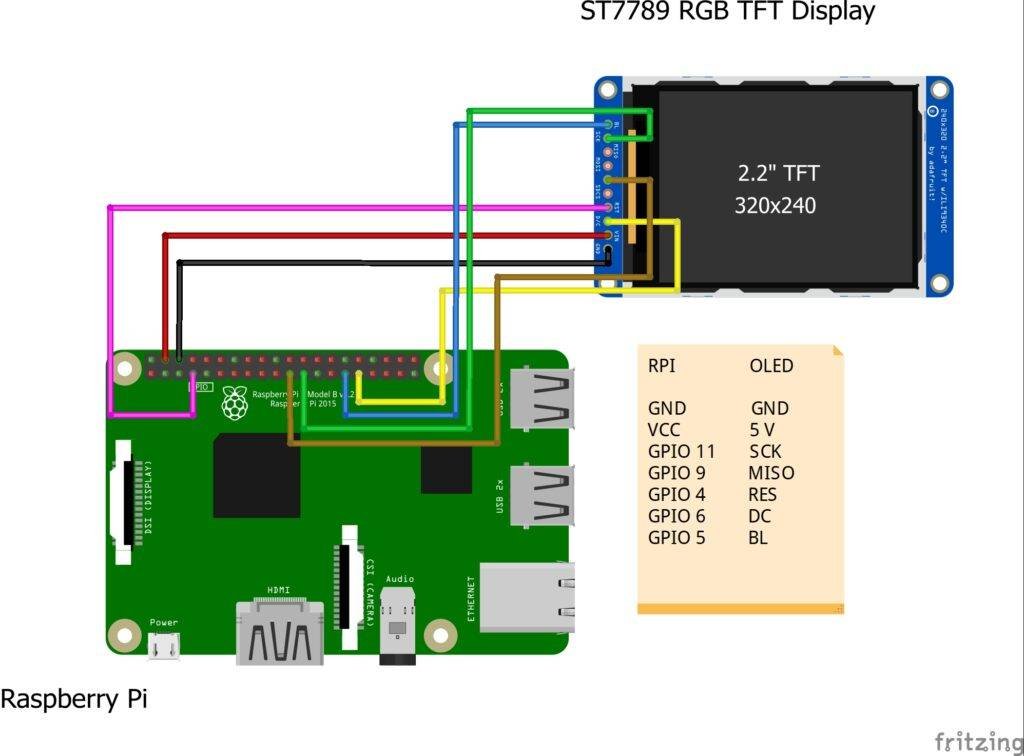
Circuit Design:

Programming:
Programming this SPI display seems to be easy but it’ as simple as you think. If you are familiar with this type of driver IC then you will be able to figure out the problems. But if not then it will be very difficult to do it in first. So here I’ll discuss the problems that you may face during programming this IC type SPI display. Now hook up the display to the pinout described as above in circuit diagram.
After this if you follow the steps mentioned in the official Adafruit website for ST7789 display python programming. For this I’ll say that it is totally waste of time. That code and library did seem to be working but not suitable for display I or You may have. So first before programming I will say that, If you haven’t visited this display interfacing with Arduino. Then please see it because it will surely help you to understand the problem.
First we need to download some repositories or the library which will run the code (open terminal):
sudo pip3 install st7789
Also you need to download some other files to make this module run. For that just download all these :
sudo apt-get install python3-rpi.gpio
 sudo apt-get install python3-spidev
 sudo apt-get install python3-pil
 sudo apt-get install python3-numpy
After you have installed all these you are good to go.
Code:
First we import the st7789 module we have just downloaded form the internet. Also we import some other modules which are required in code.
Next we create a object display which stores the initialization information of the display. In the line next to it:
display._spi.mode=3
SPI communication has 4 modes of communication i.e., 0, 1, 2, 3 . For more information on SPi modes then view this page.
If you are able to change the problem in Adafruit’s original code and think now that it would work just fine. Then you are mistaken I have tried all the things and finally came up with this.
Now after this we reset and initialize the display to set the spi mode of communication to 3.
Then we create a new image to display. (It sets all functions as image )
We try some codes like:
filling the display with red color and displaying some images on the display.
Code:
Here is the complete code have a look and try it.
import ST7789
 from PIL import Image
 from time import sleep
 display=ST7789.ST7789(port=0,cs=0,rst=6,dc=5,backlight=4,spi_speed_hz=160000000)
 display._spi.mode=3
 display.reset()
 display._init()
 image=Image.new('RGB',(240,240),(255,0,0))  #('RGB',(240,240),(r,g,b))
 display.display(image)
 sleep(2)
 image=Image.open("image5.jpg")
 image=image.resize((240,240),resample=Image.LANCZOS)
 display.display(image)
You can also do far more stuff with this. Currently, I’m working on a project on its basis. Within a short time, I’ll share it with you all.
The outputs of the code is enclosed below. have a look at those also.
#outputs####################################
With this, we end our St7789 Raspberry Pi tutorial. I hope you enjoyed it. Ask your doubts down below.