

Hey guys, welcome back to Techatronic. Today we are back with another interesting project which you can make with the help of Arduino Uno and we are using OLED display with it. This project involves some complex algorithm and logics which makes it more interesting. This project’s name is Pong Game With Arduino and you may have played with it in your childhood at Game’s Cafe.
Today we are going to recreate this game on an Arduino Board and we gonna learn how this game had been made. This game is not complicated but little bit challenging and interesting to develop and play.
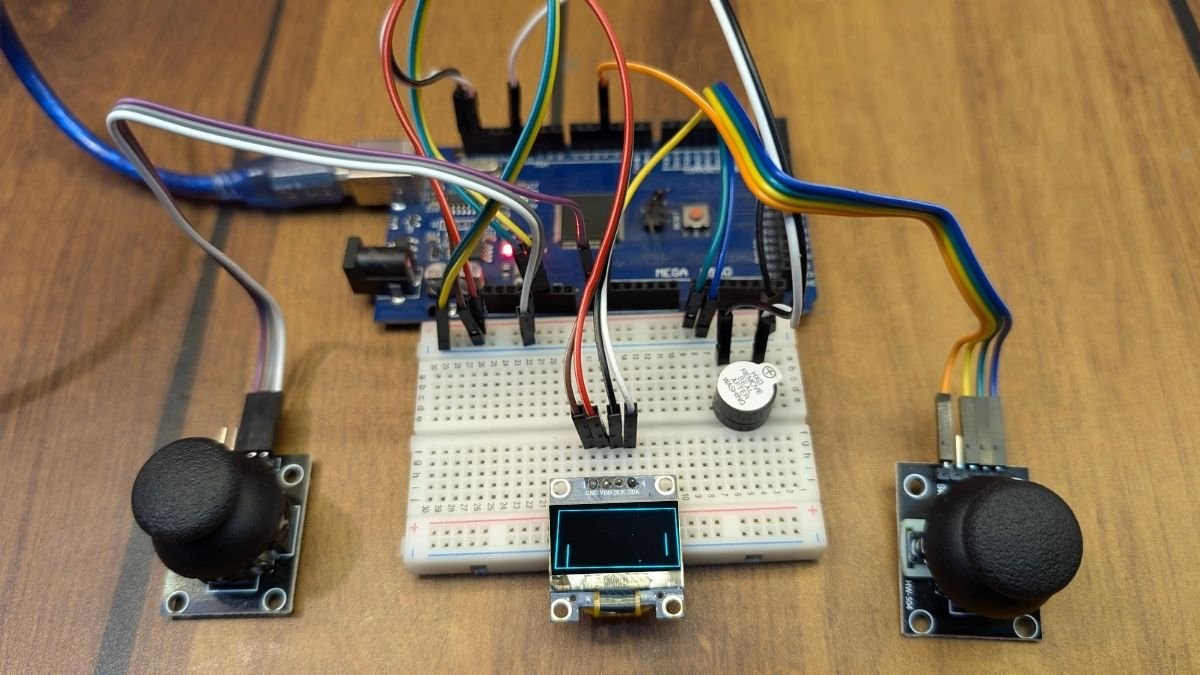
This Pong Game With Arduino is played by two players and both players controls the direction of the paddle with the Joysticks provided in Arduino Uno. The score board is shown in the middle and a buzzer is also attached to the Arduino to make the score, winning and loosing sounds.
We are using 0.96 inch OLED display and its display size is 128×64 pixels. We are going to write code to control the paddles with the Joysticks.
Table of Contents
Components Required for Pong Game With Arduino
| Arduino Uno | BUY LINK |
| 0.96 inch OLED display | BUY LINK |
| Buzzer | BUY LINK |
| 2 x Joystick | BUY LINK |
| Breadboard | BUY LINK |
| Jumper Wire | BUY LINK |
OLED Display
We are using the SSD1306 0.96 inch I2C OLED display with the Arduino. OLED (Organic Light-Emitting Diode) Display Module 4 Pin – White Color is a precise small, White OLED module which can be interfaced with any microcontroller using I2C/IIC protocol. Its having a resolution of 128×64.
OLED display doesn’t contains any backlight, as a result it give good contrast in colors and OLED displays consume less energy compared to other displays. The OLED display which we are using consists only of 4 pins. There are other OLED modules too which contains more pins.
The characteristics of this display module are high brightness, self-emission, high contrast ratio, wide viewing angle, wide temperature range. OLED display operates on 3.3V ~ 6V. Compatible Input/Output Level: 3.3V, 5V.
This OLED display module Only Need 2 Input/Output Port to Control. It can operate on varieties of temperature from -30 degree Celsius to 70 degree Celsius.
Joystick
You may have seen joystick in many devices, like in gaming consoles, toy controllers or in big vehicles and machines too. The joystick is consist of two potentiometers and a push button located beneath them.
Now, because its composed of two potentiometers and one potentiometer controls the movement of x-axis and the other controls the movement of y-axis, their analog values are in between 0 to 1023.
A digital value of pushbutton is HIGH OR LOW. The joystick is in the center, that’s its natural position at coordinates of (0,0).
Pinout
- GND pin: connects to the GND pin of Arduino
- VCC pin: connects to the 5V pin of Arduino
- VRX pin: It provides analog value between 0 to 1023 along x-axis.
- VRY pin: It provides analog value between 0 to 1023 along y-axis.
- SW pin: Its the output of the pushbutton which inside the joystick.
How it Works?
When you push the joystick’s stick left and right the voltage changes, the voltage range is in-between 0V to 5V, 0 at the left and 5V at the right. We get this change in voltage value in analog form.
Same it happens while moving the joystick up and down, we get 0V at the top-most and 5V at the bottom. Push button just give HIGH or LOW values.
Circuit Diagram of Pong Game With Arduino
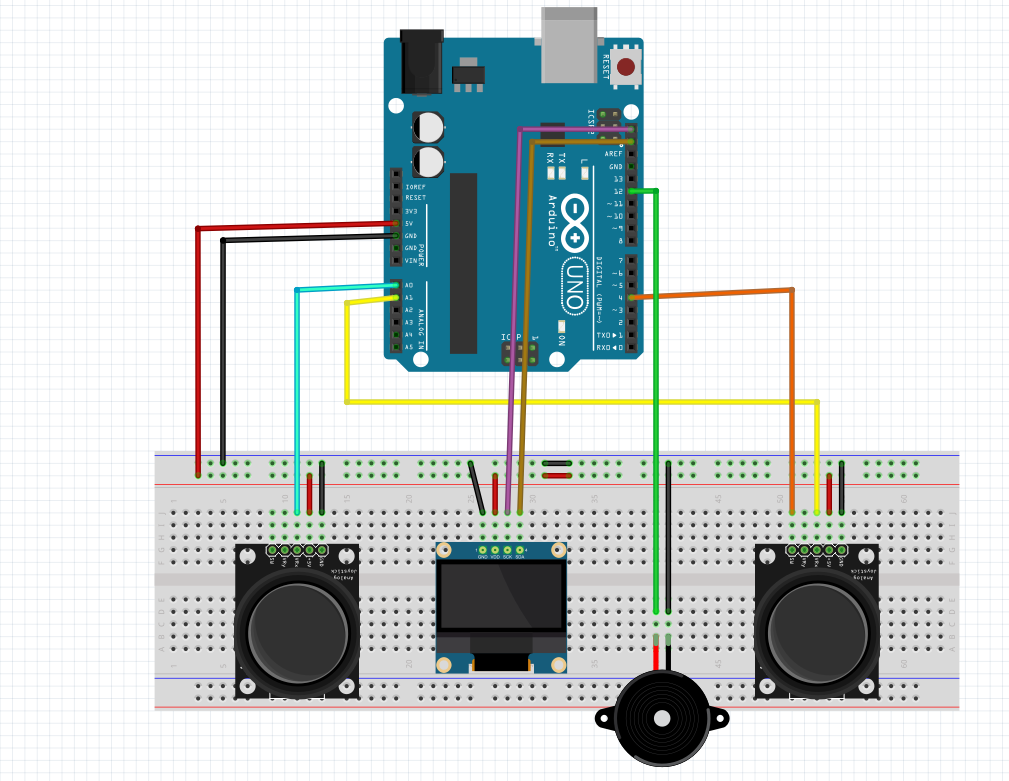
Pong Game With Arduino Connections Explained
VRx of left Joystick – A0
VRx of right Joystick – A1
SW of right joystick – Digital Pin 4
buzzer – 12
SCK – Purple wire (I2C)
SDA – Brown wire (I2C)
Code for Pong Game With Arduino
#include  <SPI.h>
#include <Wire.h>
#include <Adafruit_GFX.h>
#include <Adafruit_SSD1306.h>

const  int SW_pin = 4; // digital pin connected to switch output
const int player1 =  A1; // analog pin connected to Y output
const int player2 = A0; // analog pin  connected to Y output

const unsigned long PADDLE_RATE = 45;
const unsigned  long BALL_RATE = 0;
const uint8_t PADDLE_HEIGHT = 12;
int player1Score = 0;
int  player2Score = 0;
int maxScore = 8;
int BEEPER = 12;
bool resetBall = false;
#define  SCREEN_WIDTH 128 // OLED display width, in pixels
#define SCREEN_HEIGHT 64 //  OLED display height, in pixels
#define RESET_BUTTON 3
// Declaration for an  SSD1306 display connected to I2C (SDA, SCL pins)
#define OLED_RESET     4 //  Reset pin # (or -1 if sharing Arduino reset pin)
Adafruit_SSD1306 display(SCREEN_WIDTH,  SCREEN_HEIGHT, &Wire, OLED_RESET);

void drawCourt();
void drawScore();

uint8_t  ball_x = 64, ball_y = 32;
uint8_t ball_dir_x = 1, ball_dir_y = 1;
unsigned  long ball_update;

unsigned long paddle_update;
const uint8_t PLAYER2_X  = 22;
uint8_t player2_y = 26;

const uint8_t PLAYER_X = 105;
uint8_t  player1_y = 26;

void setup() {
  display.begin(SSD1306_SWITCHCAPVCC, 0x3C);
  display.display();
  unsigned long start = millis();
  pinMode(BEEPER, OUTPUT);
  pinMode(SW_pin, INPUT);
  pinMode(RESET_BUTTON, INPUT_PULLUP);
  digitalWrite(SW_pin,  HIGH);
  display.clearDisplay();
  drawCourt();
  drawScore();
  while  (millis() - start < 2000);

  display.display();

  ball_update = millis();
  paddle_update = ball_update;
}

void loop() {
  bool update = false;
  unsigned long time = millis();

  static bool up_state = false;
  static  bool down_state = false;


  if (resetBall)
  {
    if (player1Score  == maxScore || player2Score == maxScore)
    {
      gameOver();
    }
    else {
      display.fillScreen(BLACK);
      drawScore();
      drawCourt();
      ball_x = random(45, 50);
      ball_y = random(23, 33);
      do
      {
        ball_dir_x = random(-1, 2);
      } while (ball_dir_x == 0);

      do
      {
        ball_dir_y = random(-1, 2);
      } while (ball_dir_y  == 0);


      resetBall = false;
    }
  }


  //up_state  |= (digitalRead(UP_BUTTON) == LOW);
  // down_state |= (digitalRead(DOWN_BUTTON)  == LOW);

  if (time > ball_update) {
    uint8_t new_x = ball_x + ball_dir_x;
    uint8_t new_y = ball_y + ball_dir_y;

    // Check if we hit the vertical  walls
    if (new_x == 0 || new_x == 127) {

      if (new_x == 0) {
        player1Score += 1;
        display.fillScreen(BLACK);
        soundPoint();
        resetBall = true;

      }
      else if (new_x == 127) {
        player2Score  += 1;
        display.fillScreen(BLACK);
        soundPoint();
        resetBall  = true;
      }
      ball_dir_x = -ball_dir_x;
      new_x += ball_dir_x  + ball_dir_x;
    }

    // Check if we hit the horizontal walls.
    if  (new_y == 0 || new_y == 63) {
      soundBounce();
      ball_dir_y = -ball_dir_y;
      new_y += ball_dir_y + ball_dir_y;
    }

    // Check if we hit the  player 2 paddle
    if (new_x == PLAYER2_X && new_y >= player2_y && new_y <=  player2_y + PADDLE_HEIGHT) {
      soundBounce();
      ball_dir_x = -ball_dir_x;
      new_x += ball_dir_x + ball_dir_x;
    }

    // Check if we hit the  player 1 paddle
    if (new_x == PLAYER_X && new_y >= player1_y && new_y <= player1_y  + PADDLE_HEIGHT) {
      soundBounce();
      ball_dir_x = -ball_dir_x;
      new_x += ball_dir_x + ball_dir_x;
    }

    display.drawPixel(ball_x,  ball_y, BLACK);
    display.drawPixel(new_x, new_y, WHITE);
    ball_x = new_x;
    ball_y = new_y;

    ball_update += BALL_RATE;

    update = true;
  }

  if (time > paddle_update) {
    paddle_update += PADDLE_RATE;

    //Player 2 paddle
    display.drawFastVLine(PLAYER2_X, player2_y, PADDLE_HEIGHT,  BLACK);
    const uint8_t half_paddle = PADDLE_HEIGHT >> 1;
    if (analogRead(player2)  < 475) {
      player2_y -= 1;
    }
    if (analogRead(player2) > 550)  {
      player2_y += 1;
    }
    if (player2_y < 1) player2_y = 1;
    if (player2_y + PADDLE_HEIGHT > 63) player2_y = 63 - PADDLE_HEIGHT;
    display.drawFastVLine(PLAYER2_X,  player2_y, PADDLE_HEIGHT, WHITE);

    // Player 1 paddle
    display.drawFastVLine(PLAYER_X,  player1_y, PADDLE_HEIGHT, BLACK);
    if (analogRead(player1) < 475) {
      player1_y  -= 1;
    }
    if (analogRead(player1) > 550) {
      player1_y += 1;
    }
    up_state = down_state = false;
    if (player1_y < 1) player1_y  = 1;
    if (player1_y + PADDLE_HEIGHT > 63) player1_y = 63 - PADDLE_HEIGHT;
    display.drawFastVLine(PLAYER_X, player1_y, PADDLE_HEIGHT, WHITE);
  }
  update = true;

  if (update) {
    drawScore();
    display.display();
    if (digitalRead(SW_pin) == 0) //Player pressed button to stop the game
    {
      gameOver();
    }
  }
}

void drawCourt() {
  display.drawRect(0,  0, 128, 64, WHITE);
}
void drawScore() {
  // draw players scores
  display.setTextSize(2);
  display.setTextColor(WHITE);
  display.setCursor(45, 0);
  display.println(player2Score);
  display.setCursor(75, 0);
  display.println(player1Score);
}

void  gameOver() {
  display.fillScreen(BLACK);
  if (player1Score > player2Score)
  {
    display.setCursor(20, 15);
    display.setTextColor(WHITE);
    display.setTextSize(2);
    display.print("Player 1");
    display.setCursor(40, 35);
    display.print("won");
  }
  else
  {
    display.setCursor(20, 15);
    display.setTextColor(WHITE);
    display.setTextSize(2);
    display.print("Player 2");
    display.setCursor(40,  35);
    display.print("won");
  }
  delay(100);
  display.display();
  delay(2000);
  player2Score = player1Score = 0;

  unsigned long start  = millis();
  while (millis() - start < 2000);
  ball_update = millis();
  paddle_update = ball_update;
  resetBall = true;
}
//Sound of ball hitting  wall and paddles
void soundBounce()
{
  tone(BEEPER, 500, 50);
}
//Sound  of point scored
void soundPoint()
{
  tone(BEEPER, 100, 50);
}
FAQ(Frequently Asked Questions) for Pong Game With Arduino
Q.1) Why my code isn’t working?
Ans. Make sure you have downloaded all the libraries. The libraries are:
- SPI.h
- Wire.h
- Adafruit_GFX.h
- Adafruit_SSD1306.h
If you don’t download these libraries, your code wouldn’t run. And, also make sure to add these libraries into your code.
go to sketch > Include libraries > Manage libraries. Now search in the search bar the name of the libraries.
Q.2) Nothing showing up on my OLED display. Why?
Ans. There could be some wiring issue or you may not have connected these SCK and SDA to the I2C pins of the Arduino. Try to connect the wirings exactly as shown in the circuit diagram of the Pong Game With Arduino.