

What is an Electronic Voting Machine Project?
I believe most of you are familiar with the Electronic voting machine project. and many of you made this by yourself. but who are not familiar with this amazing project and searching for the same. we are posting all the detail of this project. so, everyone can make this project with the given instruction. An electronic voting machine is a device that selects the candidates according to the maximum votes same as the EVM used for the election. there are several buttons on the device and you have to press any one key. all the people have to vote for their chosen candidates and after the voting, there is a button. which shows the total counting of the EVM.
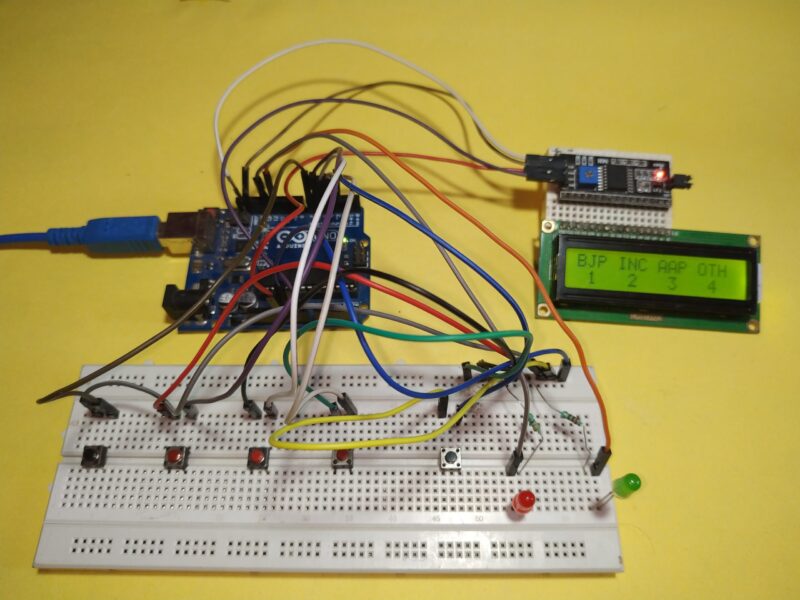
When we press a button the device stores that value in the memory. the device stores all values of the button till the result button pressed. in this machine, there are 6 buttons 4 buttons for voting 1 button for the result, and 1 button for refresh the machine. nowadays Electronic Voting Machine using in many countries this is the embedded product which counts the vote using the Arduino microcontroller. Some Buttons connected to the Controller in each press of the button controller save each button data. and each button sync to the different vote party.
Introduction to Electronic Voting Machine.
Hey guys, Welcome back to the Techatronic, Today we are going to make this awesome Project name Electronic voting machine project or we are also known as EVM Our most of the projects are on the Arduino. So, we are also making this project using Arduino. Arduino is the most favorable Controller which is using for learning and project making. This is a really interesting project. there is a lot of projects available on our website in the blog section bookmark our website for more interesting projects. this is the tutorial for the students who are a learner and hobbyist this will help you to learn the push button interfacing and coding.
Components Required to make the EVM
- Arduino UNO-BUY LINK
- 4 Button-BUY LINK
- 16×2 LCD Display-BUY LINK
- Jumper Wires-BUY LINK
- Variable Resistor 1k-BUY LINK
- Breadboard-BUY LINK
- USB UNO Cable-BUY LINK
- Arduino IDE Software
Can you Buy All Components to gather –BUY LINK
Electronic Voting Machine Circuit Diagram:-
There is two circuit diagram given for the same project as you can see in the following diagram.both are same diagram.


Electronic voting machine project Arduino code:-
#include<LiquidCrystal.h>
LiquidCrystal lcd(11,10,9,8,7,6);
#define sw1 A0
#define sw2 A1
#define sw3 A2
#define sw4 17
#define sw5 18
int vote1=0;
int vote2=0;
int vote3=0;
int vote4=0;
void setup()
{
pinMode(sw1, INPUT);
pinMode(sw2,INPUT);
pinMode(sw3,INPUT);
pinMode(sw4,INPUT);
pinMode(sw5,INPUT);
pinMode(13,OUTPUT);
pinMode(12,OUTPUT);
lcd.begin(16, 2);
lcd.setCursor(0,0);
lcd.print(“Techatronic.com “);
lcd.setCursor(0,0);
delay(3000);
lcd.print(“VOTING MACHINE “);
lcd.setCursor(0,1);
lcd.print(“Circuit desigh “);
delay(3000);
digitalWrite(sw1, HIGH);
digitalWrite(sw2, HIGH);
digitalWrite(sw3, HIGH);
digitalWrite(sw4, HIGH);
digitalWrite(sw5, HIGH);
lcd.clear();
lcd.setCursor(0,0);
lcd.print(“BJP”);
lcd.setCursor(4,0);
lcd.print(“INC”);
lcd.setCursor(8,0);
lcd.print(“AAP”);
lcd.setCursor(12,0);
lcd.print(“OTH”);
}
void loop()
{
lcd.setCursor(0,0);
lcd.print(“BJP”);
lcd.setCursor(1,1);
lcd.print(vote1);
lcd.setCursor(4,0);
lcd.print(“INC”);
lcd.setCursor(5,1);
lcd.print(vote2);
lcd.setCursor(8,0);
lcd.print(“AAP”);
lcd.setCursor(9,1);
lcd.print(vote3);
lcd.setCursor(12,0);
lcd.print(“OTH”);
lcd.setCursor(13,1);
lcd.print(vote4);
if(digitalRead(sw1)==0)
{ digitalWrite(12,HIGH);
vote1++;
while(digitalRead(sw1)==0);
digitalWrite(12,LOW);
delay(1000);
}
if(digitalRead(sw2)==0)
{
vote2++;
digitalWrite(12,HIGH);
while(digitalRead(sw2)==0);
digitalWrite(12,LOW);
delay(1000);
}
if(digitalRead(sw3)==0)
{
digitalWrite(12,HIGH);
vote3++;
while(digitalRead(sw3)==0);
digitalWrite(12,LOW);
delay(1000);
}
if(digitalRead(sw4)==0)
{
digitalWrite(12,HIGH);
vote4++;
while(digitalRead(sw4)==0);
digitalWrite(12,LOW);
delay(1000 );
}
if(digitalRead(sw5)==0)
{
digitalWrite(13,HIGH);
int vote=vote1+vote2+vote3+vote4;
if(vote)
{
if((vote1 > vote2 && vote1 > vote3 && vote1 > vote4))
{
lcd.clear();
lcd.print(“BJP Wins”);
delay(5000);
lcd.clear();
}
else if((vote2 > vote1 && vote2 > vote3 && vote2 > vote4))
{
lcd.clear();
lcd.print(“INC Wins”);
delay(5000);
lcd.clear();
}
else if((vote3 > vote1 && vote3 > vote2 && vote3 > vote4))
{
lcd.clear();
lcd.print(“AAP Wins”);
delay(5000);
lcd.clear();
}
else if(vote4 > vote1 && vote4 > vote2 && vote4 > vote3)
{
lcd.setCursor(0,0);
lcd.clear();
lcd.print(“OTH Wins”);
delay(5000);
lcd.clear();
}
else if(vote4 > vote1 && vote4 > vote2 && vote4 > vote3)
{
lcd.setCursor(0,0);
lcd.clear();
lcd.print(“OTH Wins”);
delay(2000);
lcd.clear();
}
else
{
lcd.clear();
lcd.print(” Tie Up Or “);
lcd.setCursor(0,1);
lcd.print(” No Result “);
delay(5000);
lcd.clear();
}
}
else
{
lcd.clear();
lcd.print(“No Voting….”);
delay(5000);
lcd.clear();
}
vote1=0;vote2=0;vote3=0;vote4=0,vote=0;
lcd.clear();
digitalWrite(12,HIGH);
digitalWrite(13,LOW);
}
}
Upload the given code into the Arduino with the help og Arduino IDE software. All the best. If you have any query you can ask in the comment section.