
Hey geeks, hope you are doing fine. Did you know what is a flasher light is? If not, this article is for you in which we will make a LED flasher light using 555 timer IC. A flasher light is used in emergency vehicles so that everyone can see them coming and free the way
so, this 555 timer LED flasher project can help you a lot. They are also used for sending emergency signals (SOS). The lights are available in different colors, but all red colors are used universally because it has a high wavelength and can be spotted easily. You can also check out our new projects on 555 timer.
Table of Contents
Introduction
This project is a LED flasher light circuit in which we are using LEDs of two different colors. The LEDs are flashing one after another in such a way that you can spot the flashing lights from a good distance.
The detailed connections for the project are given below. we have also uploaded a similar project traffic light project Circuit Using 555 Timer IC on 555 timer You can check made by us. You can change the speed of flashing by replacing the 1 Uf capacitor with higher values.
555 LED Flasher working
The capacitor is charged and discharged continuously, the time of charge and discharge determine the led in this led flasher using 555 timer . the capacitor gets discharged through the resistor path. if we reduced the value of the resistor the capacitor discharge very quickly. in dual led flashing both led will flash one by one. So, 555 adjustable led flasher can be adjusted by just changing the resistor and capacitor value.

Components Required for 555 timer led flasher
Please use the components with their correct values as mentioned below.
- Two 555 Timer IC
- Two red color LEDs and two green color LEDs
- Two 1M-ohm and 6.8K-ohm resistors
- 1 Uf capacitor
- 100 nano farad capacitor
- small pieces of connecting wire and a breadboard
- 5-volts battery
555 LED flasher Circuit Diagram
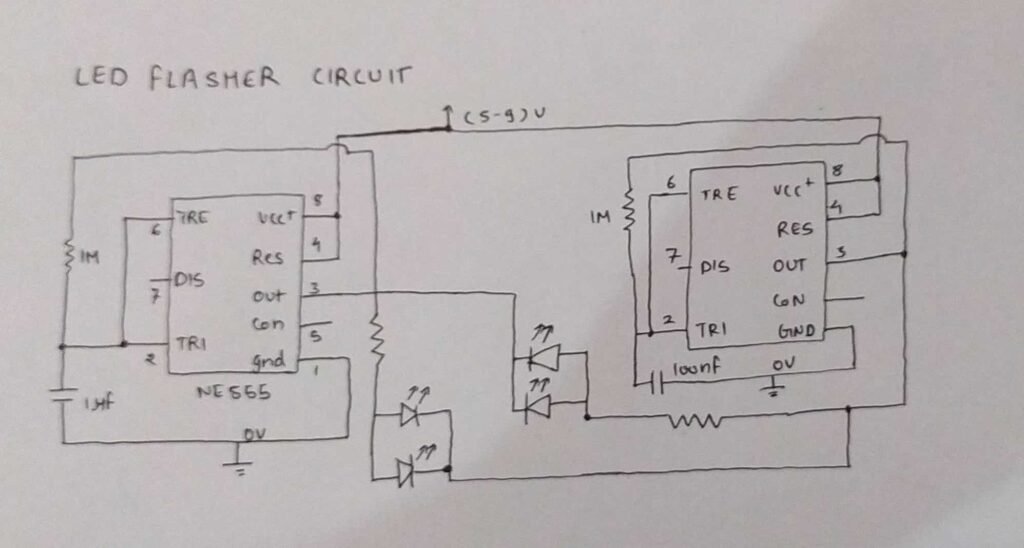
To make this awesome project which is a 555 led flasher you need to follow the given steps and make the project works.
- Place a 555 timer IC on the middle of the breadboard.
- Use small pieces of copper wire to make the connections neat.
- Connect pin number 8 of the IC to the positive rail and pin number 1 to the negative rail of the breadboard.
- Join pin numbers 2 and 6 with each other.
- Similarly, connect pins 4 and 8 with each other.
- Now place a 1M-ohm resistor between pin 3 and pin 6.
- Take a 1Uf capacitor and connect its positive leg with pin number 2 of the IC and negative leg with the negative rail of the breadboard.
- Place one more 555 timer IC on the breadboard and repeat the same connections for it as shown in the diagram.
- Connect a 100 nano farad capacitor between pin number 2 of the IC and the negative rail instead of 1 Uf capacitor for the second 555 IC.
- Make a parallel connection of all the LEDs of the same color and connect their negative terminal with pin number 3 of the second timer IC.
- Join their positive terminal with pin number 3 of the first-timer IC through a 6.8K-ohm resistor.
- Now make another parallel connection with LEDs of different colors and connect it the same way with both of the IC’s.
Final Look of the led flasher Project
Connect the power supply of 5-volts to the positive and negative rail of the breadboard. Now the LEDs start flashing like an emergency siren.

We hope that you like this project and now try to make it once. While making this project if you face any errors, feel free to ask doubts in the comments section below. Check the latest tutorials on Arduino and Raspberry Pi written by us.
HAPPY LEARNING!
Latest 555 timer project
Railway Signal Using 555 Timer IC | 555 IC project
Water Level Controller Using Ic 555 | 555 Ic Projects
traffic light project Circuit Using 555 Timer IC
Led Chaser Circuit Using 4017 IC
555 One Shot Circuit | Monostable Multivibrator | 555 timer project