

Table of Contents
Introduction
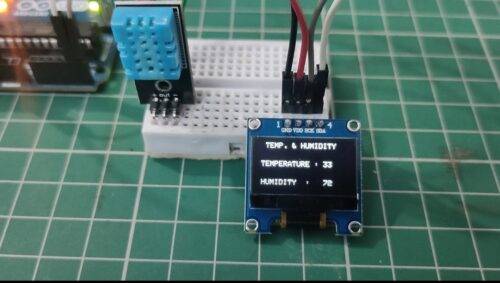
Hello techies, welcome back to Techatronic. In this article, we are going to learn how to display the temperature and humidity on an SSD1306 OLED display using Arduino UNO and DHT11 with Arduino.
DHT11 sensor have capability to measure the temperature and humidity. it is likely one sensor from outside. but inside it there is two sensor one is temperature and other humidity sensor. in this Artcle we are making a tutorial on how to connect DHT11 and OLED 1306 display with the Arduino.
To make this project we need to know the protocols and coding so, that we can make a accurate project without the mistake.OLED1306 support I2C protocol which uses SDA & SCL pins of Arduino uno.
The detailed circuit diagram for the project is given below but before starting please go through with the working of the DHT11 sensor once.
You can make more similar projects based on Arduino
DHT11 with Arduino Working
- DHT11 sensor gives the values of temperature in degree Celcius and humidity in percentage.
- The values for both temperature and humidity can also be seen on the Serial monitor screen of the Arduino Software.
- You can open the serial monitor from the top right corner of your screen as shown in the screenshot below.
- In this dht11 with Arduino Tutorial, The OLED display is useful in displaying texts as well as graphics.
- It works with the I2C protocol as it has SDA and SCK pins. In the code, we have to set the size and color of the text which is going to be displayed on the OLED screen.
- The clearDisplay() function is used to remove all the text and reset the OLED screen.
- We use setCursor() function for adjusting the text on the screen so that it looks neat and clean.
- The values of the temperature and humidity keep updating automatically with time.
to use this DHT11 sensor is very easy. because there is a library available which make all the things easy to do. only you need to call the function from the library and all the works will happened automatically done. to measure temperature and humidity DHT11 with Arduino is the best combination.

Components Required
| Arduino UNO board | BUY LINK |
| USB cable for uploading the code | BUY LINK |
| DHT11 temperature-humidity sensor | BUY LINK |
| SSD1306 OLED display | BUY LINK |
| Jumper wires | BUY LINK |
| Breadboard | BUY LINK |

Components Table
You can buy the whole components from the given link we have to share the amazon link. from where you can get a good discount on the components.
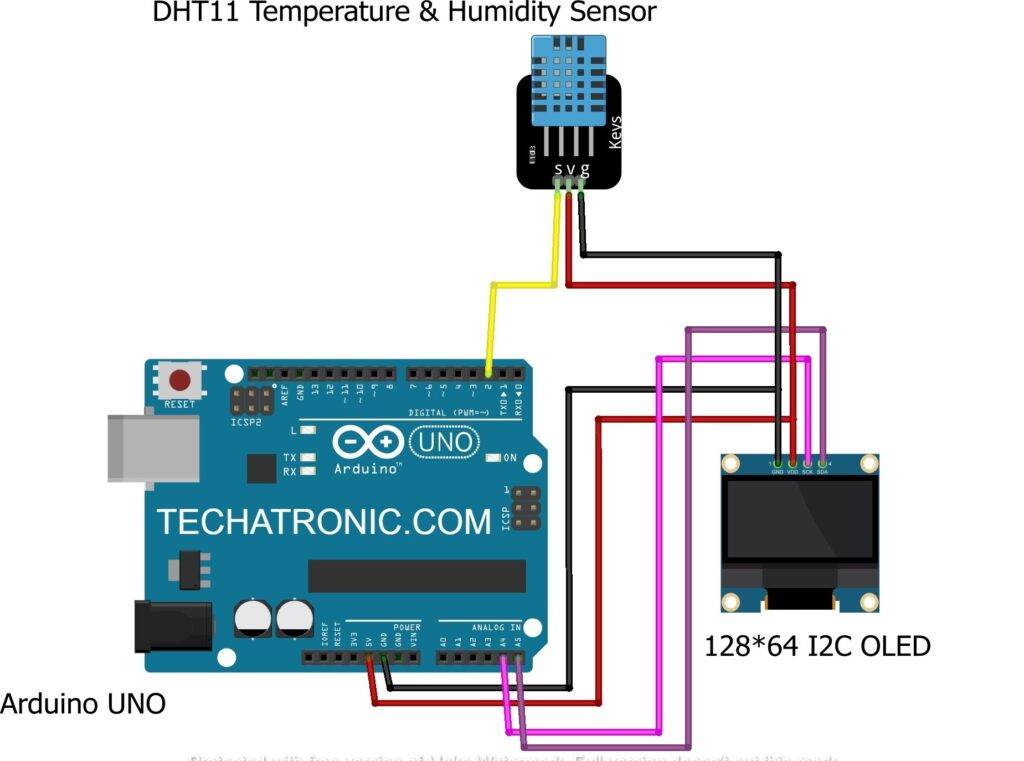
temperature humidity sensor Circuit Diagram
Connection Table
| Arduino UNO | DHT 11 Sensor |
| +5V | ( V ) VCC |
| G, GND | ( G ) GND |
| 2 Pin | ( S ) OUT Pin |
| Arduino UNO | SSD 1306 Oled Display |
| +5V | VCC |
| GND | GND |
| A4 Pin ( SDA Pin ) | SDA Pin |
| A5 Pin ( SCL Pin ) | SCL Pin |

dht11 Arduino code CodeMake the connections according to the diagram given above.
- Connect the 5 volts pin of the Arduino with the VCC pin of the DHT11 sensor and also with the VCC pin of the OLED display.
- Join the GND pin of the Arduino with the GND pin of the OLED display and also with the GND pin of the DHT11 sensor.
- Connect the signal pin of the DHT11 sensor with the digital-2 pin of the Arduino.
- Join the SCK and SDA pins of the OLED display with the SCK and SDA pins of the Arduino that are pin numbers analog-4 and analog-5.
- These pins are for serial communication between two devices. Arduino has a total of two pairs of I2C (SDA and SCK) pins. Arduino Tutorial series contains this important article too.
- You can read more about an OLED display from one of our articles on it. Connect a USB cable to the Arduino so that system starts working.
NOTE: Please upload the code which is given below to the Arduino board. Before compiling the code you have to install <SimpleDHT.h>, <SPI.h>, <Adafruit_GFX.h>, <Adafruit_SSD1306.h> these dht11 with Arduino library to the IDE software. You can take a reference from here on how to add a zip library to the Arduino IDE software.
temperature humidity sensor Arduino Code
 // TECHATRONIC.COM
  // SimpleDHT LIBRARY LINK
  // https://github.com/winlinvip/SimpleDHT
  // Library SPI.h
  // https://github.com/PaulStoffregen/SPI
  // Library Adafruit_GFX.h
  // https://github.com/adafruit/Adafruit-GFX-Library
  // Library Adafruit_SSD1306.h
  // https://github.com/adafruit/Adafruit_SSD1306
 #include <SPI.h>
 #include <Wire.h>
 #include <Adafruit_GFX.h>
 #include <Adafruit_SSD1306.h>
 #include <SimpleDHT.h>
 //   for DHT11,
 //   VCC: 5V or 3V
 //   GND: GND
 //   DATA: 2
 int pinDHT11 = 2;
 SimpleDHT11 dht11(pinDHT11);
 #define screen_width 128 // OLED display width, in pixels
 #define screen_height 64 // OLED display height, in pixels
 #define OLED_RESET 4
 Adafruit_SSD1306 display(screen_width, screen_height);
 void setup ()
 {
   Serial.begin(9600);
   Serial.println("TEMPERATURE AND HUMIDITY");
  display.begin(SSD1306_SWITCHCAPVCC, 0x3C);
  display.clearDisplay();
 }
 void loop ()
 {
  byte temperature = 0;
  byte humidity = 0;
  int err = SimpleDHTErrSuccess;
  if ((err = dht11.read(&temperature, &humidity, NULL)) != SimpleDHTErrSuccess) {
   Serial.print("Read DHT11 failed, err="); Serial.println(err);delay(1000);
   return;
  }
  Serial.print((int)temperature); Serial.print(" *C, ");
  Serial.print((int)humidity); Serial.println(" H");
  // DHT11 sampling rate is 1HZ.
   display.clearDisplay();
   display.setTextSize(1);
   display.setTextColor(SSD1306_WHITE);
   display.setCursor(0, 0);
   display.print("  TEMP. & HUMIDITY");
   display.setCursor(0, 25);
   display.print(" TEMPERATURE : ");
   display.setCursor(90, 25);
   display.print((int)temperature);
   display.setCursor(0, 50);
   display.print(" HUMIDITY  : ");
   display.setCursor(90, 50);
   display.print((int)humidity);
   display.display();
 }

without the libraries it is not possible to make this project work. that’s why we have shared all the library in the code part you can check in our code.
The issue can be encountered during Code upload. There is a new version of the DHT11 library which can’t support the DHT11 sensor many times. if this problem happens with you. you need to go to the arduino ide. click on the skect and manage the library. and find out the DHT master 1.1.0 version which can help you.
Still if you can’t geet rid of the problem you can ask in the comment section. there is a IoT version of the same project in which you can see all the temperature and humidity datat on the mobile phone app.
IoT Weather Monitoring System | IoT project
The above given project is very innovative you can make that too.
We hope that you like this project if so then try to make it by yourself once. Also, check our tutorials on Arduino and Raspberry Pi. If you have any doubts regarding this project then do inform us in the comments section below.
video sample
HAPPY LEARNING!