
Hey Friends, I’m here to do another interesting tutorial on raspberry pi pico tutorial. Sound Sensor Pi PICO is today’s topic of discussion, in which well see how can we use the KY-038 sound sensor and Raspberry Pi PICO. The tutorial is based on Micropython also code is very simple to understand and make. We’ll also try to make the led glow according to the sound and also try to receive analog signals through Sound Sensor. So let’s begin today’s tutorial.
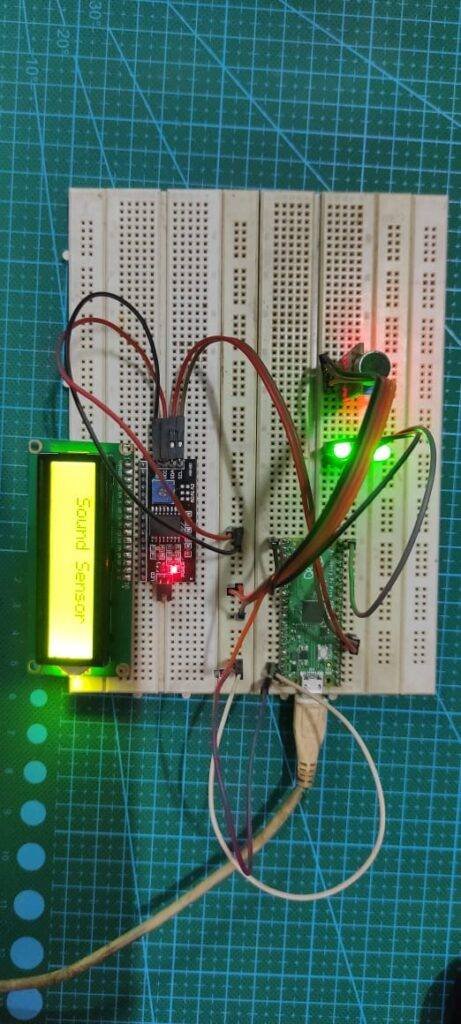
Sound Sensor raspberry pi pico tutorial
Today in it his tutorial we are going to use the KY-038 Sound sensor which is very easily available in online and offline stores. Along with this, it also has both types of outputs available, i.e., Digital & Analog outputs. We’ll try to demonstrate both types of outputs along with Led glowing on its basis. There are other variants available in the market which give both analog and digital output or on;y digital outputs.
For more precise and accurate sound signals, you can use more advanced modules like Sparkfun and some costly ones, but these are for different purposes. raspberry pi pico tutorial For today’s demonstration, we can use this basic one as we don’t need very precise data of the sound. Also in this small module, there are various other features like value range trimming using a potentiometer and onboard status led which glows when there is sound.
Material Required
- Raspberry Pi PICO
- Breadboard
- Jumper wires
- Sound sensor
- LED (RGB if possible)
- I2C LCD
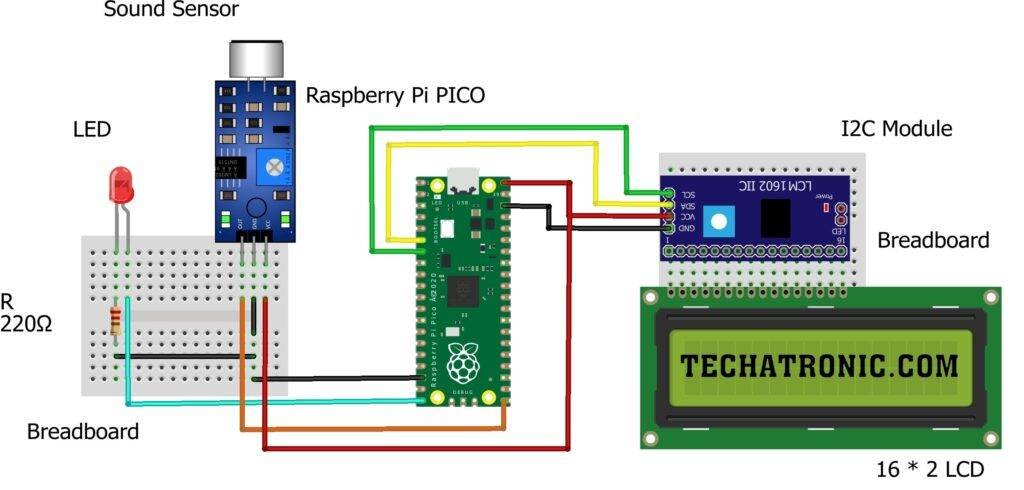
raspberry pi pico tutorial Circuit Design
|
Raspberry PI PICO |
Sound Sensor | |
|
GPIO 16 Pin |
D0 | |
|
3.3V |
VCC | |
|
GND |
GND | |
|
Raspberry PI PICO |
16*2 LCD | |
|
GPIO 4 ( SDA ) |
SDA Pin | |
|
GPIO 5 ( SCL ) |
SCL Pin | |
|
+5 Volt |
VCC | |
|
GND |
GND | |
|
Raspberry PI PICO |
LED | 220-ohm Resistor |
|
GPIO 15 Pin |
Anode Terminal ( + ) |
|
|
GND |
|
Terminal 1 |
|
|
Cathode Terminal ( – ) |
Terminal 2 |
ras pi pico sound sensor Code & Explanation
Explanation
First, we import some import modules which are required for the program to work. As we are using a 16×2 I2C LCD module, so we are going to use its module which is preloaded onto PICO as shown in our I2C LCD tutorial of PICO. We also import Pin and I2C modules which are required for the display to work and sound sensors to receive data & sleep function from the time module.
Further, we define two pins as input and output for the sound sensor to receive input and led to toggle respectively. Then we create an LCD object which initializes the i2c display on I2C port 0 (zero) whose pins are defined in code and can be changed from port 0 to port 1. Then we clear the display for removing and previous data in the ram of the LCD.
After it, we move the cursor to the specific place using commands which are clearly defined and explained in the I2C LCD tutorial of the PICO. Then in the while loop we use the try & except method to create an infinite loop with keyboard interrupt. In a while loop, we turn on the LEDs on Pin 15 as soon as the sound sensor detects the sound. This gives the VU meter effect, but as the sensor is of low quality the effect can be a bit different and not satisfactory but acceptable.
Code
 from LQ_i2c import I2cLcd
 from machine import Pin,I2C
 from time import sleep
 vu=Pin(15,Pin.OUT)
 di=Pin(16,Pin.IN)
 i2c = I2C(id=0,scl=Pin(5),sda=Pin(4),freq=100000)
 lcd = I2cLcd(i2c, 0x3f, 2, 16) # LCD 16x2
 lcd.clear()
 lcd.move_to(2,0)
 lcd.putstr('Sound Sensor')
 while True:
   try:
     if di.value()== True:
       vu.value(True)
     else:
       vu.value(False)
   except KeyboardInterrupt:
     break
With this, we have completed the Sound Sensor Pi PICO tutorial. You may ask your problems below if you face any also the link to the LCD tutorial is mentioned above in the description, look at it carefully to get familiar with the commands.