

Table of Contents
Introduction of Arduino light dimmer
Hello geeks, hope you are doing fine.
Are you searching for an Arduino light dimmer circuit? if yes then you are at the right place.
In this article,
we are going to teach you that how you can make a light dimmer circuit using an Arduino UNO. Here we can control the brightness of the LED with the help of two pushbuttons.
Do you know how a pushbutton works with Arduino, if not then check it first? You can also check out our projects on Arduino and IoT. For making more such amazing projects read our website having 10+ projects with well-labeled circuit diagrams.
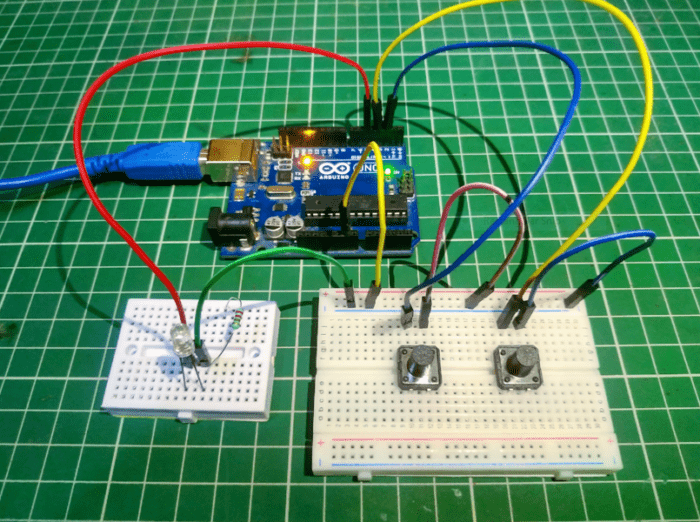
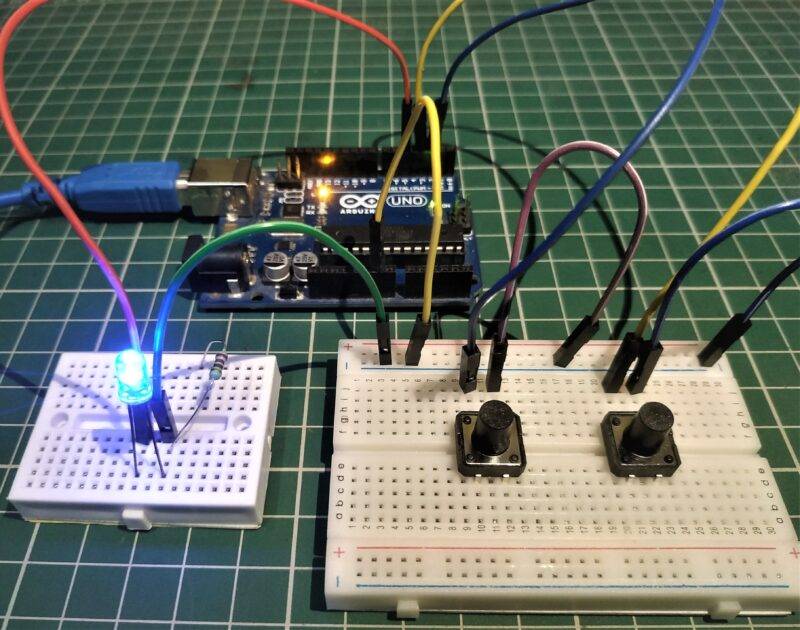
Make the connections according to the circuit which is given below and then upload the code.
How Does light dimmer Works?
- There are many types of circuits used for controlling the brightness of the bulbs but in this article,
- we are making this circuit with the help of an Arduino board this Arduino tutorial.
- There are two pushbuttons,
- you can press them to adjust the brightness or to dim the light of the LED.
- One pushbutton is for increasing the brightness and the other is for decreasing it.
- Arduino light dimmer is very useful in restaurants and cafes.

You can also check the automatic street light system with Arduino made by us.
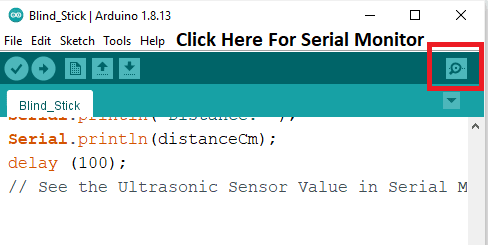
- Open the serial monitor and set the baud rate to 9600.
- You can locate the serial monitor on your screen from the screenshot given below.
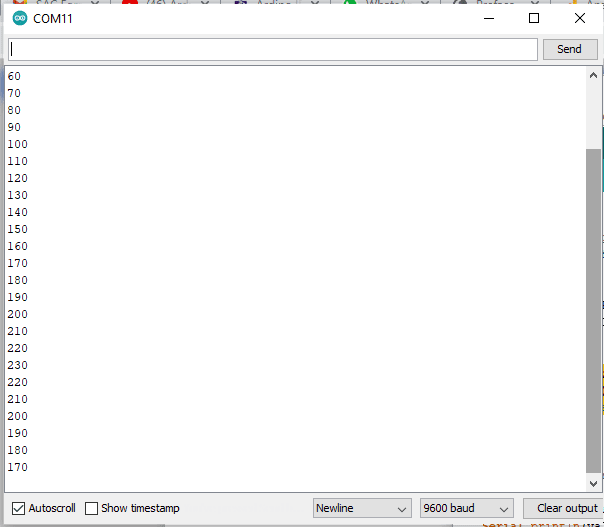
- Whenever you press a button the corresponding values are printed on the serial monitor and the brightness of the LED also changes with it.
- If you are learning Arduino tutorial this is a very good example.
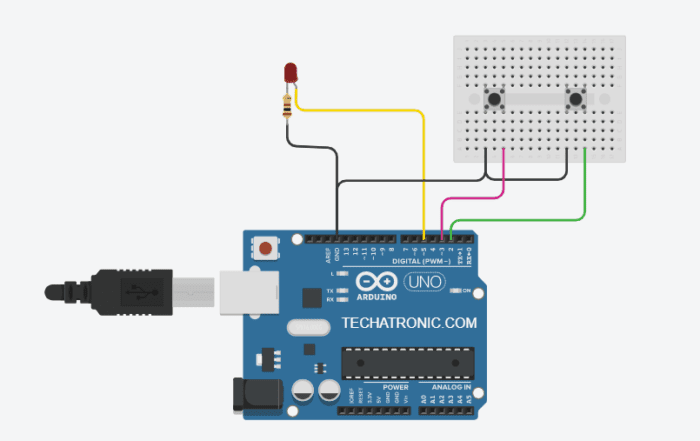
Simulation for Arduino light dimmer
Components Required for make light dimmer with Arduino
| Arduino UNO board | BUY LINK |
| 100-ohm resistor | BUY LINK |
| LED | BUY LINK |
| Two pushbuttons | BUY LINK |
| USB cable for uploading the code | BUY LINK |
| Jumper wires | BUY LINK |
| Breadboard | BUY LINK |

Components Table
You can buy the whole components from the given link we have to share the amazon link. from where you can get a good discount on the components.
Arduino light dimmer Circuit Diagram
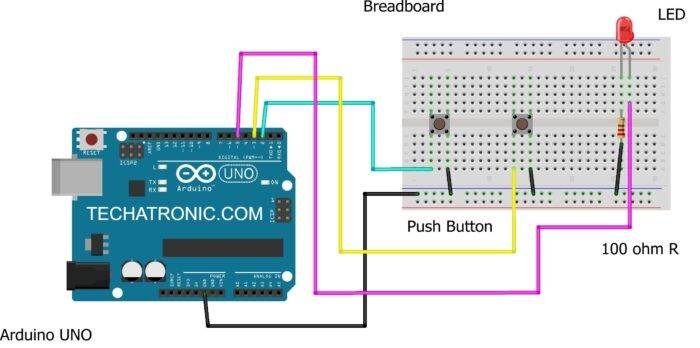
Connection Table
| Arduino UNO | Push Button 1 | Push Button 2 |
| 2 Pin | Terminal 1 | |
| 3 Pin | Terminal 1 | |
| GND | Terminal 2 | Terminal 2 |
| Arduino UNO | LED | 220 Ohm Resistor |
| 5 Pin | Anode Pin | |
| Cathode Pin | Terminal 1 | |
| GND | Terminal 2 |

- Take two push buttons and place them on the breadboard in such a way that the pair of interconnected pins are in a verticle position.
- Join the one pin of the first pushbutton with the negative rail of the breadboard and the other pin with the digital-2 pin of the Arduino.
- Make all the connections using jumper wires.
- Connect one pin of the second pushbutton with the negative rail of the breadboard and the other pin with the digital-3 pin of the Arduino.
- Attach a wire between the negative rail and the GND pin of the Arduino.
- Now take an LED and connect its positive leg with the digital-5 pin of the Arduino and the negative leg with the negative rail via a 100-ohm resistor.
- We use a resistor with the LED so that the LED did not burn due to high voltage. Connect a USB cable to power the Arduino.
Arduino light dimmer Code
NOTE: Copy this code as it is and paste it on your Arduino IDE software. Then upload the code to the Arduino.
 int but1=2;
 int but2=3;
 int led = 5;
 int x=0;
 int c;
 void setup(){
  Serial.begin(9600);
  pinMode(5,OUTPUT);
  pinMode(2,INPUT_PULLUP);
  pinMode(3,INPUT_PULLUP);
  //
 }
 void loop(){
  attachInterrupt(digitalPinToInterrupt(but1),increase,LOW);
  attachInterrupt(digitalPinToInterrupt(but2),decrease,LOW);
  delay(1000);
  c=0;
 }
 void increase()
 {
  if(x>-1 && x<255 && c==0){
   c=1;
   x=x+10;
   Serial.println(x);
   analogWrite(5,x);
   return x;
  }
  else if(x>255){
   x=0;
  }
 }
 void decrease(){
  if(x>0 && x<255 && c==0){
   c=1;
   x=x-10;
   Serial.println(x);
   analogWrite(5,x);
   return x;
  }
  else if(x<0){
   x=0;
  }
 }
We hope that you like this light dimmer circuit and must try to make it on yourself. If you have any doubts regarding this project then ask them in the comments section given below. Also, do check out amazing tutorials on Arduino and Raspberry Pi.
HAPPY LEARNING!