
Hey guys, welcome back to Techatronic. Are you fond of playing games? Do you want to make an electronic game so that you can pass your free time playing it? Well in this article, We are going to make a sequence game using Arduino UNO. We are using a few pushbuttons here so that Arduino can take input from it. Are you familiar with the working of a pushbutton with Arduino, if not then go through it first? In this game, you have to remember the sequence of the LEDs in which they are turning on and once it is done, the system will ask to enter the same sequence. You can also check out our latest projects on Arduino and IoT. Complete the connections and then upload the given code.
Working of Arduino electronic game
This is a memory-based game so it will also help to improve your skills. Let’s enjoy it and make our personal high scores in it. You can enter the same sequence by pressing the pushbuttons in the same order. The buzzer beeps indicate your turn. You have a limited time to start entering the sequence after that the system repeats the sequence once again. if you are looking for a game with Arduino then you are at the right place. You have only two chances for completing the sequence. If you enter the wrong sequence, the system will reset itself and a new random sequence will be generated automatically.


Components Required
| Arduino UNO | BUY LINK |
| LEDs | BUY LINK |
| pushbuttons | BUY LINK |
| Buzzer | BUY LINK |
| 220-ohm resistors | BUY LINK |
| USB cable for uploading the code | BUY LINK |
| Jumper wires | BUY LINK |
| Breadboard | BUY LINK |
Arduino based game Circuit Diagram
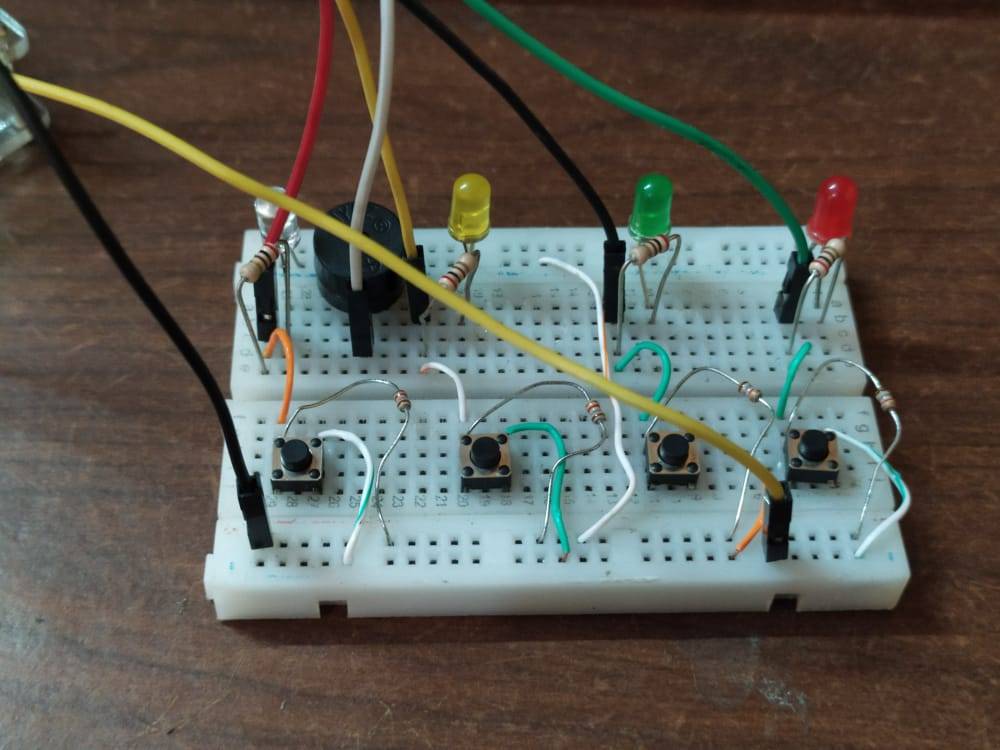
Take a pushbutton and place it on the breadboard in such a way that the pair of interconnected pins are in a verticle direction. this is basically a sequence collection electronic game in which we are using a microcontroller too. Then Connect one pin with the positive rail of the breadboard and the other pin with the ground rail via a 220-ohm resistor. Repeat these connections similarly for the other three pushbuttons as shown in the diagram. Then take four LEDs of different colors and connect them one by one on the breadboard. Join the first LED’s positive leg with a pushbutton pin via a 220-ohm resistor and the negative leg with the negative rail. For the second, third, and fourth LED repeat the same connections. Connect the negative wire of the buzzer with the negative rail and the positive wire of the buzzer with the digital-5 pin of the Arduino. Connect the digital-13 pin of the Arduino with the pin of the pushbutton where the negative wire is connected for the first LED. Join the digital-10, digital-8, and digital-2 pins of the Arduino with the pins of the pushbuttons similarly for the second, third, and fourth LED. At last, connect the 5 volts pin of the Arduino with the positive rail and the GND pin of the Arduino with the negative rail.
Code for the Project
NOTE: Please upload the code which is given below to the Arduino.
 //Techatronic.com
 #define PLAYER_WAIT_TIME 2000 // The time allowed between button presses - 2s
 byte sequence[100];      // Storage for the light sequence
 byte curLen = 0;       // Current length of the sequence
 byte inputCount = 0;     // The number of times that the player has pressed a (correct) button in a given turn
 byte lastInput = 0;      // Last input from the player
 byte expRd = 0;        // The LED that's suppose to be lit by the player
 bool btnDwn = false;     // Used to check if a button is pressed
 bool wait = false;      // Is the program waiting for the user to press a button
 bool resetFlag = false;    // Used to indicate to the program that once the player lost
 byte soundPin = 5;      // Speaker output
 byte noPins = 4;       // Number of buttons/LEDs (While working on this, I was using only 2 LEDs)
                // You could make the game harder by adding an additional LED/button/resistors combination.
 byte pins[] = {2, 13, 10, 8}; // Button input pins and LED ouput pins - change these vaules if you wwant to connect yourbuttons to other pins
                // The number of elements must match noPins below
 long inputTime = 0;      // Timer variable for the delay between user inputs
 void setup() {
  delay(3000);        // This is to give me time to breathe after connection the arduino - can be removed if you want
  Serial.begin(9600);     // Start Serial monitor. This can be removed too as long as you remove all references to Serial below
  Reset();
 }
 ///
 /// Sets all the pins as either INPUT or OUTPUT based on the value of 'dir'
 ///
 void setPinDirection(byte dir){
  for(byte i = 0; i < noPins; i++){
   pinMode(pins[i], dir);
  }
 }
 //send the same value to all the LED pins
 void writeAllPins(byte val){
  for(byte i = 0; i < noPins; i++){
   digitalWrite(pins[i], val);
  }
 }
 //Makes a (very annoying :) beep sound
 void beep(byte freq){
  analogWrite(soundPin, 2);
  delay(freq);
  analogWrite(soundPin, 0);
  delay(freq);
 }
 ///
 /// Flashes all the LEDs together
 /// freq is the blink speed - small number -> fast | big number -> slow
 ///
 void flash(short freq){
  setPinDirection(OUTPUT); /// We're activating the LEDS now
  for(int i = 0; i < 5; i++){
   writeAllPins(HIGH);
   beep(50);
   delay(freq);
   writeAllPins(LOW);
   delay(freq);
  }
 }
 ///
 ///This function resets all the game variables to their default values
 ///
 void Reset(){
  flash(500);
  curLen = 0;
  inputCount = 0;
  lastInput = 0;
  expRd = 0;
  btnDwn = false;
  wait = false;
  resetFlag = false;
 }
 ///
 /// User lost
 ///
 void Lose(){
  flash(50);
 }
 ///
 /// The arduino shows the user what must be memorized
 /// Also called after losing to show you what you last sequence was
 ///
 void playSequence(){
  //Loop through the stored sequence and light the appropriate LEDs in turn
  for(int i = 0; i < curLen; i++){
    Serial.print("Seq: ");
    Serial.print(i);
    Serial.print("Pin: ");
    Serial.println(sequence[i]);
    digitalWrite(sequence[i], HIGH);
    delay(500);
    digitalWrite(sequence[i], LOW);
    delay(250);
   }
 }
 ///
 /// The events that occur upon a loss
 ///
 void DoLoseProcess(){
  Lose();       // Flash all the LEDS quickly (see Lose function)
  delay(1000);
  playSequence();   // Shows the user the last sequence - So you can count remember your best score - Mine's 22 by the way :)
  delay(1000);
  Reset();      // Reset everything for a new game
 }
 ///
 /// Where the magic happens
 ///
 void loop() {
  if(!wait){
               //****************//
               // Arduino's turn //
               //****************//
   setPinDirection(OUTPUT);           // We're using the LEDs
   randomSeed(analogRead(A0));          // https://www.arduino.cc/en/Reference/RandomSeed
   sequence[curLen] = pins[random(0,noPins)];  // Put a new random value in the next position in the sequence - https://www.arduino.cc/en/Reference/random
   curLen++;                   // Set the new Current length of the sequence
   playSequence();                // Show the sequence to the player
   beep(50);                   // Make a beep for the player to be aware
   wait = true;                 // Set Wait to true as it's now going to be the turn of the player
   inputTime = millis();             // Store the time to measure the player's response time
  }else{
               //***************//
               // Player's turn //
               //***************//
   setPinDirection(INPUT);            // We're using the buttons
   if(millis() - inputTime > PLAYER_WAIT_TIME){ // If the player takes more than the allowed time,
    DoLoseProcess();              // All is lost :(
    return;
   }
   if(!btnDwn){                 //
    expRd = sequence[inputCount];        // Find the value we expect from the player
    Serial.print("Expected: ");         // Serial Monitor Output - Should be removed if you removed the Serial.begin above
    Serial.println(expRd);           // Serial Monitor Output - Should be removed if you removed the Serial.begin above
    for(int i = 0; i < noPins; i++){      // Loop through the all the pins
     if(pins[i]==expRd)
      continue;                // Ignore the correct pin
     if(digitalRead(pins[i]) == HIGH){     // Is the buttong pressed
      lastInput = pins[i];
      resetFlag = true;            // Set the resetFlag - this means you lost
      btnDwn = true;             // This will prevent the program from doing the same thing over and over again
      Serial.print("Read: ");         // Serial Monitor Output - Should be removed if you removed the Serial.begin above
      Serial.println(lastInput);       // Serial Monitor Output - Should be removed if you removed the Serial.begin above
     }
    }
   }
   if(digitalRead(expRd) == 1 && !btnDwn)    // The player pressed the right button
   {
    inputTime = millis();            //
    lastInput = expRd;
    inputCount++;                // The user pressed a (correct) button again
    btnDwn = true;               // This will prevent the program from doing the same thing over and over again
    Serial.print("Read: ");           // Serial Monitor Output - Should be removed if you removed the Serial.begin above
    Serial.println(lastInput);         // Serial Monitor Output - Should be removed if you removed the Serial.begin above
   }else{
    if(btnDwn && digitalRead(lastInput) == LOW){ // Check if the player released the button
     btnDwn = false;
     delay(20);
     if(resetFlag){               // If this was set to true up above, you lost
      DoLoseProcess();             // So we do the losing sequence of events
     }
     else{
      if(inputCount == curLen){         // Has the player finished repeating the sequence
       wait = false;              // If so, this will make the next turn the program's turn
       inputCount = 0;             // Reset the number of times that the player has pressed a button
       delay(1500);
      }
     }
    }
   }
  }
 }
We hope that you will love to play your self-made game. If you have any quarries related to this project then tell us in the comments section below. Also, check more related tutorials on Arduino and Raspberry Pi.
HAPPY LEARNING!