

Hey tech Folks, I’m back with another basic yet interesting article, and that is about the flex Sensor. Today we’re gonna learn about it in detail and see how and where we can use this in our projects.
- A flex sensor is generally a flexible strip of conductive ink and material that offers some resistance. This strip is made flexible in order so that it can be bent and alter the resistance.
- This sensor is not mostly used as it needs certain safety precautions in order to keep them alive, or you may break them, and the whole sensor replacement is needed.

Table of Contents
What is Flex Sensor?
- This Flex sensor is can be found in devices that are attached to the body of the person who is using it. Or we can say that it is embedded in devices that read gestures of the human body.
- It comes mostly in two sizes that are 2.2” & 4.5” which are easily available in the market either online or offline. The range of resistance also varies with length, from 30 kΩ to 40 kΩ.
- The sensor gives an Analog value that is in terms of the voltage levels. Or we can say that is similar to the force sensor discussed previously in basic electronic series.
- Make sure to connect it to the MCU pins not to the external power supply as, although it has high resistance due to its construction, the sensor or flexible strip may heat up. That can result in the sensor melting in severe cases.
- We have also made a very good Sign language project using Flex sensor which is a hit of this sensor and arduino.
Flex Sensor Construction
- The construction of flex sensor is similar to the flex sensor. But there is a bit of change that makes them different from one another.
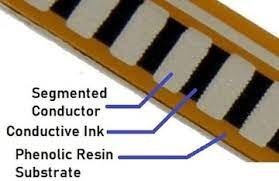
- From the above picture, you can have a clear picture of the construction of the sensor, and its main 3 components. That are segmented conductors, Phenolic resin & conductive ink.
- The endpoints of the contact pins are punched into the flexible strip and connected to conductive ink. Be careful if you are soldering these pins. As high temperatures may lead to melting of the strip and pins popping out.
- Make sure not to flex or bend the sensor rigidly or kept in a bent state for a long time as it may lead to a fixed shape due to its limit of elasticity.
- We have to connect a resistor of 10k with the Flex sensor to get the reading from the flex sensor.

Flex Sensor Working
- The working of flex sensor is similar to that of the force sensor as stated above. But there are some features which make it different.
- The sensor is commonly connected to the High potential of the system, as to measure the voltage drop due to the resistance.
- The values must be mapped from 0-1024 to 0-255, so to make it easier to control and perform a task based on it. For example, if making a servo move with a flex sensor, you can use for loop in combination with the map function to control the servo.
- The sensor values won’t change if you make the sensor bend in the opposite direction. As the resistance won’t change, so as the values, so try to bend or flex the sensor in the correct direction for long usage and stable durability.
Advantages
- There are many advantages of this sensor, but some of the major ones are listed below it is thin and flexible, so there is n such problem of space or location of placement.
- Moreover, there is no issue with working-level voltage, as it must be connected to the microcontroller’s working voltage for accurate readings.
- Also, the resistance changes are more or less noticeable by all microcontrollers of all resolutions, so there is no issue with using a high potential power supply.
Disadvantages
- One of the most important demerits or disadvantages of this sensor is the build quality of the Flex sensor. Though it is made in such a way to make it flexible, it is not up to the mark.
- Secondly, you cannot connect it to a high current source as it is a type of resistor, and also it is flexible so the generation of heat over a long time of continuous use can melt the sensor.
Applications of flex sensor
- There are many projects which can be built out of flex sensors, some of them are listed below
- Flex with Arduino
- Flex with ESP32
- Flex with Raspberry Pi
FAQ
Q. In which direction Flex Sensor should be bent?
Flex sensor should be bent in the backside where there is the somewhat likely opaque face, as bending the other side may damage the sensor earlier than it’s life span.
Q. What is the maximum power rating of the flex sensor?
It depends upon the quality of the material used to build the sensor and mentioned in its datasheet, but you should keep it under 1W for safety purposes.
If you want to learn to interface flex sensor with the Arduino you can read our article on it.