Hey Folks, I’m back with another tutorial based on Raspberry Pi in Python. Today we’re going to discuss the Ultrasonic sensor with Raspberry Pi. ultrasonic sensor is very important in the task of distance measuring and obstacle avoiding tasks and projects. But until now, you’ve only discussed its Arduino tutorial, which you can view by visiting the Ultrasonic sensor Arduino Tutorial. So let’s begin today’s article.
Ultrasonic sensor HC-SR04
When we talk about distance and obstacle avoiding, the first thing that comes to our minds is the HCSR04 Ultrasonic sensor. This sensor works, as its name, works on Ultrasonic sound. Ultrasonic sound is good for detecting obstacles also it does not affect human hearing range. Like bats, This sensor also works on the principle of reflection of sound. This method is used in various practical applications in daily life like ships, SONAR is used for underground Iceberg detection and other various objects.
HC-SR04 module is packed with Transmitter and Receiver structures which is the main working thing of the module. ultrasonic sensor with raspberry pi Also, there are various other microcontrollers embedded in the module for signal processing. It works within the Range of 0-400 cm with a minimum distance from transmitter and receiver of 2-3 cm. It works on the 40KHz frequency and a field angle of 30°. Also, the trigging time of the trig pin is 10µs. The module has two pins TRIG and ECHO which will be used through the whole process.
While using the module, take some measures in mind. Like the distance, the measuring can be sometimes inaccurate for that check the speed of sound in your region. I’m not cracking a joke, but the speed of sound may differ according to the climatic conditions in your region. So make sure to check it if the sensor gives inaccurate measuring.
Material Required
| Raspberry Pi | BUY LINK |
| HC-SR04 Ultrasonic Sensor | BUY LINK |
| Breadboard | BUY LINK |
| Jumper wires | BUY LINK |
| 16X2 LCD | BUY LINK |
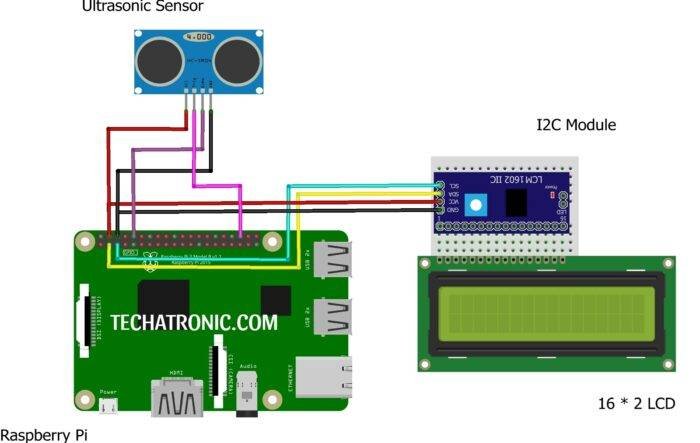
ultrasonic sensor with raspberry pi Circuit Diagram

ultrasonic sensor with raspberry pi Code & Explanation
|
Raspberry PI |
16*2 LCD |
|
GPIO 2 ( SDA ) |
SDA Pin |
|
GPIO 3 ( SCL ) |
SCL Pin |
|
+5 Volt |
VCC |
|
GND |
GND |
|
Raspberry PI |
Ultrasonic Sensor |
|
GPIO 15 Pin |
Echo Pin |
|
GPIO 16 Pin |
Trig Pin |
|
+5 Volt |
VCC |
|
GND |
GND |
Explanation
First, we import some modules in the code to make it work like LiquidCrystal_I2C, RPi.GPIO, time & sleep functions from the time module. The detailed explanation and commands of the LiquidCrystal module are explained in detail in the LiquidCrystal tutorial of Raspberry Pi. Visit that article for a detailed explanation and commands of the module.
Now we set the mode of pin numbering according to the Board conventions. Also, we initialize some pins for Trig and Echo pins of the ultrasonic sensor. Moreover, we create an LCD object to initialize LCD for working. We define the Echo pin as input and Trig pin as output for working. Then we clear the display and print some starting strings on the LCD.
Then we turn the trig pin of the ultrasonic sensor to low to clear the signal of the ultrasonic sensor than in the while loop using the try & except method we create an infinite while loop with keyboard interrupt. In the while loop, we turn the trig pin high for 10µs and then turn it low. Then we count the time taken by the ultrasonic sound waves to return by striking from the obstacles using a time function.
Further, we calculate total time and distance using simple calculations using the formula distance = speed x time. But as I have said in the above description that uses the speed of sound according to the temp in your region as I have mentioned in the code.
Code
 import RPi.GPIO as gp
 from time import sleep,time
 import LiquidCrystal_I2C
 lcd=LiquidCrystal_I2C.lcd()
 gp.setmode(gp.BOARD)
 gp.setup(16,gp.OUT)
 gp.setup(15,gp.IN)
 lcd.clear()
 lcd.display("Measuring",1,4)
 lcd.display("Distance",2,4)
 sleep(1)
 lcd.clear()
 gp.output(16,gp.LOW)
 sleep(0.000002)
 global st,sto
 lcd.display("Distance:",1,1)
 while True:
   try:
     gp.output(16,True)
     sleep(0.00001)
     gp.output(16,False)
     while gp.input(15)==0:
       st=time()
       #print(st,"\n")
     while gp.input(15)==1:
       sto=time()
       #print(sto)
     tt=sto-st
     dist=(tt*35124)/2 # in place of 35124 enter your spped of sound on basis of tempreature
     dist=round(dist,3)
     lcd.display("%f"%(dist),2,4)
   except KeyboardInterrupt:
     lcd.clear()
     gp.cleanup()
     break

So with this, we completed our ultrasonic Raspberry Pi tutorial. I hope you like it & if you need any help, just comment me below, I’ll answer all your questions.
