
Hey guys, welcome back to the Techatronic. Today we are going to make an Air Quality monitoring system project with the help of Arduino. In this, we will use many sensor to measure the air quality index.
many a time you have seen the AQI Reading at many places. This project is all about Air quality. if you travel from one place to another places you can check the air quality near by you by the help of this device. That’s why we are doing an air quality check project. We are going to use multiple sensors to measure the air quality using Arduino.
By using various sensors Mq series sensor and DHT11 sensors. we are making a very good air quality monitoring system project which can be used anywhere to get the air quality, as all we know there is pollution everywhere. and we need to monitor where is quality of air is good or where is not.
Do distinguish the quality and find the good area we need this kind of device. this is portable device can work with a very less power. so, here we are going to share all the details with code and circuit too. if you really want to learn and make this amazing project read full article. so, let get started without wasting the time.
First we need to know what components we need to make this project. Here the components list.
Table of Contents
Air quality monitoring system project components Required
| DHT Sensor | BUY LINK |
| MQ 4 methane sensor | BUY LINK |
| MQ 9 (carbon monoxide sensor) | BUY LINK |
| MQ135 (air quality sensor) | BUY LINK |
| Arduino Uno | BUY LINK |
| USB to A type cable | BUY LINK |
| Breadboard | BUY LINK |
| Jumper wire | BUY LINK |
| 16X2 LCD | BUY LINK |
You can buy all components are together – BUY LINK
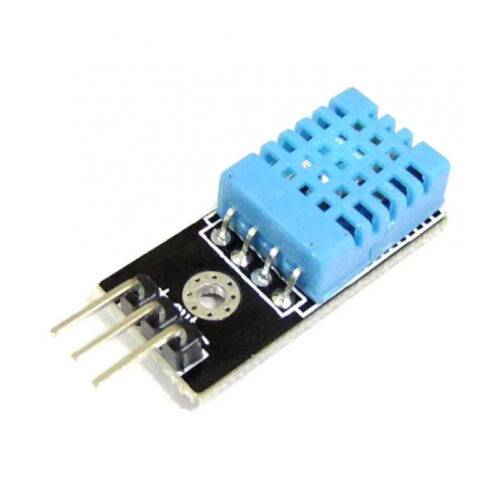
DHT sensor:- DHT sensor stand for digital temperature and humidity sensor. this sensor gives digital values for temperature and humidity. inside this sensor there are two separate sensors one is for temperature and other is for humidity.
We already have made a tutorial how the dht sensor work with the arduino and how to interface. if you have any difficulty in Air Quality monitoring system project here with dht sensor you should visit the previous Page for better understanding.
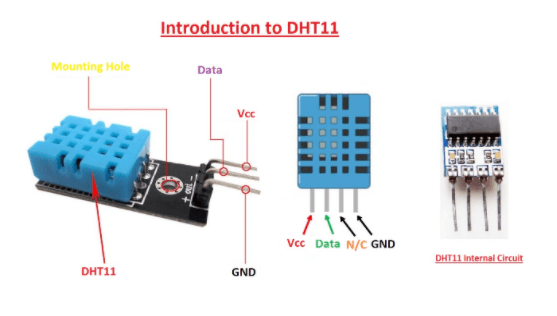
DHT sensor uses the capacitive humidity sensor and a thermister to measure the temperature and humidity. there is a humidity absorb material sandwiched between two electrodes which measure the humidity in term of conductivity.
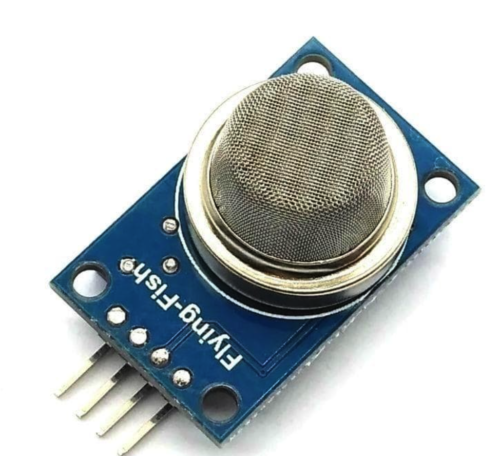
MQ GAS SENSORS
Mq series sensor Detail diagram for each sensor.
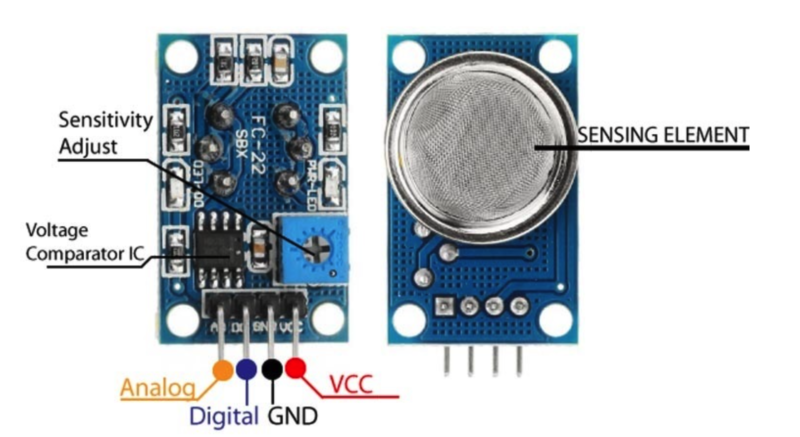
MQ 2 sensor:- MQ2 sensor is a smoke detect sensor which widely use in air pollution monitoring system projects. which only detect the smoke presence in the air. thee gas sensors are made up of special element inside the main cover which absorb the smoke.
there is a components or element use which is reactive with the smoke. which is also know as the chemiresistor. means when it comes with the contact of any specific chemical it changes thee resistance value.
like if we are using this smoke sensor there is inside the sensor the element use which is highly reactive with the smoke. when it comes in the contact with the smoke then the resistance of the conductive material changes. and we get the output from the output pin as a result. which output use as the data in our Air Quality monitoring system project.
MQ 9 sensor:-
MQ 9 sensor is an gas sensor which detect the presence of carbon monoxide. which works very well. carbon monoxide is one of the most pollutant particle present in the air. which cause by the vehicle , factories and other things too.

here inside the mq9 sensor they are using the filament made by the co reactive element which reacts with the co. and in the presence of the co the conductivity will vary with thee carbon monoxide. that’s why we are getting the different value in this air quality monitoring system project.
- Gas Detection: The MQ-9 sensor is only designed for detecting carbon monoxide (CO) and some of the flammable gases like (methane, propane, butane).
- Sensitivity Adjustment: the sensors come with a built-in adjustor that helps users to adjust the sensitivity of the sensor. This enables customization based on specific environmental conditions or concentration levels of the target gas.
- Analog Output: The MQ-9 sensor gives analog voltage output that varies with the presence of the detected gas. This output signal can be interfaced with microcontrollers
- Heating Element: The sensor includes a heating element, which helps in stabilizing the sensor’s performance and allows it to operate effectively in different environmental conditions.
- Preheating Time: The sensor requires a certain preheating time before it can provide accurate readings. This preheating time is essential to ensure stable and reliable measurements.
- Response Time: The MQ-9 sensor generally has a response time in the range of a few seconds to a few minutes, depending on the specific gas being detected.
- Applications: MQ-9 sensors find applications in various industries, including residential and commercial safety systems, industrial gas detection systems, and environmental monitoring devices.
It’s important to note that while MQ-9 sensors are widely used, they may have limitations and may not be suitable for many conditions.
MQ 135 sensor:- The last sensor we are using mq135 sensor which always be the most usable sensor in this mq series sensor. mq135 sensor have the ability to detect the smoke presence in air.

MQ-135 sensor is another type of gas sensor that help to get the air pollution presence in the environment. in this air pollution monitoring project which mmq135 sensor is very important because this mq135 sensor is abal;we to detect the many poisness gasses presence in air.
If you want to make air quality monitoring system project we add this sensor to detect the air quality at it best. if you want to intake the fresh air you should know the air quality of the air near you
The working is nearly same for this sensor too. there is a chemioresistor which vary the conductivity with the smoke presence in the air. more the smoke detect more conductivity.
The MQ-135 sensor is designed to detect gases such as ammonia (NH3), nitrogen oxides (NOx), benzene, smoke, and various other volatile organic compounds (VOCs). It is particularly sensitive to ammonia.
The mq 135 sensor give us the analog output value which help to make the more condition in the code.
Limitations of mq sensor: While MQ sensors are cost-effective and widely used, they may have some limitations, including cross-sensitivity to certain gases and the need for periodic calibration.
after knowing all about the sensor and the other hardware now, it’s time to make the construction and code of this project.
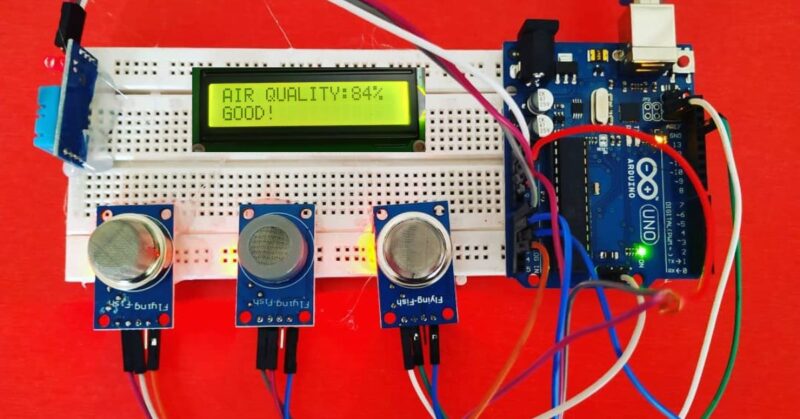
Air quality monitoring system project circuit diagram

- Connect all mq gas sensors Vcc to the +5v voltage pin of the Arduino
- Connect all sensor ground to the Gnd of Arduino
- Connect both ground and RW pins from LCD to Arduino
- Connect potentiometer T1 to Vcc and T3 to gnd
- Connect T2 or middle pin of the potentiometer to the LCD V0 pin
- Connect LCD d4,d5, d6 and d7 pin to Arduino pin 10,, 9 , 8 and 7 respectively
- LCD RS and E pin Connect to PIN 12 & 11 Respectively
- Connect MQ2 to Arduino A0 , MQ9 to Arduino A1 and MQ135 to Arduino A3 pin respectively
- Connect DHT Data pin to the Arduino pin 2.
All these sensor you are seeing in the components required or circuit diagram easily available in the market and online shops.
After making all these connection make sure no pin will short circuit to each other.
Connection Table
| Arduino UNO | DHT 11 Sensor |
| +5V | ( V ) VCC |
| G, GND | ( G ) GND |
| 2 Pin | ( S ) OUT Pin |
| Arduino UNO | MQ 2 Sensor |
| +5V | VCC |
| GND | GND |
| A0 Pin ( SDA Pin ) | A0 Pin |
| Arduino UNO | MQ 9 Sensor |
| +5V | VCC |
| G, GND | GND |
| 2 Pin | A1 |
| Arduino UNO | MQ 135 Sensor |
| +5V | VCC |
| GND | GND |
| A0 Pin ( SDA Pin ) | A2 Pin |
| Arduino UNO | 16X2 LCD |
| +5V | VCC , A |
| G, GND | VSS, K |
| 12 | RS |
| 11 | E |
| 10 | D4 |
| 9 | D5 |
| 8 | D6 |
| 7 | D7 |
| Potentiometer | |
| T1 | VCC |
| T3 | GND |
| T2 | V0 |
Air Quality monitoring system project code
// TECHATRONIC.COM
  // SimpleDHT LIBRARY LINK
  // https://github.com/winlinvip/SimpleDHT
  // Library SPI.h
  // https://github.com/PaulStoffregen/SPI
  // Library Adafruit_GFX.h
  // https://github.com/adafruit/Adafruit-GFX-Library
  // Library Adafruit_SSD1306.h
  // https://github.com/adafruit/Adafruit_SSD1306
 #include <SPI.h>
 #include <Wire.h>

 #include <SimpleDHT.h>
 //   for DHT11,
 //   VCC: 5V or 3V
 //   GND: GND
 //   DATA: 2
 int pinDHT11 = 2;
 SimpleDHT11 dht11(pinDHT11);


 #include <LiquidCrystal.h>
 const int rs = 12, en = 11, d4 = 10, d5 = 9, d6 = 8, d7 = 7;
 LiquidCrystal lcd(rs, en, d4, d5, d6, d7);


 void setup ()
 {
 lcd.begin(16, 2);
  lcd.print("hello, world!");
   Serial.begin(9600);
   Serial.println("TEMPERATURE AND HUMIDITY");
pinMode(A0, INPUT_PULLUP);
pinMode(A1, INPUT_PULLUP);
pinMode(A2, INPUT_PULLUP);

 }
 void loop ()
 {


 lcd.setCursor(2, 0);
lcd.print("AIR QUALITY");
lcd.setCursor(0, 2);
lcd.print("MONITORING");
delay(1000);
  byte temperature = 0;
  byte humidity = 0;
  int err = SimpleDHTErrSuccess;
  if ((err = dht11.read(&temperature, &humidity, NULL)) != SimpleDHTErrSuccess) {
   Serial.print("Read DHT11 failed, err="); Serial.println(err);delay(1000);
   return;
  }
int m = analogRead(A0);
int n = analogRead(A1);
int o = analogRead(A2);
Serial.print(m);
Serial.print(n);
Serial.print(o);
  Serial.print((int)temperature); Serial.print(" *C, ");
  Serial.print((int)humidity); Serial.println(" H");
  // DHT11 sampling rate is 1HZ.
 lcd.setCursor(2, 0);
lcd.print("m");
lcd.setCursor(6, 0);
lcd.print("n");
  lcd.setCursor(11, 0);
lcd.print("n");
lcd.setCursor(3, 1);
lcd.print("temperature");
  lcd.setCursor(10, 1);
lcd.print("humidity");
delay(1000);
 }
In the given code.
// SimpleDHT LIBRARY LINK
  // https://github.com/winlinvip/SimpleDHT
  // Library SPI.h
  // https://github.com/PaulStoffregen/SPI
  // Library Adafruit_GFX.h
  // https://github.com/adafruit/Adafruit-GFX-Library
  // Library Adafruit_SSD1306.h
  // https://github.com/adafruit/Adafruit_SSD1306
These are the libraries we are using you need to download all the libraries first to install the code into the Arduino. without the given libraries you can not compile the program for the air quality monitoring system project.
void setup ()
 {
 lcd.begin(16, 2);
  lcd.print("hello, world!");
   Serial.begin(9600);
   Serial.println("TEMPERATURE AND HUMIDITY");
pinMode(A0, INPUT_PULLUP);
pinMode(A1, INPUT_PULLUP);
pinMode(A2, INPUT_PULLUP);

 }
In the void setup we are initiating the LCD libraries and pin of arduino from which we need to get the output from the sensors. These three A0,A1,A2 are the pins getting the out put from the mq sensor. which you can clearly seen from the circuit diagram.
Air quality monitoring system project using Arduino is very simple and easy to. make because of the presence of the desire libraries.
due to these libraries you don’t need to make a huge code. you need only to call the libraries simple.
 lcd.setCursor(2, 0);
lcd.print("AIR QUALITY");
lcd.setCursor(0, 2);
lcd.print("MONITORING");
delay(1000);
Initially we are printing on display our project name. lcd.setcursor means we are setting out cursor at 2nd column and 1 st raw. we can’t write the full name air quality monitoring system project so, we write only airt quality monitoring in two rows.
int err = SimpleDHTErrSuccess;
  if ((err = dht11.read(&temperature, &humidity, NULL)) != SimpleDHTErrSuccess) {
   Serial.print("Read DHT11 failed, err="); Serial.println(err);delay(1000);
In these lines of code. we are extracting the temperature and humidity from the DHT11 sensor. dht11 sensor given some anonyms value which is not direct;y the temperature and humidity. there is a library which we are using help us to extract the actual temperature and humidity value.
int m = analogRead(A0);
int n = analogRead(A1);
int o = analogRead(A2);
Here,we are storing the analog sensor output values into the m,n,o variable so that we can easily compare and print the values into the display and serial monitor.
Serial.print(m);
Serial.print(n);
Serial.print(o);
  Serial.print((int)temperature); Serial.print(" *C, ");
  Serial.print((int)humidity); Serial.println(" H");
Using These lines of Code we are printing all the output from sensors printing on the Serial monitoring. Serial monitor is always make sure thee data is coming or not from the sensors. in This air quality monitoring system project using Arduino can get many complications. so, we need to verify first all the outputs are rightor not.
lcd.setCursor(2, 0);
lcd.print("m");
lcd.setCursor(6, 0);
lcd.print("n");
  lcd.setCursor(11, 0);
lcd.print("n");
lcd.setCursor(3, 1);
lcd.print("temperature");
  lcd.setCursor(10, 1);
lcd.print("humidity");
delay(1000);
Here, I am writing all the information on the 16X2 display.
If you have any problem to uploading the code you can refer our tutorial. How to upload the code in Arduino using Arduino IDE.
These is an error occurs sometimes which is contrast of the display. but we have added the potentiometer in this project. so you can easily adjust the contrast of the LCD by rotating the potentiometer.
still if you have any queries you can ask in the comment section.
Advantages of Air Quality Monitoring System Project
- Public Health Protection:
- Early Detection of Pollutants: air quality monitoring system project can easily detect harmful pollutants, which help to take ealry action to protect public health.
- Environmental Awareness:
- Community Awareness: by detecting and measure the real-time air quality data, the people can raises awareness among the community about the environmental impact of various activities and encourage responsible behavior.
- Data-Driven Decision-Making:
- Policy and Regulations: Governments can take the action on undesired action which are mostly responsible for increasing the airt pollutant. Also, they can make the policies and regulations related to air quality standards and emissions control.
- Emergency Response:
- Natural Disasters or Industrial Incidents: Before the natural disaster and accident in any industries can be stop ny assuming the air quality from the particular area. for example many accident happens due to leakage of harmful gasses in past years. an air quality monitoring system can provide critical information for emergency response teams to protect citizens and the environment.
- Indoor Air Quality Monitoring:
- Occupational Health: In addition to outdoor air quality monitoring, the project can extend to indoor spaces.
- Education and Outreach:
- Community Involvement: Involving citizens in the monitoring process fosters a sense of community responsibility and encourages individuals to take actions to reduce their environmental impact.
By using our air quality monitoring system project, you can help the other and your too. you can put one project at your home too. to measure the AQI at your home. which help you to make the good environment by placing the plants and air purifier.
We have also made the air purifier project which can help you to regulate the good quality air. the combination of both project help you to stay at the good quality air near by you.