
Table of Contents
Introduction
Hey guys, hope you are doing fine. In this article, we are going to make a stepper motor controlling circuit using Arduino UNO and ULN2003 motor driver. There are three circuits given below along with the codes. You can make any of them as per your choice. When the stepper moves in a clockwise direction a text is appeared on the LCD screen informing the same and when it moves in the counterclockwise direction, the text will display status. SO, basically we are controlling the stepper motor with Arduino. Make the connections according to the given circuit diagrams and then upload the code.

Components Required
| Arduino UNO | BUY LINK |
| ULN2003 driver module | BUY LINK |
| Stepper motor | BUY LINK |
| I2C module | BUY LINK |
| 16×2 LCD | BUY LINK |
| Jumper wires | BUY LINK |
| breadboard | BUY LINK |
| UNO Cable | BUY LINK |

What is a ULN 2003 stepper motor Driver
we will use this ULN2003 stepper motor driver to control the stepper motor with Arduino.
- It is a motor driver module that uses ULN2003 IC.
- In some cases, the motors used in the circuit need high voltage for their operation.
- There are four LEDs connected in the module which glows according to the signal received by the driver module.
- Since a microcontroller alone can not provide power to the motors so in that case, we use a motor driver.

- There are a variety of motor driver modules available in the market, one of them is ULN2003.
- It is a 16 pin IC that comes in a DIP (dual inline) package.
- Some of the alternatives of a ULN2003 driver are TPIC2701, ULN2001, L293d, ULN2004, etc.
- The IC is commonly used to drive high current LEDs, relays, motors, and stepper motors.
- In this article, we are using this driver module to run a stepper motor with arduino.

Circuit for Stepper Motor Controller /arduino with stepper motor circuit
NOTE: Please upload this code to the Arduino. First, you have to install <CheapStepper.h>, <LiquidCrystal_I2C.h> library in the software. If you don’t know how to add a zip library in your IDE software then check it first.
The circuit diagram is given below. Make sure that you connected all the wires properly and tightly.
Simple Circuit for stepper motor and arduino
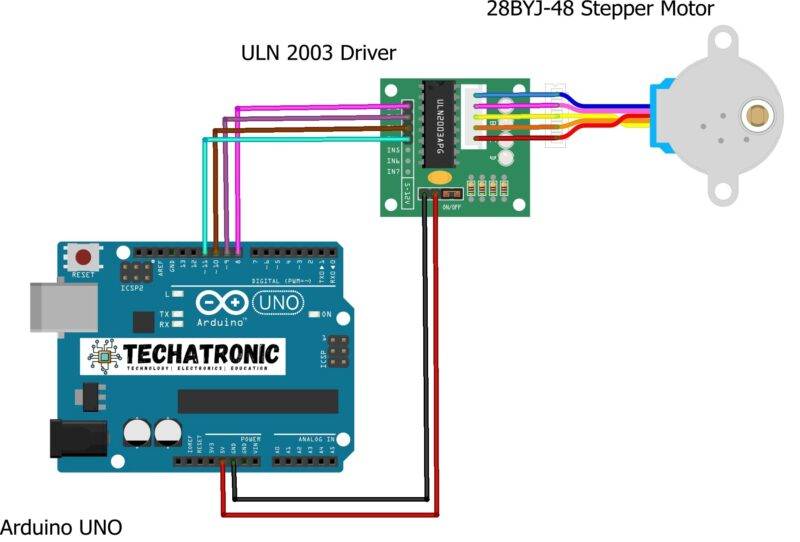
- First, let us discuss the connections for the ULN 2003 driver module and Arduino UNO.
- So you have to connect the 5 volts pin of the Arduino with the VCC pin (power) of the driver module.
- Join the GND pin of the Arduino with the GND pin of the driver module.
- Attach the IN1, IN2, IN3, IN3, and IN4 pins of the driver module with the digital-8, digital-9, digital-10, digital-11 pins of the Arduino.
- At last, join the five pins of the stepper motor with arduino the pins given on the other side of the driver module.
- Your circuit is now ready to use.
Arduino stepper motor Code
// TECHATRONIC.COM
// CheapStepper Library
// https://github.com/tyhenry/CheapStepper

#include <CheapStepper.h>

CheapStepper stepper (8,9,10,11);

void setup()
{

  stepper.setRpm(12);

}

void loop() {

 stepper.moveDegreesCW (180); // you can set the angle
delay(2000);
stepper.moveDegreesCCW (160); // you can set the angle
delay(2000);
}
stepper motor with lcd 16×2
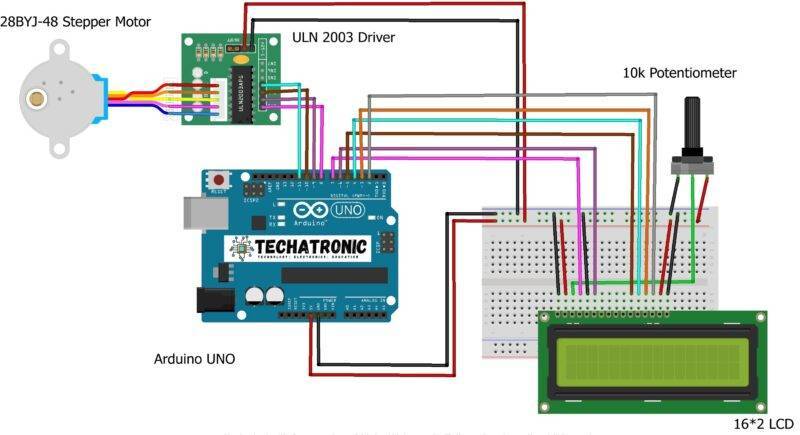
- Make the connections between the pins of the Arduino and 16×2 LCD as shown in the diagram.
- You can also read our article on it to understand the connections.
- Connect the 5 volts pin of the Arduino with the VCC pin of the driver module.
- Attach the GND pin of the Arduino with the GND pin of the driver module. Now join the IN1, IN2, IN3, IN3, and IN4 pins of the driver module with the digital-8, digital-9, digital-10, digital-11 pins of the Arduino.
- At last, connect the pins of the stepper motor with the remaining pins of the driver module.
stepper motor project Code
// TECHATRONIC.COM
// CheapStepper Library
// https://github.com/tyhenry/CheapStepper
#include "LiquidCrystal.h"
LiquidCrystal lcd(7,6,5,4,3,2);
#include <CheapStepper.h>
CheapStepper stepper (8,9,10,11);
void setup()
{
stepper.setRpm(12);
lcd.begin(16,2);
pinMode(12,OUTPUT);
pinMode(13,OUTPUT);
lcd.setCursor(0,0);
lcd.print("TECHATRONIC.COM ");
delay(3000);
lcd.setCursor(0,0);
lcd.print(" Stepper Motor ");
}
void loop() {
lcd.setCursor(0,1);
lcd.print("Clock Wise Directon ");
digitalWrite(13,HIGH);
digitalWrite(12,LOW);
stepper.moveDegreesCW (180); // you can set the angle
delay(2000);
lcd.setCursor(0,1);
lcd.print("Anti-Clock Wise Directon ");
digitalWrite(13,LOW);
digitalWrite(12,HIGH);
stepper.moveDegreesCCW (250); // you can set the angle
delay(2000);
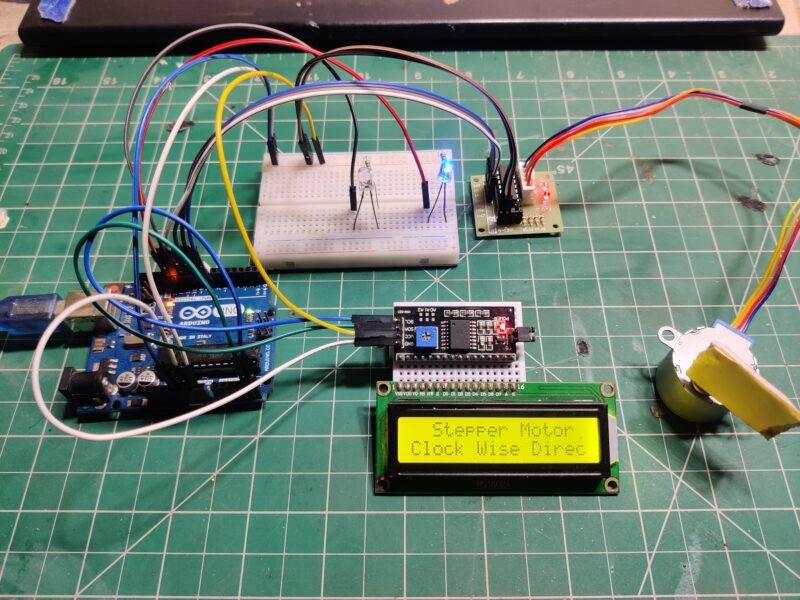
}Circuit With 16×2 LCD And I2C Module

- First, connect the pins of the I2C module with the pins of 16×2 LCD.
- Then join the 5 volts pin of the Arduino with the VCC pin of the driver module.
- Connect the GND pin of the Arduino with the GND pin of the driver module.
- Now join the IN1, IN2, IN3, IN3, and IN4 pins of the driver module with the digital-8, digital-9, digital-10, digital-11 pins of the Arduino.
- Connect the VCC and GND pins of the I2C module with the 5 volts and GND pins of the Arduino.
- At last, join the pins of the servo motor with the driver module and SDA, SCL pins of the I2C module with the analog-4, 5 pins of the Arduino.
we are simple make the arduino with stepper motor project
Code
// TECHATRONIC.COM
// CheapStepper Library
// https://github.com/tyhenry/CheapStepper
// I2C LIBRARY
//https://github.com/fdebrabander/Arduino-LiquidCrystal-I2C-library

#include <Wire.h>
#include <LiquidCrystal_I2C.h>
LiquidCrystal_I2C lcd(0x3F,16,2);
// lcd(0x27,16,2);
#include <CheapStepper.h>

CheapStepper stepper (8,9,10,11);

void setup()
{

  stepper.setRpm(12);
  lcd.init();    // Arduino
  lcd.backlight();
   pinMode(12,OUTPUT);
   pinMode(13,OUTPUT);
  lcd.setCursor(0,0);
  lcd.print("TECHATRONIC.COM    ");
  delay(3000);
  lcd.setCursor(0,0);
  lcd.print("  Stepper Motor    ");
}

void loop() {
 lcd.setCursor(0,1);
 lcd.print("Clock Wise Directon   ");
 digitalWrite(13,HIGH);
 digitalWrite(12,LOW);
 stepper.moveDegreesCW (180); // you can set the angle
 delay(2000);

 lcd.setCursor(0,1);
 lcd.print("Anti-Clock Wise Directon   ");
 digitalWrite(13,LOW);
 digitalWrite(12,HIGH);
 stepper.moveDegreesCCW (250); // you can set the angle
 delay(2000);
}
About the Code

In this section, we are exploring the code for arduino with stepper motor detail like how the system works and the inbuilt functions that we are using. So first we include the library so that we can use the functions defined in that library. Now create an object, here we create a stepper and define the pins that you are using. We declare digital pins 8, 9, 10, 11. In the setup function for stepper and arduino, set the RPM of the motor using setRpm function. RPM is the speed of the motor (round per minute). Here we set it to 12, you can increase or decrease it as per your choice. In the loop function, we use a pre defined function to rotate the stepper motor clockwise to a given angle. Then we provide a delay and again rotate the stepper motor towards anti clockwise to a given angle. We hope that you understand the code well.
FAQ
Q1. What makes a stepper motor different from an ordinary motor?
While using a stepper motor we can control its rotation at different angles by providing control signals.
Q2. What are the types of a stepper motor?
It is available in two types, unipolar and bipolar.
Q3. Can we directly connect a stepper motor to the Arduino?
No, it will not work directly. Since Arduino alone can not power a stepper motor and also kickback problem is there.
Q4. Can we control the RPM and direction of a stepper motor?
Yes, there are some built-in functions by which you can control the above factors.
Q5. What if we dont have an ULN2003 driver?
In that case, you can use other motor drivers such as L293d.
Conclusion

We hope that you liked this project on the stepper motor controller and understand it’s working as well. If you have any doubts related to this article then do let us know in the comments section given below. Also, do check out more projects listed below made by us.
- Projects on Arduino
- Projects on Raspberry Pi
- Projects on 555 timer IC
- Projects on Transistors
- Projects on Embedded Systems
Thanks for reading!