
Hi There, I’m back with another important and interesting article on Using raspberry pi pico LCD. Today we’re going to discuss Interfacing I2C 16 × 2 I2C LCD with Pi PICO. LCD is important for displaying information in a visual format for prototyping and also for projects. But you all may be familiar with using the display with Arduino microcontrollers and NodeMCU. But using it with Raspberry Pi PICO and programming in MicroPython seems to be a bit tough but not as much as it seems to be. So, let’s start today’s tutorial.
Table of Contents
raspberry pi pico i2c LCD
16x Displays are very common among basic projects and tutorials with Arduino Boards, but due to few examples on other boards and complex programming, it seems to be hard in MicroPython. These 16×2 Displays are usually 13-pin modules that use 4 data pins and 3 other pins to communicate with Microcontroller. But due to a high number of pin usage, it is rather a disadvantage for smaller boards like Arduino.
I2C module is the solution to the consumption of a large number of pins of LCD. This raspberry pi pico LCD is available in the market at a low cost and works on I2C communication (i.e., SCL & SDA), hence saving the number of pins utilized during communication. Also, you can connect various I2C modules at the same time, so it is not a problem in using them. For this purpose, you need to define the I2C port of the PICO as it has two ports 0 & 1. Also, first, check the Address of the display by using the I2C scanner code for Arduino.
The commands for controlling all the functions of the Display is rather similar to that of Arduino and can be learned easily. Power pins of the I2C display must be connected to v input to drive the LCD as a 3.3V level might not work in some cases. So, to be on the safer side, used 5V power for powering the module.
Material Required
| S.No | Component Required | Quantity | Buy Link |
| 1. | Raspberry PI PICO | 1 | BUY LINK |
| 2. | 16*2 LCD | 1 | BUY LINK |
| 3 | I2C Module | 1 | BUY LINK |
| 4. | Jumper Wire | 40 | BUY LINK |
| 5. | Breadboard | 1 | BUY LINK |
| 6. | Power supply | 1 | BUY LINK |
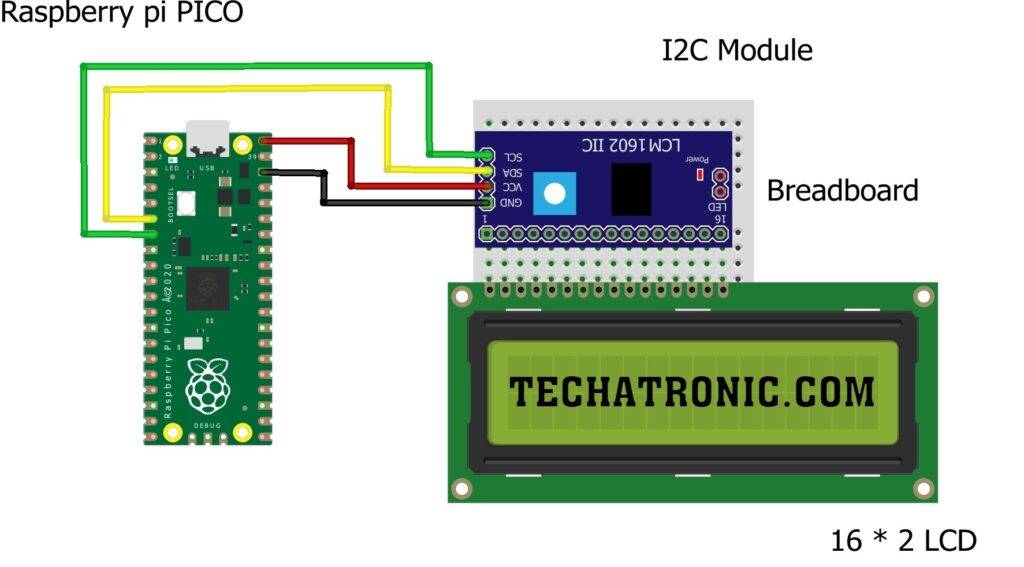
raspberry pi pico lcd Circuit Diagram
raspberry pi pico i2c lcd Code & Modules
| Raspberry PI PICO | 16*2 LCD |
| GPIO 4 ( SDA ) | SDA Pin |
| GPIO 5 ( SCL ) | SCL Pin |
| +5 Volt | VCC |
| GND | GND |
Modules
 import time
 class LcdApi:
   LCD_CLR = 0x01       # DB0: clear display
   LCD_HOME = 0x02       # DB1: return to home position
   LCD_ENTRY_MODE = 0x04    # DB2: set entry mode
   LCD_ENTRY_INC = 0x02    # --DB1: increment
   LCD_ENTRY_SHIFT = 0x01   # --DB0: shift
   LCD_ON_CTRL = 0x08     # DB3: turn lcd/cursor on
   LCD_ON_DISPLAY = 0x04    # --DB2: turn display on
   LCD_ON_CURSOR = 0x02    # --DB1: turn cursor on
   LCD_ON_BLINK = 0x01     # --DB0: blinking cursor
   LCD_MOVE = 0x10       # DB4: move cursor/display
   LCD_MOVE_DISP = 0x08    # --DB3: move display (0-> move cursor)
   LCD_MOVE_RIGHT = 0x04    # --DB2: move right (0-> left)
   LCD_FUNCTION = 0x20     # DB5: function set
   LCD_FUNCTION_8BIT = 0x10  # --DB4: set 8BIT mode (0->4BIT mode)
   LCD_FUNCTION_2LINES = 0x08 # --DB3: two lines (0->one line)
   LCD_FUNCTION_10DOTS = 0x04 # --DB2: 5x10 font (0->5x7 font)
   LCD_FUNCTION_RESET = 0x30  # See "Initializing by Instruction" section
   LCD_CGRAM = 0x40      # DB6: set CG RAM address
   LCD_DDRAM = 0x80      # DB7: set DD RAM address
   LCD_RS_CMD = 0
   LCD_RS_DATA = 1
   LCD_RW_WRITE = 0
   LCD_RW_READ = 1
   def __init__(self, num_lines, num_columns):
     self.num_lines = num_lines
     if self.num_lines > 4:
       self.num_lines = 4
     self.num_columns = num_columns
     if self.num_columns > 40:
       self.num_columns = 40
     self.cursor_x = 0
     self.cursor_y = 0
     self.implied_newline = False
     self.backlight = True
     self.display_off()
     self.backlight_on()
     self.clear()
     self.hal_write_command(self.LCD_ENTRY_MODE | self.LCD_ENTRY_INC)
     self.hide_cursor()
     self.display_on()
   def clear(self):
     """Clears the LCD display and moves the cursor to the top left
     corner.
     """
     self.hal_write_command(self.LCD_CLR)
     self.hal_write_command(self.LCD_HOME)
     self.cursor_x = 0
     self.cursor_y = 0
   def show_cursor(self):
     """Causes the cursor to be made visible."""
     self.hal_write_command(self.LCD_ON_CTRL | self.LCD_ON_DISPLAY |
                 self.LCD_ON_CURSOR)
   def hide_cursor(self):
     """Causes the cursor to be hidden."""
     self.hal_write_command(self.LCD_ON_CTRL | self.LCD_ON_DISPLAY)
   def blink_cursor_on(self):
     """Turns on the cursor, and makes it blink."""
     self.hal_write_command(self.LCD_ON_CTRL | self.LCD_ON_DISPLAY |
                 self.LCD_ON_CURSOR | self.LCD_ON_BLINK)
   def blink_cursor_off(self):
     """Turns on the cursor, and makes it no blink (i.e. be solid)."""
     self.hal_write_command(self.LCD_ON_CTRL | self.LCD_ON_DISPLAY |
                 self.LCD_ON_CURSOR)
     hide_cursor()
   def display_on(self):
     """Turns on (i.e. unblanks) the LCD."""
     self.hal_write_command(self.LCD_ON_CTRL | self.LCD_ON_DISPLAY)
   def display_off(self):
     """Turns off (i.e. blanks) the LCD."""
     self.hal_write_command(self.LCD_ON_CTRL)
   def backlight_on(self):
     """Turns the backlight on.
     This isn't really an LCD command, but some modules have backlight
     controls, so this allows the hal to pass through the command.
     """
     self.backlight = True
     self.hal_backlight_on()
   def backlight_off(self):
     """Turns the backlight off.
     This isn't really an LCD command, but some modules have backlight
     controls, so this allows the hal to pass through the command.
     """
     self.backlight = False
     self.hal_backlight_off()
   def move_to(self, cursor_x, cursor_y):
     """Moves the cursor position to the indicated position. The cursor
     position is zero based (i.e. cursor_x == 0 indicates first column).
     """
     self.cursor_x = cursor_x
     self.cursor_y = cursor_y
     addr = cursor_x & 0x3f
     if cursor_y & 1:
       addr += 0x40  # Lines 1 & 3 add 0x40
     if cursor_y & 2:  # Lines 2 & 3 add number of columns
       addr += self.num_columns
     self.hal_write_command(self.LCD_DDRAM | addr)
   def putchar(self, char):
     """Writes the indicated character to the LCD at the current cursor
     position, and advances the cursor by one position.
     """
     if char == '\n':
       if self.implied_newline:
         # self.implied_newline means we advanced due to a wraparound,
         # so if we get a newline right after that we ignore it.
         pass
       else:
         self.cursor_x = self.num_columns
     else:
       self.hal_write_data(ord(char))
       self.cursor_x += 1
     if self.cursor_x >= self.num_columns:
       self.cursor_x = 0
       self.cursor_y += 1
       self.implied_newline = (char != '\n')
     if self.cursor_y >= self.num_lines:
       self.cursor_y = 0
     self.move_to(self.cursor_x, self.cursor_y)
   def putstr(self, string):
     """Write the indicated string to the LCD at the current cursor
     position and advances the cursor position appropriately.
     """
     for char in string:
       self.putchar(char)
   def custom_char(self, location, charmap):
     """Write a character to one of the 8 CGRAM locations, available
     as chr(0) through chr(7).
     """
     location &= 0x7
     self.hal_write_command(self.LCD_CGRAM | (location << 3))
     self.hal_sleep_us(40)
     for i in range(8):
       self.hal_write_data(charmap[i])
       self.hal_sleep_us(40)
     self.move_to(self.cursor_x, self.cursor_y)
   def hal_backlight_on(self):
     """Allows the hal layer to turn the backlight on.
     If desired, a derived HAL class will implement this function.
     """
     pass
   def hal_backlight_off(self):
     """Allows the hal layer to turn the backlight off.
     If desired, a derived HAL class will implement this function.
     """
     pass
   def hal_write_command(self, cmd):
     """Write a command to the LCD.
     It is expected that a derived HAL class will implement this
     function.
     """
     raise NotImplementedError
   def hal_write_data(self, data):
     """Write data to the LCD.
     It is expected that a derived HAL class will implement this
     function.
     """
     raise NotImplementedError
   def hal_sleep_us(self, usecs):
     """Sleep for some time (given in microseconds)."""
     time.sleep_us(usecs)
Copy this code and save this into PICO with name LQ.py. This is the main code for driving LCD.
 from LQ import LcdApi
 from machine import I2C
 from time import sleep_ms
 DEFAULT_I2C_ADDR = 0x27
 # Defines shifts or masks for the various LCD line attached to the PCF8574
 MASK_RS = 0x01
 MASK_RW = 0x02
 MASK_E = 0x04
 SHIFT_BACKLIGHT = 3
 SHIFT_DATA = 4
 class I2cLcd(LcdApi):
   """Implements a character based lcd connected via PCF8574 on i2c."""
   def __init__(self, i2c, i2c_addr, num_lines, num_columns):
     self.i2c = i2c
     self.i2c_addr = i2c_addr
     self.i2c.writeto(self.i2c_addr, bytearray([0]))
     sleep_ms(20)  # Allow LCD time to powerup
     # Send reset 3 times
     self.hal_write_init_nibble(self.LCD_FUNCTION_RESET)
     sleep_ms(5)  # need to delay at least 4.1 msec
     self.hal_write_init_nibble(self.LCD_FUNCTION_RESET)
     sleep_ms(1)
     self.hal_write_init_nibble(self.LCD_FUNCTION_RESET)
     sleep_ms(1)
     # Put LCD into 4 bit mode
     self.hal_write_init_nibble(self.LCD_FUNCTION)
     sleep_ms(1)
     LcdApi.__init__(self, num_lines, num_columns)
     cmd = self.LCD_FUNCTION
     if num_lines > 1:
       cmd |= self.LCD_FUNCTION_2LINES
     self.hal_write_command(cmd)
   def hal_write_init_nibble(self, nibble):
     """Writes an initialization nibble to the LCD.
     This particular function is only used during intiialization.
     """
     byte = ((nibble >> 4) & 0x0f) << SHIFT_DATA
     self.i2c.writeto(self.i2c_addr, bytearray([byte | MASK_E]))
     self.i2c.writeto(self.i2c_addr, bytearray([byte]))
   def hal_backlight_on(self):
     """Allows the hal layer to turn the backlight on."""
     self.i2c.writeto(self.i2c_addr, bytearray([1 << SHIFT_BACKLIGHT]))
   def hal_backlight_off(self):
     """Allows the hal layer to turn the backlight off."""
     self.i2c.writeto(self.i2c_addr, bytearray([0]))
   def hal_write_command(self, cmd):
     """Writes a command to the LCD.
     Data is latched on the falling edge of E.
     """
     byte = ((self.backlight << SHIFT_BACKLIGHT) | (((cmd >> 4) & 0x0f) << SHIFT_DATA))
     self.i2c.writeto(self.i2c_addr, bytearray([byte | MASK_E]))
     self.i2c.writeto(self.i2c_addr, bytearray([byte]))
     byte = ((self.backlight << SHIFT_BACKLIGHT) | ((cmd & 0x0f) << SHIFT_DATA))
     self.i2c.writeto(self.i2c_addr, bytearray([byte | MASK_E]))
     self.i2c.writeto(self.i2c_addr, bytearray([byte]))
     if cmd <= 3:
       # The home and clear commands require a worst case delay of 4.1 msec
       sleep_ms(5)
   def hal_write_data(self, data):
     """Write data to the LCD."""
     byte = (MASK_RS | (self.backlight << SHIFT_BACKLIGHT) | (((data >> 4) & 0x0f) << SHIFT_DATA))
     self.i2c.writeto(self.i2c_addr, bytearray([byte | MASK_E]))
     self.i2c.writeto(self.i2c_addr, bytearray([byte]))
     byte = (MASK_RS | (self.backlight << SHIFT_BACKLIGHT) | ((data & 0x0f) << SHIFT_DATA))
     self.i2c.writeto(self.i2c_addr, bytearray([byte | MASK_E]))
     self.i2c.writeto(self.i2c_addr, bytearray([byte]))
Copy this code and save it onto PICO with the name LQ_i2c.py. This is the driving module for the I2C module on PICO.
This two code will be utilized every time you want to use LCD, so remember to load these two files every time you need to use LCD in your project. Commands for the usage are explained below, do read them carefully. Here the LCD object used to define LCD is LCD so, disregard LCD in the prefix of each command.
- lcd.clear() –> To clear the display
- lcd.show_cursor() –> To show the cursor at the current position
- lcd.hide_cursor() –> To hide the displaying cursor at current position
- lcd.blink_cursor_on() –> To make cursor blink at current position
- lcd.blink_cursor_off() –> To make the blinking cursor stop blinking
- lcd.display_on() –> To turn display on
- lcd.display_off() –> To turn display off
- lcd.backlight_on() –> To turn backlight on
- lcd.backlight_off() –> To turn backlight off
- lcd.move_to(x,y) –> To move the cursor to desires position
- lcd.putstr(“string”) –> To make the string in inverted commas displayed on string
These are few mostly used commands, so read them carefully.
Code
Here is the test code which display the string entered using keyboard.
 from LQ_i2c import I2cLcd
 from machine import Pin,I2C
 from time import sleep
 i2c = I2C(id=0,scl=Pin(5),sda=Pin(4),freq=100000)
 lcd = I2cLcd(i2c, 0x3f, 2, 16)
 for j in range(2):
   for i in range(10):
     lcd.clear()
     lcd.move_to(i,j)
     lcd.putstr("LCD I2C")
     sleep(0.25)
 lcd.clear()
 for j in range(2):
   for i in range(16):
     lcd.move_to(i,j)
     lcd.putstr("*")
     sleep(0.1)
 while True:
   try:
     lcd.clear()
     lcd.move_to(0,0)
     lcd.putstr("Enter String")
     lcd.move_to(0,1)
     lcd.putstr("To Display")
     sleep(1)
     a=input("Enter String you want to display : ")  # simple input statement for python to enter via keyboard
     lcd.clear()
     lcd.putstr(a)
     sleep(2)
     lcd.clear()
   except KeyboardInterrupt :
     break
With this, we have completed the I2C LCD Pi PICO tutorial. Have a look at this and if you find any problem let me know below.