Hello Folks, I am back with another tutorial on Pi PICO based on MicroPython. Today we’re going to discuss interfacing the raspberry pi pico ultrasonic sensor also we’ll calculate distance using this. Ultrasonic sensors are of various and available in the market, but the one we’re going to use today is the very common one, which is HC-SR04. HcSro4 is the best Ultrasonic sensor at a cheap price and is very easy to use with most microcontrollers. So let’s see, it’s a further tutorial.
Ultrasonic Sensor HC-SR04
HC-SR04 is the sensor that is used in many projects and tutorials you may find on the internet also if you’re a beginner them first see its Arduino tutorial and projects for more information. HC-SR04 has a bit of a complicated design from the look, but it is rather very simple to use and hook up to any microcontroller. It has a pair of ultrasonic sound transmitter and receiver which is used to send and receive sounds to detect object and obstacles.
The sensor has two pins TRIG and ECHO which are output and input pins for the sensor respectively. As we’re going to use PICO we may use its main and base code to create a working program also we may further make this into a module like the I2C LCD one for simplicity in the program. The sensor has a range of 400 cm and a minimum distance from the sensor of 2-3 cm, which is minimum. Also, the frequency of the sensor is 40kHz on which it transmits and receives ultrasonic sound from striking from object respectively.
To measure the correct distance, keep in mind to put the accurate speed of sound. As I have mentioned, that the distance accuracy may differ according to the temp in your region, so calculate the speed of sound according to the temp.
Material required
- Raspberry Pi PICO
- I2C 16×2 LCD
- Ultrasonic Sensor
- Breadboard
- Jumper wires
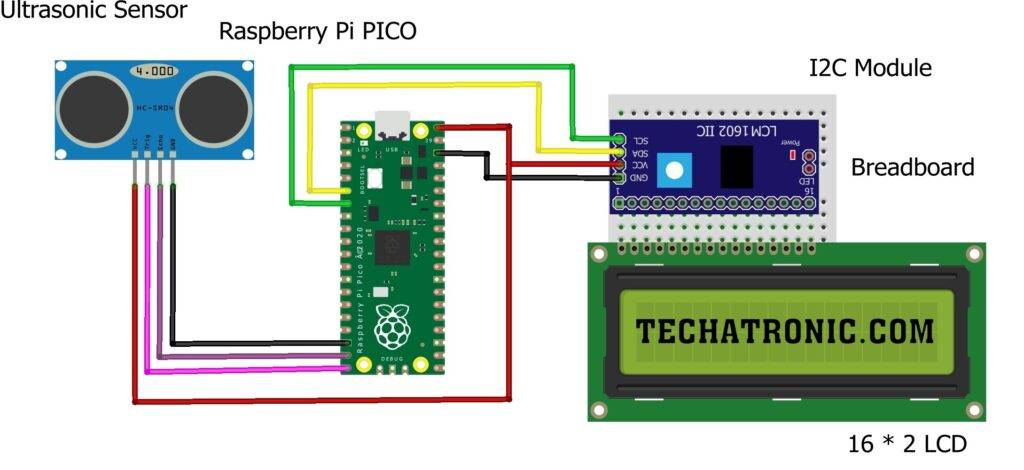
raspberry pi pico ultrasonic sensor Circuit Diagram

|
Raspberry PI PICO |
16*2 LCD |
|
GPIO 4 ( SDA ) |
SDA Pin |
|
GPIO 5 ( SCL ) |
SCL Pin |
|
+5 Volt |
VCC |
|
GND |
GND |
|
Raspberry PI PICO |
Ultrasonic Sensor |
|
GPIO 14 Pin |
Echo Pin |
|
GPIO 15 Pin |
Trig Pin |
|
+5 Volt |
VCC |
|
GND |
GND |
raspberry pi pico ultrasonic sensor Code & Explanation
Explanation
In the beginning, we import some important modules which are used in making code work like I2cLcd functions from the LQ_i2c module, Pin and I2C functions from the machine module, and sleep_us, ticks_us functions from the time module. In this code, we are using the time module which is used for calculation time in micro(µ)s. So we are using this one in raspberry pi pico ultrasonic sensor.
Then we create two pins as input & output for echo and trig pins of the ultrasonic sensor. Further, we create an object for initialization of I12C Lcd at the I2C port 0(zero) whose pins are defined in the code. Then we use some LCD commands to display some initial text on the LCD by setting the cursor and using sleep functions. Then we clear the signal, making the trig pin low. Then we put our main code in a while loop.
In this raspberry pi pico tutorial, while loop using try & except, we create a keyboard-interrupted infinite loop. In a loop, we turn the trig pin high for 10µs and then turn it low again. Then, when the echo pin goes low, we start counting time until the echo pin goes high. By this we calculate total time and using simple calculations we find the distance. But keep in mind as the time is calculated in µs then you have to take speed in cm/µs. So, like 343 m/s will be 0.0343 cm/µs.
Code
Here is the main code
 from LQ_i2c import I2cLcd
 from machine import Pin,I2C
 from utime import sleep_us,ticks_us
 echo=Pin(14,Pin.IN)
 trig=Pin(15,Pin.OUT)
 i2c = I2C(id=0,scl=Pin(5),sda=Pin(4),freq=100000)
 lcd = I2cLcd(i2c, 0x3f, 2, 16) # LCD 16x2
 lcd.move_to(0,0)
 lcd.putstr("Ultrasonic")
 lcd.move_to(0,1)
 lcd.putstr("Sensor")
 sleep_us(1000000)
 lcd.clear()
 lcd.move_to(0,0)
 lcd.putstr("Distance :")
 trig.value(0)
 sleep_us(2)
 while True:
   try:
     trig.high()
     sleep_us(10)
     trig.low()
     while echo.value()==False:
       st=ticks_us()
     while echo.value()==True:
       sto=ticks_us()
     tt=sto-st
     dis=(0.031594*tt)/2
     print(dis)
     lcd.move_to(4,1)
     lcd.putstr(str(dis))
   except KeyboardInterrupt:
     break