
Hey there Folks, I am back again with another article on Raspberry Pi PICO, Micropython Tutorial. Today we are going to discuss, how we can connect a rotary encoder with Pi PICO and grab the values from it. It is very simple demonstration and program which output numbers, further you can also use its core library or module to make something useful, which I’ll be making in the future. Visit more projects on Raspberry Pi PICO also it’s Arduino tutorial. So let’s begin today’s session.
Rotary Encoder:
You’ll be familiar with the Rotary encoder, and some of you might also have worked on it via Arduino Boards. In today’s article, we’ll see through its connection and code with Pi PICO. The rotary encoder is a rotating shaft device that is used to determine the position based on clock and data and give the desired output. Generally, its output is in the form of a Square waveform, which can be visible using an oscilloscope.
It has a simple construction which is easy to understand its code and working. A disk rotates with equally spaced pads, and two other pads are made on the other disk. When these pads, which are connected to a common output between VCC and GND, come in contact with the other two pads their signal fluctuates between HIGH and LOW in Square wave format. This sequence of output, corresponding with each output (DATA & CLK), helps to determine the rotation direction and speed of the encoder.
This simple procedure helps us to know the position and make something done according to the output. Also, to ease the selection, it is also provided with a button with gives LOW output when pressed. DATA & CLK output is always 90° differ in phase.
Material Required:
- Raspberry Pi PICO
- Rotary Encoder
- Jumper wires
- Breadboard
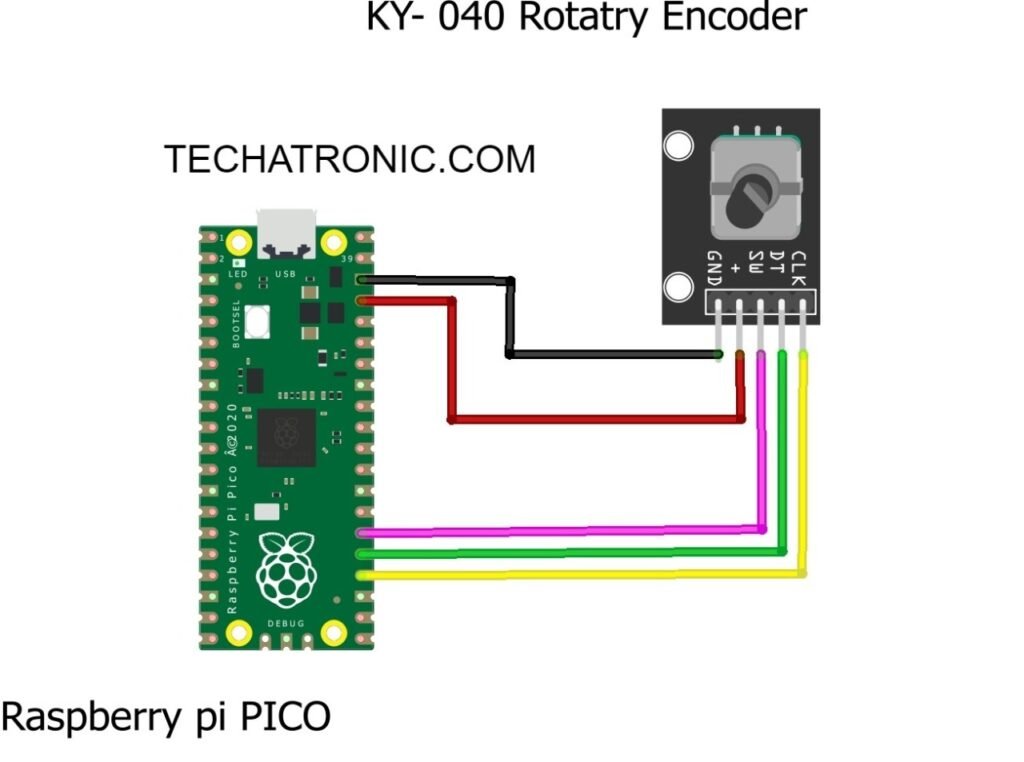
Pi Pico Rotary Encoder Circuit Design:
Pi Pico Rotary Encoder Code and Explanation:
Explanation:
First, you have to download some modules and save them to your PICO in order to make the code working
In the first 3 lines, we import the time module and rotary_irq_rp2 module which is required for working. Then in the next line, we define SW pin for button in the encoder. After that, we create an r object for the rotary encoder, which is connected to GPIO pin 18 as clock and GPIO pin 19 as data. You can also use its SW pin if needed, as I have done, to select the value. Also, we read the previous or minimum value to store it in the variable.
In a while loop, we use to try and exception to make an infinite loop until a Keyboard Interrupt strikes. In a loop, we read the value from the encoder and store it in the variable to select and print the value. Also, we check the value for the button pressed. If the button value is 0 i.e., the button is pressed, the last value received from the encoder will be selected and be printed on the screen.
  try:
     val_new = r.value()
     if SW.value()==0 and n==0:
       print("Button Pressed")
       print("Selected Number is : ",val_new)
       n=1
       while SW.value()==0:
         continue
     n=0
     if val_old != val_new:
       val_old = val_new
       print('result =', val_new)
     time.sleep_ms(50)
   except KeyboardInterrupt:
     break
Code
Here is the complete code
 import time
 from rotary_irq_rp2 import RotaryIRQ
 from machine import Pin
 SW=Pin(20,Pin.IN,Pin.PULL_UP)
 r = RotaryIRQ(pin_num_clk=18,
        pin_num_dt=19,
        min_val=0,
        reverse=False,
        range_mode=RotaryIRQ.RANGE_UNBOUNDED)
 val_old = r.value()
 while True:
   try:
     val_new = r.value()
     if SW.value()==0 and n==0:
       print("Button Pressed")
       print("Selected Number is : ",val_new)
       n=1
       while SW.value()==0:
         continue
     n=0
     if val_old != val_new:
       val_old = val_new
       print('result =', val_new)
     time.sleep_ms(50)
   except KeyboardInterrupt:
     break