
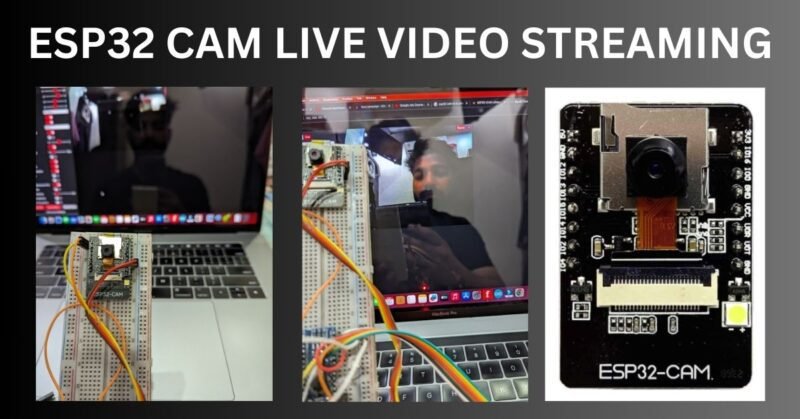
Esp32 Microcontroller is a powerful controller that’s why we are using it in many new technologies. this board is available in many variants for different purpose. In this project we are using one of the most useful product variant of esp32 to make Esp32 Cam Live video Streaming. we will use an application in mobile phone which will help to streaming the live video to the phone screen.
This project is for surveillance. you can monitor your home your office etc.this can be use in security purposes.
ESP32 CAM introduction
If we want to stream live video Esp32 Cam Live video Streaming is the best option. ESP32-CAM is powerful and very versatile development board which consist the esp32 module inside it. there Is wifi and Bluetooth feature is given by this board. the esp 32 is a dual core powerful controller board. Espressif developed the all software for this board there are many libraries and module made by espressif.ESP32-CAM is specifically designed for projects involving camera integration. which can be use in surveillance cameras, it proects and many other. which can help you to record or stream the live videos and photos. ESP32 cam live video streaming can be successful some libraries and mobile software.
So. in this tutorial we will stream the live video on our android mobile phone.
main feature of this ESP32-CAM module is its camera module, esp32 cam is using OV240 image sensor. wich provide the 2 mp resolution in the pictures which is quite good for the images and recognisee the things. also there is an option to integrate the sd card which can give you the option to record the video, there you can use 32gb sd card maximum.
Programming the ESP32-CAM is made accessible through the Arduino IDE, thanks to the availability of the ESP32 Arduino core. This simplifies development for both beginners and experienced developers, as it leverages a familiar programming environment.
Basic details of the esp32 cam module so this is an ESP 32 based camera module developed by AI thinker. The controller is based on a 32-bit CPU with a frequency of up to 240 megahertz. It has a built in 520 KBSRAM with an external 4MPSRAM. It has a combined Wi-Fi plus Bluetooth and BLE SOC module. There is an onboard voltage regulator, IC and a PSRM chip. The reset button is placed here. This is a design problem as this should happen placed on the back side.
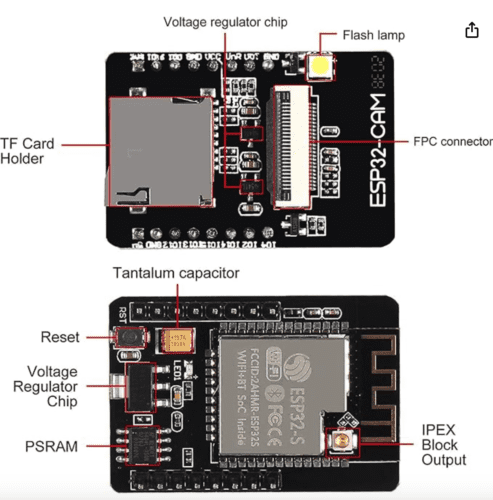
It’s GPI your pins have support like you aren’t SPI, I2C, PWM, ADC and DAC. You can get a 3.3 volt VCC as well as a 5 volt pin from this module. There are multiple GND pins as well. On the back side, there is an SD card holder which supports SD card up to 4GB but I found even a 16GB card working fine with this module. The SD card is used for storing images while making images best projects. This is a 4GB SD card that I recently purchased for this module. Simply slide and insert this SD card into the SD card adapter.
Okay, you can see here and LED that can be used as an indication now. which help you to know ESP32 cam live video streaming how to do.
The most important part is the camera. This is a 24 pin camera holder and this one is the over 2640 camera module. It has the highest camera resolution up to 1600 cross 1200. This is the gold plated connector strip using this connector. You can connect this camera with the ESP32 to connect it.
Push the slide in opposite direction and then you will see the beans for connecting the camera. Simply insert the camera mark with the gold plate at the bottom side and then pull the slide. Now the camera is connected to this module. You are ready to use this module okay. One more thing, this module has already an antenna attached here as you can see it but if you want to use an external antenna of better.

You need any USB to dtl converted module or an FTDI module? This is an FTDI module from maker Fabs based on CP2104 driver. I will use this to program my ESP32 cam board. You can also use some other type of FDDI module as soon in the image. Here all of them have dx and i x pins so they will work fine.
How to connect FTDI module in Esp32 Cam Live video Streaming
Let’s see now how to connect the FTDI module to ESP32 cam module. Here is a connection diagram I made using the fixing software. Connect the five volt and GND pin of ESP32 to 5 volt and GND of FTDI model. Similarly, connect the RX2 VOT and TX2 vor pin and the most important thing you need to short the IO 0 and GND pin together. This is to put the device in programming mode. Once programming is done, you can remove it.
How to configure Esp32 cam in Arduino ide
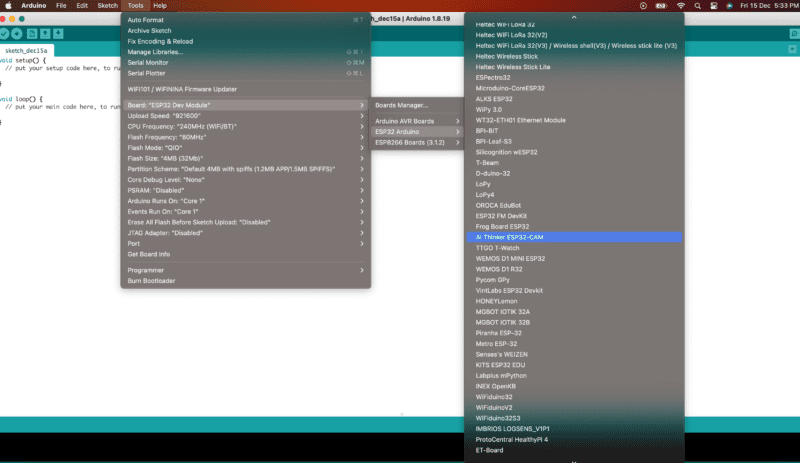
Now let’s start with the programming part. For that, open your Arduino ID, go to twos then select the esp32 board and from this list select AI thinker ESP32 cam select the comp port. If you have connected the device to the computer now go to files and then select examples, then select email and then the camera. Then finally open this sketch. So this is the example code for basic video streaming.
You need to modify this code a little bit from this lines. Select the camera module by uncommenting the model that you are using. I’m using AI thinker board, hence I will not comment this and then comment rest of the models from here. Change your Wi-Fi society and password. No more modification needed.
Now connect the micro USB cable to the FTDI module and then connect the other end of the cable to the computer and then you can upload the code. The code will take more than a minute to compile and upload. Once programming is done, you can open the serial monitor at the same stance and start ESP32 cam live video streaming.
If you press the reset button, the serial monitor will shut. The device isn’t in downloading mode. To disable the downloading mode, remove the resistor from the esp32 cam module. Now again press the reset button so the device will try connecting to the Wi-Fi network. Once the device is connected, it will display the local IP address.
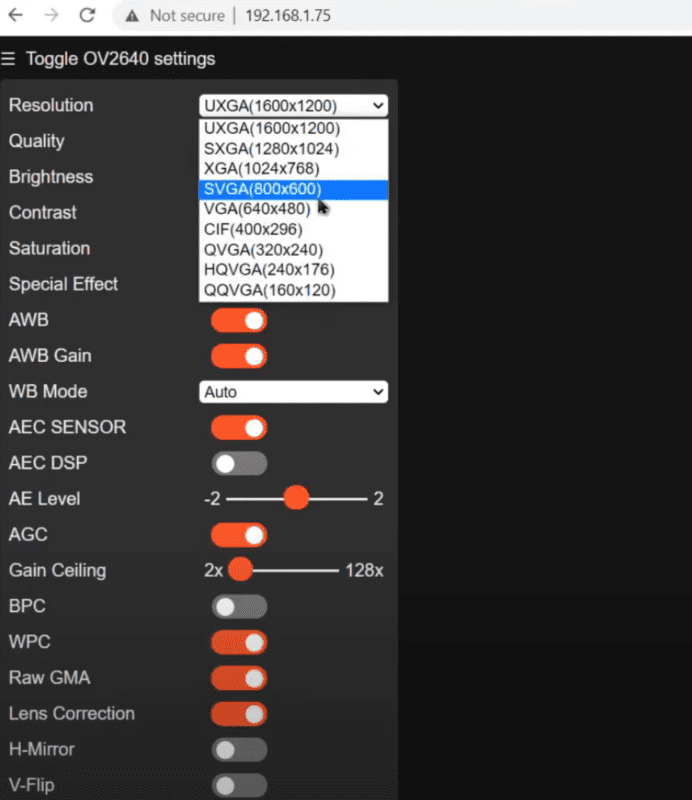
Copy this IP address link and paste it on your favorite web browser. So the web page has appeared here and all the camera settings on the left side. You can go through it settings manually. At the bottom part you can see there is an option to start streaming. You can click here and see yourself in the video maximize the resolution using the option here. am impressed with the quality of the boards, the delivery time, and the cost-effectiveness. You can make your own CCTV camera using this ESP32 cam live video streaming project.